benchwork idea for your commentary

Gary S.

Senior Member
Oct 13, 2005
1,576
0
36
Texas
Does anyone see problems with what I am about to do here?

I would prefer using 1 1/2 to 2 inch foam but all that is easily obtained down here is the 3/4 stuff. Any suggestions on what glue to use to bond them? Maybe a spray adhesive so I get 100% coverage instead of the liquid nails stuff?

Also, any comments on using 1/4" thick "pegboard" material under the foam?
 

Attachments

  • benchworkcross.jpg
    benchworkcross.jpg
    27.9 KB · Views: 87
N

nachoman

I personally don't like the idea of attatching a layout directly to the wall. The reason? House framers often work quickly, use twisted boards, and arent too concerned with whether or not a wall is square, straight or perfectly vertical. Hold a level against your wall to check. if your layout has legs, it is easy to shim up to make it level. When I was a kid, I helped my dad build a shelf around my bedroom wall. I soon learned the corners of the room weren't square, and the cieling was not the same distance from the floor in all places. I think they measured the sides of one doorjam to be perpendicular to the floor, but the header above the door was parallel to the ceiling. Since the ceiling was not perpendicular to the walls, the doorjam did not match the shape of the door!!

kevin
 

Gary S.

Senior Member
Oct 13, 2005
1,576
0
36
Texas
I didn't think about that, and you are right, I'm sure there will be some "ins and outs" in my walls. I've installed cabinets before, and the walls certainly were not straight. But again, we still got them installed. I'll take a straight edge and see just what I have to work with.
 

ezdays

Out AZ way
Feb 3, 2003
6,339
0
36
Arizona
bigbluetrains.com
Yeah, the tolerances on house building is something like +/- 1/4", but many framers go outside that. This could mean that your layout could vary 1/2" from one end to the other. But, that wouldn't be my biggest concern with not having legs. I attached my layout addition to the wall just so it won't move around, but still put legs in the front and back in order to support the weight of me leaning on it. I won't pull it out of the wall, and I won't push it out of plumb, but I can move it by removing just a few screws. I should be able to sit or stand on it if I needed to. You may want to go with a bit more than 1 1/2" of foam if you are going to put in some valleys or streams.
 

60103

Pooh Bah
Mar 25, 2002
4,754
0
36
Brampton, Ontario, Canada
Visit site
Gary: I use green contact cement (non-solvent/non-toxic, by lePages) for foam. Paint it on, let it dry, then you have one chance to put the bits together right. It can be separated with a bit of effort. I also used it for gluing to wood parts and for putting roadbed and track on. I apply it with either a foam brush or an older brush that I don't plan to use again -- I can never get it all out.
 

pgandw

Active Member
Jul 9, 2005
1,002
0
36
Use the 1x2 framework to adjust for any "untrueness" experienced in your shelf brackets. Plane or cut the 1x2 to get the tips and tops level and straight. Your method has plenty of strength and rigidity provided the depth (front to back measurement) is 24 inches or less. Having no legs is great. You can change the height of your layout fairly easily, and you can add storage shelves underneath easily.

If you extend the wall mounted tracks upward, you have a mount point for a backdrop and overhead lighting underneath a top shelf.

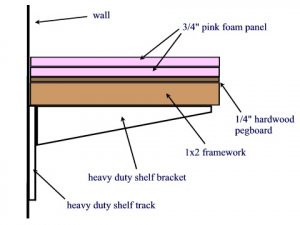
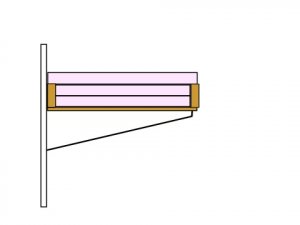
Personally, I would use 1/4 inch plywood underneath the foam instead of pegboard. Plywood weighs less and is more rigid, especially when glued to the foam. You could also do away with the plywood or pegboard by using 2 inch thick foam by itself - assuming supports every 16 inches (wall stud spacing). A front fascia of 1/8 inch plywood or similar adds even more rigidity then the plywood underneath.

The optimum for wiring and mounting switch machines and the like underneath is foam with 1/4" plywood plates or strips underneath. That way you can poke the wires through the foam with out having to drill the plywood, yet have a rigid surface to mount switch throws and wire ties.

In your case, I would be tempted to use several 2 or 3 inch wide plywood strips - 1 at each edge and 1 in the middle - underneath the foam running the entire length across the 1x2 supports. Then use some 3/4 x 3/4 wood cleats to screw mount the plywood strips/glued foam to the 1x2 (assumes the 1x2 is positioned with 2 inches vertically). This allows you to remove the layout from the shelf brackets when desired on its own self-supporting flat base.

The drawback to the just discussed arrangement is the protrusion of the switch machines and similar below the bottom of the layout. To get a true flat bottomed layout (do you want or need a flat bottom to set on top of platforms and/or furniture?), you have to create a void underneath the foam, usually using a 4-6 inch high grid of a combination of 1/4 inch plywood and dimensional lumber. If going this route, I would recommend not making the 1x2 supports part of your grid because they are the key to getting a true level support system.

My 2 cents, your layout.

yours in framing
 

Gary S.

Senior Member
Oct 13, 2005
1,576
0
36
Texas
Thank you for the good advice. pgandw. Here is a photo of one wall.

Now I have discovered that the 18 inch and 24 inch shelf brackets actually are built with a slope going up from back to front. The rise is about 3/8 inch in 24 inches. Not a problem though, I can either make adjustments in the 1x2 framework or I could get out the grinder and adjust the bracket where it connects to the shelf rail.

The shelf bracket system is darned strong. I am thinking I could have gotten away with brackets every 32 inches instead of every 16 inches.
 

Attachments

  • shelf6.jpg
    shelf6.jpg
    31.8 KB · Views: 76

Russ Bellinis

Active Member
Feb 13, 2003
4,501
0
36
78
Lakewood, Ca.
Visit site
Gary S. said:
Thank you for the good advice. pgandw. Here is a photo of one wall.

Now I have discovered that the 18 inch and 24 inch shelf brackets actually are built with a slope going up from back to front. The rise is about 3/8 inch in 24 inches. Not a problem though, I can either make adjustments in the 1x2 framework or I could get out the grinder and adjust the bracket where it connects to the shelf rail.

The shelf bracket system is darned strong. I am thinking I could have gotten away with brackets every 32 inches instead of every 16 inches.

Another way to deal with the front to back slope is to put a thin wooden shim in back, or to just use the shelf as a base and build your layout subroadbed on top of it. If you use the shelf for your layout, you will have the ends of all of the brackets sticking out. If you use the shelf to just support an actual layout, you can actually make it wider than the 24 inches of the standard shelf, and can create a valance in front of the layout to give it a more finished look. One caution on those shelf brackets, use a mallet to "knock" them into place. They tend to sit on top of the slots instead of down in them. Then after your benchwork is installed and the layout is started, one or more brackets fall out of the wall and the whole thing can come tumbling down.
 

pgandw

Active Member
Jul 9, 2005
1,002
0
36
Gary

Nice pictures.

I would favor making the adjustments with the 1x2. If you grind the bracket where it attaches, you will loosen the fit. As Russ states, the last thing you want is for a bracket to be loose. Don't ask me how I know this. This was with the old single slot system of tracks and brackets. I had a 4ft shelf full of books come tumbling down - hadn't hung my layout yet.

I agree the 16 inch spacing is probably overkill. But I would not want to try light plywood/foam on anything more than 24 inches. Remember, there will be times when you will put serious weight on the shelf, even if inadvertantly while trying to fix something on the layout. Even 1/2 inch plywood, unreinforced needs support at least every 24 inches. So unless you are going to add longintudinal reinforcement to the foam and/or plywood, 16 inch support spacing is not far from the ideal.

yours in shelving
 

Gary S.

Senior Member
Oct 13, 2005
1,576
0
36
Texas
here is a thought I had last night:

So here we have all these expensive metal brackets on 16 inch centers, do I really need all the 1x2 boards supporting the 1/4 inch plywood and foam? What if I use a grinder to get all the brackets good and level... put a 1x2 board spanning the length of the plywood on the front and back, glue the foam layers down, and then sit the whole thing on the brackets, put in a few screws to hold it in place....
 

Attachments

  • benchwork alternate.jpg
    benchwork alternate.jpg
    10.7 KB · Views: 86

Russ Bellinis

Active Member
Feb 13, 2003
4,501
0
36
78
Lakewood, Ca.
Visit site
I wouldn't grind on the brackets at all. They have a proclivity for falling off the wall if you aren't very careful. I would put the shelf boards on in the normal manner. If any are low, put shims between the wood shelf and the foam to level everything out. If the layout isn't level front to back, use some thin wood or cardboard to shim the front or back as needed to get that part level.
 

Gary S.

Senior Member
Oct 13, 2005
1,576
0
36
Texas
I think what I will do is build a gridwork out of 1x2 material, put the 1/4" plywood on top of that, then glue on the foam on top of the plywood. To get the top of the foam level, I will use a combination of shimming under the 1x2 to raise the benchwork up and and filing the 1x2s to lower the benchwork down to get everything level. This will be the easist and least labor intensive way to do it, and is what most of yall have been telling me to do already! ;)

I'm holding off for now until I get the final layout dimensions settled. But I am chomping at the bit to get started on that wood and foam and glue and stuff. Hmmm.... I guess I could go ahead and start ripping the 3/4 plywood into 1x2s.

But instead I built a couple of accurail box cars tonight.
 

Gary S.

Senior Member
Oct 13, 2005
1,576
0
36
Texas
oh, also what I will do is this: Since the 24" shelf brackets have a difference in height at back and front, I will actually make the back "1x2" about 1/4" taller than the front "1x2", reducing the shimming and shaving that will be needed.

I plan to make the layout "semi-modular" in 8 foot long sections where I can, and some will be shorter to fit the room dimensions where needed. The drawback to using different height 1x2s in front and back is that the "modules" will not sit level except on the shelfs. hmmm..... maybe the best thing is to go ahead and make the 1x2s all the same dimensions and just notch them where they cross over the shelf bracket at the front. This is probably the smart thing to do.
 

Gary S.

Senior Member
Oct 13, 2005
1,576
0
36
Texas
Well, I finally got around to looking at the "Modular" forum and see that my questions have pretty much been addressed over there already. Sorry for the redundancy, but I am enjoying discussing these issues and reading everyone's replies. And I am enjoying hanging around The Gauge!
 

MasonJar

It's not rocket surgery
Oct 31, 2002
5,362
0
36
Ottawa, Canada
Visit site
A thought that just occured to me...

What if you tapped a hole at the back (wall end) of the bracket for a "leveller bolt"? I think you are using the double track shelf brackets, so you should have room for this?

Also - thanks for looking in the modular forum... :thumb: ;)

Andrew
 

Gary S.

Senior Member
Oct 13, 2005
1,576
0
36
Texas
A leveler bolt would be good. In my mind, anything with threaded adjustments makes life easier. The bracket would have to be modified as in the drawing below.

I think I am going to just do some minor cutting and filing of the 1x2 grid to get everything level.

Some neat stuff in the modular forum!
 

Attachments

  • bracket.jpg
    bracket.jpg
    36.3 KB · Views: 34

MasonJar

It's not rocket surgery
Oct 31, 2002
5,362
0
36
Ottawa, Canada
Visit site
Gary,

I assumed that you are using the double width brackets. If that is not the case, it might be harder to do what I propose. (Although you might be able to weld a nut to the side of the bracket).

The back edge of your frame would rest on the bolt, with the front edge on the bracket itself.

Andrew
 

Attachments

  • bracket2.jpg
    bracket2.jpg
    13.4 KB · Views: 35

MasonJar

It's not rocket surgery
Oct 31, 2002
5,362
0
36
Ottawa, Canada
Visit site
Another alternative is put two holes (maybe easier if the bracket is single width...) along the upper edge of the bracket and screw a 1x to it level...

Andrew
 

Attachments

  • bracket3.jpg
    bracket3.jpg
    8 KB · Views: 36

Gary S.

Senior Member
Oct 13, 2005
1,576
0
36
Texas
Yes, I am using the double sided brackets. They are really strong and I wouldn't be uncomfortable to throw a board on them and stand on it.

The idea of bolting a 1x on the side of the bracket is a good one. I may do something along that line. hmmm..... maybe even build the gridwork where the cross pieces can be bolted to the brackets like what you have drawn. Still, it may be easier to just shim and file the grid where necessary to get everything level.

Are we getting to the point of " six of one, half a dozen of the other" ? ;)