Battlestar Galactica models?

Status
Not open for further replies.

Gearz

Member
Mar 13, 2006
258
17
16
OZ
Thanks Steve ~ Looking good! build tips noted ~ also added additional notes to AG and part for strengtheners 'parts 6' brace.

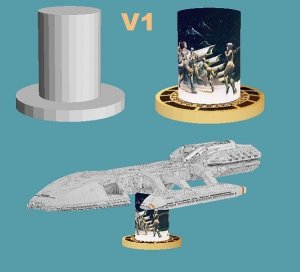
As pointed out, it would be a shame to go to these lengths and not provide a stand of some sort. So I fiddled with a bunch of ideas with multiple variations there of. Without building something more complex than the model, I settled on these two styles. The textures can be changed, if a better suggestion comes along, so anyone have a preference for either style.?

* The BSG art is by Frank Frazetta


Style 1
 

Attachments

  • GALstandv1.jpg
    GALstandv1.jpg
    75.6 KB · Views: 361

Gearz

Member
Mar 13, 2006
258
17
16
OZ
yeah # 2 would probably be the easiest to build, it still needs a little tweaking, size etc. + have to check for a balance point on a finished model. Sounds good, style 2 it is. Thanks guys
:)
 

sjsquirrel

Member
Feb 9, 2006
541
22
18
64
British Columbia, Canada
stevebondy.ca
Engine done

Hey everybody,

I finished the main body of the engine module last night. Went together without a hitch. You do need to take it slow and be precise with the alignment of parts. The only tricky bit was getting those small side tabs on the rear assembly glued. It would help to leave the top (part 2) open until the rear assemebly is in place so you have easy access to the tabs inside. If I had my druthers I'd switch steps 1 and 2, and in step 2 leave the top unglued, then step 3 is insert and glue the rear assembly, then close the top.

Comments and observations:

On parts sheet 16 there are some tabs missing as indicated here.

parts16a.jpg


The engine brace also includes tabs along the top and bottom that I assume are to be folded over and glued for strength like the ones on part 6 in the bridge module. This should be noted in the AG or on the parts sheet. BTW, not sure if it's been mentioned, but on part 6 of the bridge module you have the text "Fold to 90 degrees". This should actually be 180.

I haven't started the engine ducting yet, but on page AG11 at the top, the overview for the lower surface shows parts F2 in place, but those parts aren't part of that step. It's confusing when you try to match that overview with the parts on the page ( because they don't match :wink: ).

And also BTW, consider adding page numbers to both the parts pages and assembly guide pages.

That's it for now. Engine ducting is next, then on to the mid section.

TTFN
 

Stev0

Active Member
Jan 30, 2006
626
1
36
I can only make ooooo shapes with my mouth and OOOOOOO with my eyes and ~~~~~~~~~~ from my lips with * on the floor.
 

sjsquirrel

Member
Feb 9, 2006
541
22
18
64
British Columbia, Canada
stevebondy.ca
Not an oops

doc_harvey said:
ooops...I just glued them as butt joints...didn't think there was supposed to be tabs there...I'm pert near finished with the duct work on the top (6 more pieces).

Not really an oops doc - I just butt jointed them as well, but flaps would be easier. With this kind of edge the flap is really optional, but in my opinion they would be advisable there. Like everything else there's more than one way to do it, and no one way is really right or wrong.

Great build you've got going there. It's funny how pictures of other peoples always look better than my own - even when it's the same model and mine is probably just as good. I guess we're always most critical of our own work eh?

TTFN
 

Gearz

Member
Mar 13, 2006
258
17
16
OZ
Steve ~ Aaaa..huU .. I can see the missing flaps you pointed out before on the Engine 'Shoulder' Parts.. TYSs ~ sjsquirrel 2 ~ Gearz 0 ~ I was looking at the wrong side of those parts...= FIXED

Yeah... no matter how you look at it, the engine 'insert' step isn't the greatest of designs, it is going to be a love it or hate it . When the method works, its great!. Your alternat sequence sounds valid,. building just for myself I'd probably have done the same, designing for others, I try to balance ease of building V likelihood of building a twisted form. Sometimes it works, sometimes not. ~ It would be interesting to give one form to the designers here and see how many 'cutting' solutions they come up with ~ all workable I'd say,

All other points noted and actioned ~ err...except 90 V 180 on Bridge part 6 ~ perhaps a moot point in that position, but 90 is actually stronger ~ reduces lateral movement etc.
Great work, almost time for the beers!

Doc ~ Most excellent! I didn't think the Toooobz would make it that far without disaster. Btb love your poetic licence ~ 'Coming at ya' ~ nice angle! Those pesky Cylons will be filling their pants with rivets!

One question ~ Can you give me a finer balance point? From the pix it looks like the dome ~ Just need a finer point so I can fit the stand that point.


:-D :-D :-D
 

Gearz

Member
Mar 13, 2006
258
17
16
OZ
Now for only 27 trillion Cubits, you can start you own Battlestar fleet!

My times up unfortunately, its now or never..I've incorporated as many of the corrections as I could without having to do major modification, no doubt I've missed one or two, not to mention the model could do with further improvement ~ Just don't have the time. Hopefully your build reports will cover most hiccups for builders

Have to say that it has been a real pleasure collaborating with you all on this project.
Excellent work cousins!

The Battlestar Galactica


HERE

OR

HERE


Enjoy
:)
 

Bad_Scorpion

Member
Jul 2, 2006
213
0
16
Already printed it out on my new toy, COLOR LASER PRINTER, And will start the build tonight. AND THANK YOU TO EVERYONE INVOLVED! Gearz, nice work. Now from reading this I have some excelent pointers for my own builds so thank you for that too!
 
Status
Not open for further replies.