Bachmann Spectrum USRA 2-10-2

doctorwayne

Active Member
Sep 6, 2005
3,516
0
36
Canada, eh?
Anybody buy the new Bachmann USRA Light 2-10-2? I ordered two of them last year and picked them up last Tuesday. Mine are the painted but unlettered version and they look great when comparing them to prototype photos. Unfortunately, one of them runs with a bit of a jerky motion. I disassembled it and found the mechanism, with the motor removed, to be very free-rolling, although some of the clearances on the valve gear were a little close. I couldn't find anything obviously wrong, so I reassembled it. I tested the other one and was disappointed to find that it would pull only 8 various freight cars up the 2.5% grade out of Elfrida on my layout, while any of my Bachmann 2-8-0s would pull those same eight cars plus another seven up the same grade. There is, as I discovered when I had the jerky sister apart, ample room inside the cast boiler for more weight. I made a U-shaped saddle out of sheet lead and draped it over the boiler as a temporary weight to see if the motor would accomodate more weight while still being capable of slipping the drivers under load. The test was successful: the loco easily moved the fifteen cars up the grade. I had to manually hold the caboose to stall the train and the drivers slipped easily, even with the addition 10 ounces of weight. The downside of this story is that the locomotive found 3 or 4 spots around the layout where the ground appeared to hold more attraction for the wheels than did the rails. None of my eight-coupled locos have any derailment troubles in these places and I think that the longer rigid wheelbase is the culprit, although the minimum radius is 30". I have a slighly longer brass version of this locomotive, but the middle driver is blind, and it tracks well around the entire layout. Because of this problem, I didn't bother to explore further the pulling capabilities of the loco. Both locomotives will be returned to the store, but since I need more motive power, I'll exchange them for something else. My thought is a pair of Athearn Mikes and another Bachmann 2-8-0, which, in my opinion, is one of the nicest running HO scale steamers around.

Wayne
 

steamhead

Active Member
Apr 16, 2005
2,360
0
36
75
Brownsville, TX
Hi,

Don't mean to rain on your parade (or Athearn's), but I've heard horrible things about their Mikes...Something to do with gear shearing and no parts availability... Your 2-10-2's should make it around 30" radius curves with ease, even without blinding some drivers. Some locos are more skittish when it comes to track irregularities. Check the Bachmann forum (bachmanntrains.com)for more insights into this loco.

Good luck!

Gus (LC&P).
 

doctorwayne

Active Member
Sep 6, 2005
3,516
0
36
Canada, eh?
I already own two of the Athearn Mikes, and while their pulling power was abysmal, I've made a few modifications and they're quite improved. I am aware of the gear problem, as I've repaired a couple for others, but so far, mine have been okay. And I understand now that Northwest Shortline has replacement gears for these locos, so I won't have to wait almost two years for replacemant parts from Athearn again.
I do agree that the 2-10-2s should handle a 30" radius but, in spite of the generally excellent job that Bachmann has done on these locos, I just don't like the proportions of them. Not that they're incorrect, but in person they look ungainly to me, and that, coupled with the tracking problem, is enough to send them back.
Wayne
 

jim currie

Active Member
Jun 29, 2003
1,383
0
36
arizona
Visit site
will second the Athearn mikes lack of pulling power though the running gear is good so i chucked the bolier's on a couple of them and used the running gear under some old PFM's .
 

doctorwayne

Active Member
Sep 6, 2005
3,516
0
36
Canada, eh?
I don't have the camera around and the locos have been repackaged to go back to the hobby shop. If anybody wants to see pictures, they're on the Bachmann web site, in the Gallery.
As for the Athearn Mikes, I've removed the spring on the trailing truck and added some weight. I don't recall what the weight of the stock locomotive was, but the modified ones, loco only, weigh 14 3/4 ounces. And I also ran one of them with the 10 oz. lead saddle weight, no train attached, but with the drivers slipping when the tender was held stationary, so it should be possible to add at least that amount of weight. I'm going to hack off the front of the cast weight inside the boiler, just forward of the gear box and replace it with one cast in lead. Should be able to get some in the cab too, and in the slot where the wire "pigtail" used to be. I've also got some Bachmann tender trucks to install on the tenders so there'll be even better current pick-up.

Wayne
 

doctorwayne

Active Member
Sep 6, 2005
3,516
0
36
Canada, eh?
http://www.bachmanntrains.com/home-usa/index.html

I surprised myself by getting that link to show up. If you go to the Gallery, you'll see pictures of all the versions. The undec locos have a centred headlight, bell on a bracket overhanging the smokebox, and the class lights mounted high on the smokebox front. The undecs come only with the USRA long tender and only with Southern valve gear. The painted and lettered versions come with railroad-specific tenders and some details, including valve gear. Running board style is also protoype-specific. There are several new style tenders, 'though at this time none is available with the undec or separately. All locos are DCC equipped, and will also run on DC.

Wayne
 

doctorwayne

Active Member
Sep 6, 2005
3,516
0
36
Canada, eh?
When you go to the Bachmann site, click on the U.S. flag, then on the next screen, go to "Ask the Bach-man" at the bottom of the page. The Photo Gallery will appear in the middle of the next screen, near the top. Just click on it and take the tour. All of the photos enlarge with a "click".

Wayne
 

doctorwayne

Active Member
Sep 6, 2005
3,516
0
36
Canada, eh?
Dick, sorry about the misdirection. I was so pleased with my ability to post that link that I never thought to try it out. Just click on the small lettering that appears at the bottom of the first screen that shows up: "Ask the Bach-Man". In the centre of the next screen that appears, click on "Photo gallery", near the top of the screen. Scroll down to the second picture and click on it to gain access to all of the 2-10-2 photos.

Wayne
 

Gary Pfeil

Active Member
May 7, 2001
2,510
0
36
Boonton NJ
Visit site
Hey Wayne, When you start to modify the weights in the Athearn mikes, try to take photos as you go, I'd be interrested in what you do. I have a pair and see little possibility to add weight. I had thought about replacing the stock weight in the forward part with lead too, but be careful as the loco has a split frame and you don't want to short them together. Weight is needed forward, not in the cab, it is too rear heavy already. Rather than remove the rear spring, I strengthed it, to push up the underside of the cab, transferring some weight forward. I had noticed the front drivers barely made contact with the rails. I doublehead mine in order to pull a decent train.
 

doctorwayne

Active Member
Sep 6, 2005
3,516
0
36
Canada, eh?
Gary, I just grabbed one of the Athearns off the layout to have a quick look at it. It was easy to do, too, since I long ago removed that "pigtail". I can't get the smokebox front off, but if I recall correctly, I added a small piece of lead where the electrical stuff for the headlight was. Other than a couple of Atlas diesels, none of my locos have working lights, since my preference is for more pulling power and ease of disassembly as opposed to frills like working lights. None of my LPCs (little plastic crews) will work nightshifts anyways, even though that was always my favourite shift.) I also notice that there are two lead blocks on top of the frame, one just behind the cylinder/smokebox saddle, and another right in front of the gear box. These louse up the see-through effect in that area, but, on the layout, are not really noticeable. The end effect of these weights is that the loco is now balanced around a point mid-way between the second and third drivers. My plan, probably when I get a couple more of these locos, is to chop off the existing weight/casting that came with the model, just ahead of the gearbox, and replace it with a similar shaped hunk of lead. This will shift the weight bias forward again and I'll need to offset that with additional weight in the cab. My goal is to get it balanced around the centre of the driver wheelbase again, only with an additional 10 ounces or so of weight. I may also give the same treatment to the Bachmann Consolidations, if I get ambitious.

Wayne
 

doctorwayne

Active Member
Sep 6, 2005
3,516
0
36
Canada, eh?
Some people have asked for more information on how I added
weight to the Athearn Mikado and Bachmann Consolidation.
In this case, it's fortunate that I'd already
returned the two 2-10-2s to the hobby shop, since I got, in
return, two more Athearn Mikes and another Bachmann 2-8-0.
It was much easier to examine the new locos as an aid in
jogging my memory about the modifications, especially the
2-8-0, since mine are a little more work to disassemble due
to cosmetic modifications.
I weighed the new stock Athearn, loco only: it weighed 12.5
ounces and the balance point was behind the centreline of
the third driver set. In other words, it was back-heavy.
I've heard that some modellers put a stronger spring on the
trailing truck in order to shift some of that imbalance
forward, and this may help. However, I removed the spring
completely (the loco still tracks well) and added weight,
making sure that all of the new weight was placed ahead of
the mid-point of the driver wheelbase (between the 2nd and
3rd drivers).
To balance a loco fairly accurately, you need a balance. I
made one using a sheet of heavy brass and a piece of brass
tubing. Find, by measuring, the mid-point of the brass (you
could use any material, as long as it doesn't flex under the
weight of the loco). Then place the fulcrum (brass tubing
in my case) beneath the sheet at the marked mid-point. You
may have to move the tubing a bit towards either end in
order to get the sheet to balance properly. When it does,
mark it, then solder the tubing to the sheet. It's not
necessary to fasten the fulcrum to the balance if you have
some other way to ensure that it's placed accurately when in
use. If the lead and/or trailing trucks are sprung, they
should be installed when checking the balance, since, as
noted, the springs can shift the balance point. It is
possible that a light loco that is properly balanced will
pull better than an identical, but heavier loco that is not
balanced.
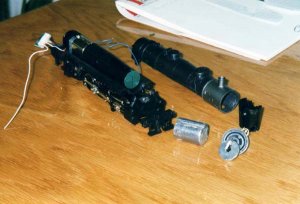
To obtain proper balance of the Athearn Mike, I first
removed the front of the Athearn weight, using a hacksaw
(use masking tape to cover the motor and gears if you don't
completely disassemble the weight.) I made the cut just a
bit in front of the screws that enter each side of the stock
weight, at a point just above the rear half of the front
drivers. These screws attach the front end of the
weight/motor assembly to the chassis and the screw that goes
up into the bottom of the smokebox can be discarded. If you
want working headlights, you're on your own, since I almost
always remove them. To replace the weight just removed, I
used a suitable length of 1/2" copper water pipe, with a
copper cap soldered on one end. I then filled the pipe with
molten lead. You could cram more weight into this space by
making a mould so that the entire weight would be lead, but
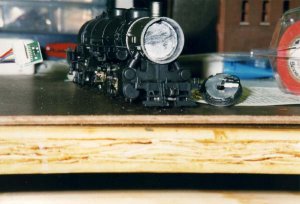
this is a quicker solution. I did make moulds, using scrap
aluminum siding (score, cut where required, then bend), to
make two weights that sit on top of the frame in the area
behind the cylinders and in front of the gearbox. These
will pretty much block the view beneath the boiler, but,
unless you use low-mounted floodlamps to light your layout,
this shouldn't be a concern. Paint them black and they'll
disappear. The weights that I cast had to be filed to fit
properly and are held in place by their own weight and the
driver spring castings. Use the normal precautions when
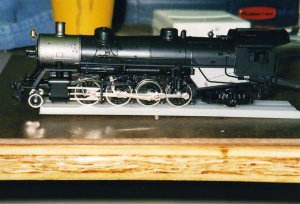
handling lead. Finally, I used a suitably-sized piece of
brass tubing, filled with lead, to create an air reservoir
for the pilot deck, then added the appropriate piping. This
brought the total weight of the loco up to 15 ounces. More
importantly, the weight is balanced at a point mid-way
between the 2nd and 3rd drivers.
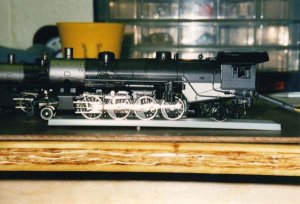
The Bachmann 2-8-0, unmodified, weighs 12.75
oz., loco only, but it is balanced around the mid-point of
the driver wheelbase. Some of the weight that I added was
included as part of cosmetic modifications that I made to my
locos, so you might want to skip that step. First, I
removed the lighting, wiring and circuit board for the
headlight and refilled that space with lead. I then
fabricated a new air tank for the pilot, using lead in brass
tubing as with the Athearn. The air reservoirs under the
running boards were similarly replaced, although this
required that the air system be almost completely repiped.
Finally, to put the loco back in balance, a suitable size
block of lead was placed on the cab floor. If you skip the
side air tank replacement, the cab weight should only be
large enough to balance what you actually did add to the
front end. My reballasted Consolidations each weigh 14.25
oz. With both the Athearn and Bachmann locos, use
electrical tape to ensure that the new weights don't cause a
short between the insulated halves of the factory boiler
weights.
When I get around to working on the three recently acquired
locos, I'm going to attempt to find a way to add even more
weight, and I'll report back if I'm successful.

Wayne
 

Gary Pfeil

Active Member
May 7, 2001
2,510
0
36
Boonton NJ
Visit site
Thanks Wayne, it is all very interesting. I'll mention for the benefit of anyone who doesn't want to build the balance you descibe, that I have gotten accurate results ( I think) using a round pen placed on a level work surface. I place the loco on the pen with the pen between the 2nd and 3rd drivers (for a loco with 4 drivers, of course!) When I did this with the Athearn loco, I found as you did it was rear heavy. Really rear heavy! I placed 1/4 ounce weights on the smokebox front, stacking them just to get an idea how much weight would be needed to balance. I quickly realized the available space wasn't going to hold enough weight. But this is where reading what you did interests me. I want headlights, so that restricts me a bit. I had thought to add a bit of weight behind the smokebox front, and pour some low temp weight into the cylinder cradle. I guessed how much weight would fit, then taped that much weight to the front top of the loco and tested for improvement, not much. So I gave up! I had thought about cutting out that sheet metal weight like you descibe, but thought I couldn't remove enough due to the screws which hold things together. You say you discarded the screw into the bottom of the smokebox, that doesn't cause any problems? That does make the idea feasable, doesn't it?

Thanks again Wayne!
 

doctorwayne

Active Member
Sep 6, 2005
3,516
0
36
Canada, eh?
Gary, I don't know what the purpose is of the screw that goes up through the cylinder casting. As I'm sure you're aware, it's not to hold the plastic boiler casting in place, as this is difficult to remove even when you know what you're doing. Without that screw in place, it is possible, by holding the cylinders, to lift the smokebox slightly, although I can't imagine why anyone would want to do so. The cast weight that surrounds the motor/gearbox is held in place by those screws on either side of the weight just aft of where I suggest making the cut. The screws engage a block of material that rises out of the chassis, so all of the mechanical stuff is still held together. I don't know what you need to install for a working headlight: if it's just a couple of wires, there should be room for them beside that copper pipe, as it's not a real tight fit. If you need a circuit board, you might be able to fit it in the slot under the cab where the big pigtail came out. I removed that monstrosity and ran the wires from the pickups right to the terminals near the motor. I've also got some Bachmann tender trucks that I'm going to use to install tender pickup in all four of my Mikes, probably at the same time that I cut out those coal loads and build a bunker for loose coal tender loads.

Wayne
 

Gary Pfeil

Active Member
May 7, 2001
2,510
0
36
Boonton NJ
Visit site
Wayne, all I need for the light is wire, won't be a problem to run them by a pipe full of lead. I replaced the Athearn tender with a Bachman Vanderbilt, adding tender pickup in the process. I cut the wires on the Athearn cable and soldered them to a connector which mates with the Bachman tenders socket. Got 6 wires, two for power pickup to the decoder in the tender, two for the motor and two for the headlight. Locos do run very nice, and doubleheaded pull a respectable train as is. Both have sound, and when running by at eyelevel (so I don't want to add the weights on the frame) they are impressive sounding. I would like to have the chuff wired to a cam, but the design of the loco makes that difficult. I have other projects for now, but will see what I can do with weight and cam someday!
 

Fluesheet

Member
Jan 22, 2006
339
0
16
Central Ohio
I've made modifications almost identical to what doctorwayne describes above, other than the lead on the frame ahead of the gearbox. I've attached some photos for those (like me) that need a visual.

As this is my first post, feel free to "correct" me if I've step over a boundary of too many images or the like.

The first image (if they display in the order I expect) is with the boiler shell off. I've made some comments on the various pieces displayed:
-The chassis - note the green electrical tape to insulate the two sides from the large weight
-The lead slug I used in the smoke box. The weight was formed by forming a cylinder out of sheet lead, then pouring the molten lead into it. Use a good heat sink (like a big vice) while doing this, otherwise the molten lead will melt through the sheet. The groove cut along the top is to allow room for wiring. You can't see it, but I screwed a coarse threaded a brass nut into the lead that had a fine machine thread internally (kind of like a heli-coil) to give the boiler mounting screw somewhere to attach.
-The smokebox front and the lead disk that fits in the backside
In front of the boiler shell is the pitifully skinny, short and light piece of the chassis that I cut off to allow room for the lead weight.
-If you look carefully, you'll see that there is also lead in the steam chest, with a hole drilled through it for the boiler fastening screw.

The second image is looking into the smokebox. Anyone who has pulled the front of theirs off will appreciate how much bigger in diameter the new slug is compared to the original weight. I didn't run it as far forward as possible to leave room for headlight connectors (if I ever get around to reattaching them).

The last two images are the locomotives balance points before and after the reweighting. Balance point was moved a whole driver diameter forward, though it's still not perfectly balanced.

Regarding the spring on the rear truck, I removed it. It would take some load off the rear most drivers if left in place (just like the prototype) and maybe lead to an even more even driver axle loading, but the downside is that it takes weight off the drivers!

The end result is the weight increased from about 12.75 oz. to 14.7 oz. and occasional tracking problems (lead driver walking off the rail in a turn / elevation change scenario). That said, my other light mikes (Trix) are 16.2 oz. out of the box. I love those engines...:D
 

Attachments

  • 2004 Athearn Reweighting (disassembled) small.jpg
    2004 Athearn Reweighting (disassembled) small.jpg
    49 KB · Views: 39
  • 2004 Athearn Reweighting - Smokebox small.jpg
    2004 Athearn Reweighting - Smokebox small.jpg
    48.7 KB · Views: 35
  • 2004 Athearn Reweighting Balance Point (Before) small.jpg
    2004 Athearn Reweighting Balance Point (Before) small.jpg
    51.3 KB · Views: 36
  • 2004 Athearn Reweighting Balance Point (After) small.jpg
    2004 Athearn Reweighting Balance Point (After) small.jpg
    53.7 KB · Views: 35