B5 - Project Centauri Vorchan

Revell-Fan

Co-Administrator
Staff member
Administrator
Moderator
Aug 1, 2009
11,610
12,349
228
Vreden
I have my eyes everywhere! :D ;)

How's the sandman car design coming along?

Basic design is complete, I only need some "insights" of the interior. Rhaven is going to help me with some screenshots. However at the moment my private life is rather "eventful", meaning not much time for building and such. I'll get back to it asap, I promise (and I have some more exciting things in the stash)! :)
 

Gandolf50

Researcher of obscure between war vehicles...
Staff member
Moderator
Jan 28, 2013
1,327
1,576
96
New Mexico USA
RF - Hey thanks! More work needs to be done, but the overall design now just needs to be tweeked here and there. BTW the head is actually quite strong on the sides. The back also needs some reinforcement and the head needs a better way to stay on the rest of the body.

BTW - How's the sandman car design coming along?

Sky Seeker
:tank:

You basically have 2 ways to go as I see it.....for attachment..
1. cut the rear of the head with a rectangular cutout and inset a rectangle box connection from the neck. ( probably the best way for your version...as the back is mostly flat on yours) and make the neck to main body all one piece...
2. cut the rectangle from the neck to main body to fit the head..? 6 of 1..... 1/2 doz of the other which ever works best and is easiest !

I went with the cut the neck.... the back of the head I rounded, as in the Darkness version of the Vorchan ... I also have a 2 piece "egg crate" inside ..one down the center back to front, and one in the middle just behind the drop-in do-dad..both will help add strength and help with building the thing to the proper shape...aka.. fuselage former's...." though I stayed back from the nose except for the center center, front to back...don't need any more parts than necessary in this thing !!
 
  • Like
Reactions: Sky Seeker

Sky Seeker

Well Established Member
Jun 1, 2015
1,178
1,083
95
You basically have 2 ways to go as I see it.....for attachment..
1. cut the rear of the head with a rectangular cutout and inset a rectangle box connection from the neck. ( probably the best way for your version...as the back is mostly flat on yours) and make the neck to main body all one piece...
2. cut the rectangle from the neck to main body to fit the head..? 6 of 1..... 1/2 doz of the other which ever works best and is easiest !

I went with the cut the neck.... the back of the head I rounded, as in the Darkness version of the Vorchan ... I also have a 2 piece "egg crate" inside ..one down the center back to front, and one in the middle just behind the drop-in do-dad..both will help add strength and help with building the thing to the proper shape...aka.. fuselage former's...." though I stayed back from the nose except for the center center, front to back...don't need any more parts than necessary in this thing !!

Gandolf,

Yes, I agree probably with version #1 is how I'll go. Maybe I might reinforce it with a popsicle stick from the rectangular section on the front part to partway inside of the head for reinforcement. Further reinforcement could be done by adding a piece of cardstock around the opening in the back of the head for additional strength. I'm also going to make the rectangular box on the back panel of the head slightly smaller and use the tabs that are cut to make glue tabs.

Also, I recently noticed that there are a pair of "shock absorbers" on each side (behind the head - in the lightwave version) that would definitely help in stabilizing the head as well. The rectangular front portion extending from the fuselage might have to be made narrower (width wise).

I would love to see the pics of what you're building right now.

Sky Seeker
:tank:
 
Last edited:

Sky Seeker

Well Established Member
Jun 1, 2015
1,178
1,083
95
The one from Darkness Ascending and the video Babylon 5-X http://www.zealot.com/threads/b5-project-centauri-vorchan.179598/page-5#post-1013489 ...lost the link to the videos for the time being... but there are some great shots of them in battle shows what I used as a base for the design direction I went with...oh I remember now..I captured the videos..and have them here...
http://www.moddb.com/mods/babylon-5-x3-mod/videos/latest-in-game-video GREAT STUFF! That's what they used the ship from Darkness for!

I haven't run a color print as yet for anything, just a few B/W to see if it will be cut-able or not!! ..jesshh just my luck it will be all muddy and all the detail will dissolve into nothing..not on my printer but on others, perhaps! That is about the way things have been working out! I went with the DARK version of my texture...and added the deep purple to the file out-side of Inkscape since it would not transfer to PDF's...

Just watched the video. Yeah talk about a dream given form. :) The Vorchan they did looked great! Need to see more views.

Sky Seeker
:tank:
 

Gandolf50

Researcher of obscure between war vehicles...
Staff member
Moderator
Jan 28, 2013
1,327
1,576
96
New Mexico USA
Gandolf,

Yes, I agree probably with version #1 is how I'll go. Maybe I might reinforce it with a popsicle stick from the rectangular section on the front part to partway inside of the head for reinforcement. Further reinforcement could be done by adding a pice of cardstock around the opening in the back of the head for additional strength. I'm also going to make the rectangular box on the back panel of the head slightly smaller and used the tabs that are cut to make glue tabs.

Also, I recently noticed that there are a pair of "shock absorbers" on each side (behind the head - in the lightwave version) that would definitely help in stabilizing the head as well. The rectangular front portion extending from the fuselage might have to be made narrower (width wise).

I would love to see the pics of what you're building right now.

Sky Seeker
:tank:
Yep...the tubes will add a lot to stabilize and strengthen the beast...and an easy addition ..make the platform as a build-up to .5 or even up to 1.0 mm to both ends / head and neck/ and add the tubes in-between!

http://www.zealot.com/threads/b5-project-centauri-vorchan.179598/page-4#post-1013243 pix #7 shows a good detail of all the parts from the head to the neck....

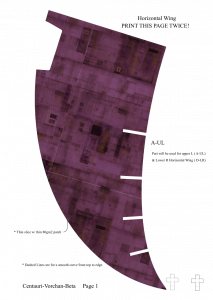
here is an example.. texture and ..beta page horizontal wing...
Horiz-wing-LU.png


...Have not decided as yet to cut out for wing boxes ( more than likely will ) rather than cutting boxes. as well as the engine parts at rear......thing is complicated..and may end up being a single piece cut wing out to fit...and vertical wing attached to it....still playing with that, as well as the egg-crate former for inside. I really hate the fold lines..but what are you going to do on such a complicated thing!! any lighter and they vanish! Edge lines are the same..as large as can go before the cut lines vanish....If it ends up..going to 1/4 wing per A4 sheet to double the size..then things will be a bit better..but then ..the main fuselage and horizontal body will have to be cut up to several sections and spliced together..on mat board or such...

For now..I have a house to get prep as I want to try and get it on the market this spring! and have been playing with a PrintRbot my wife bought me..too many irons in the fire as usual!!
 
Last edited:

Revell-Fan

Co-Administrator
Staff member
Administrator
Moderator
Aug 1, 2009
11,610
12,349
228
Vreden
WOW! WOW! WOWOWOW! I would get rid of the lines at the perimeter as they are much too small to be actually dealt with (if they don't belong to the texture, of course ;) ).
 

Sky Seeker

Well Established Member
Jun 1, 2015
1,178
1,083
95
Yep...the tubes will add a lot to stabilize and strengthen the beast...and an easy addition ..make the platform as a build-up to .5 or even up to 1.0 mm to both ends / head and neck/ and add the tubes in-between!

http://www.zealot.com/threads/b5-project-centauri-vorchan.179598/page-4#post-1013243 pix #7 shows a good detail of all the parts from the head to the neck.... (still waiting for pic problem to get fixed..don't want to upload a bunch off site!!)

here is an example.. texture and ..beta page horizontal wing...

5bf480c649.png

...Have not decided as yet to cut out for wing boxes ( more than likely will ) rather than cutting boxes. as well as the engine parts at rear......thing is complicated..and may end up being a single piece cut wing out to fit...and vertical wing attached to it....still playing with that, as well as the egg-crate former for inside. I really hate the fold lines..but what are you going to do on such a complicated thing!! any lighter and they vanish! Edge lines are the same..as large as can go before the cut lines vanish....If it ends up..going to 1/4 wing per A4 sheet to double the size..then things will be a bit better..but then ..the main fuselage and horizontal body will have to be cut up to several sections and spliced together..on mat board or such...

For now..I have a house to get prep as I want to try and get it on the market this spring! and have been playing with a PrintRbot my wife bought me..too many irons in the fire as usual!!

Gandolf,

Love the Color / textures for the wing! Understand the cut outs for the struts. However, after you assemble it I think that you'll find having the wing all together will work out better, but it's designers choice on this.

Good luck on the selling of the house!

Sky Seeker
:tank:
 
  • Like
Reactions: Gandolf50

Gandolf50

Researcher of obscure between war vehicles...
Staff member
Moderator
Jan 28, 2013
1,327
1,576
96
New Mexico USA
Gandolf,

Love the Color / textures for the wing! Understand the cut outs for the struts. However, after you assemble it I think that you'll find having the wing all together will work out better, but it's designers choice on this.

Good luck on the selling of the house!
THANKS!! It is an AIR FORCE town so houses don't stay on the market for long..and this is a nice 40's 3 bedroom bungalow, with some craftsman woodwork. Just depends if I get my asking price. It is non-negotiable, I don't haggle..they want to offer less, I raise the price! It is rented now, and it is just to much hassle to drive the 3 hours to deal with things.

Sky Seeker
:tank:

Thanks...I hear ya..and I debated on it,,, I figured it was better for several reasons..one it makes it a snap to put the boxes together and gives a good location to add flaps from the wing to the boxes. Since the wing still has a slight curve to it from the crescent on the front edge. Cutting the boxes, made a slight nightmare of Boolean operations, and made more tiny parts. I already cut the crescent into small chunks to fit between each of the boxes It was way too big even cut in half to work with ...as well as the main fuselage ( which still leaves open areas into the inner side of the wing where the vertical wing drops down...and joins in...it isn't that apparent but once you start breaking it down to tiny bits you find all the gaps! Have to deal with that..( it is on the list.. probably an egg crate, with dark flat plate to mount the main fuselage to the horizontal wing, and add strength to the vertical wing halves and hide the view into the horizontal wing..)

WOW! WOW! WOWOWOW! I would get rid of the lines at the perimeter as they are much too small to be actually dealt with (if they don't belong to the texture, of course ;) ).

Yeah...I don't like them myself...if I do an egg crate for the inner structure..then they will become obsolete as that will define the curve of the wing and I can get rid of them..the cut lines have to stay..but they are so small that by the time you take out that sliver and tab them with 80lb typing paper they will vanish. It also will be a good idea to eliminate them if I go ahead and add the gold band around the rear section..as that will really make them stand out and look BAD!!
 
  • Like
Reactions: Sky Seeker

Gandolf50

Researcher of obscure between war vehicles...
Staff member
Moderator
Jan 28, 2013
1,327
1,576
96
New Mexico USA
Actually that brings up a good question? Fold Lines? YES or NO? If you look at this link to the sample page...the part C in the light gray test..has a ton of folds... http://www.zealot.com/threads/b5-project-centauri-vorchan.179598/page-7#post-1014074 ...personally I hate them!! messes up the feng shui ! You have this nice texture going on and right across it this ugly dotted line! and on all the corners! So when something is this complicated would it be better to include them or ..add the stand-off dotted lines with fold here arrows..and rely on your build instructions? Us newbies want to know!
 

zathros

*****SENIOR ADMINISTRATOR*****
Staff member
Administrator
Moderator
Apr 5, 2013
13,498
9,549
228
You could always make a white model showing the fold lines, as instructions, so people would know where to bend the textured model. :)
 

Sky Seeker

Well Established Member
Jun 1, 2015
1,178
1,083
95
Actually that brings up a good question? Fold Lines? YES or NO? If you look at this link to the sample page...the part C in the light gray test..has a ton of folds... http://www.zealot.com/threads/b5-project-centauri-vorchan.179598/page-7#post-1014074 ...personally I hate them!! messes up the feng shui ! You have this nice texture going on and right across it this ugly dotted line! and on all the corners! So when something is this complicated would it be better to include them or ..add the stand-off dotted lines with fold here arrows..and rely on your build instructions? Us newbies want to know!

Gandolf,

Hmmm... good question. To fold line or not fold line? Maybe incorporate a VERY thin line that sort of blends in with the model. Once you fold, most of the line breaks up and you can color at will anyway for the distortion of the paper at the fold line depending on how you print and fold. With some of the areas done, the lines add an accent to an area.

Of course it helps to have directions to "fill in the gaps" that aren't too intuitive.

When I have the final design for the Vorchan, instructions will be made to assist people where to fold what and to assemble what with what. It just makes it easier on future builders for that aspect.

Sky Seeker
:tank:
 
Last edited:
  • Like
Reactions: spaceagent-9

spaceagent-9

Right Hand Man and Confidant
Moderator
Jul 10, 2013
3,107
3,474
143
62
pheonix
I like Zathros's idea, same scale white model showing fold lines, in detail, so you can print it out and work it alongside the build. By the way, this has turned out great, what a wealth of knowledge gained just following along with you here!
 
  • Like
Reactions: Sky Seeker

Gandolf50

Researcher of obscure between war vehicles...
Staff member
Moderator
Jan 28, 2013
1,327
1,576
96
New Mexico USA
I am at a quandary at the moment..I have looked and studied several sheets that are ready now...and I have several options...

My solution depends on the format you use. I use layered PDF files. I have layers for cut files, fold lines etc which you can all switch on or off as wanted. That way you can print (or just watch on screen) a white version with cut and fold lines and then print the textured version without.

I like the idea of this...and since it will have to be offered in several PDF's this would be do-able...:) BUT...

there are problems...and I have to decide how to deal with them ...

one way is to just add the fold lines..( easy solution ! )
or remove the fold lines and create the layered PDF's ( lots more work...and makes the model extremely difficult to construct!)
or start over and go back to the original mesh and re-work all the problem areas that cause the difficult fold lines..and remove them ( lots more work...makes model easier to construct and removes the fold lines!) Logic really dictates the last solution..if I wish to include all the details that need to be included and maintain the level of quality I want! Luckily I am too busy at the moment with the Scammel to wrestle with logic to see who wins.:(
 

Sky Seeker

Well Established Member
Jun 1, 2015
1,178
1,083
95
WoW, this looks like a big fat challenging model! Good luck with it. From what I have seen so far I am pretty sure it will be a success :)

It is indeed challenging to put it mildly. Some of the curves on the model are quite complex. I'm trying to rework the head and the back of the head has to be slightly bulged out (one of the many lessons done with the pre-build). I hope that we can create something that has clean crisp lines like what you have done on your models. You are quite an inspiration to the rest of us.:) Thank you for all you've done and what you'll do in the future!:)

Sky Seeker
:tank:
 

zathros

*****SENIOR ADMINISTRATOR*****
Staff member
Administrator
Moderator
Apr 5, 2013
13,498
9,549
228
Some people (me) can't work with .pdf's as well as others seem able to do. A jpeg option is always nice.. Just some food for thought.
 
  • Like
Reactions: Sky Seeker

Sky Seeker

Well Established Member
Jun 1, 2015
1,178
1,083
95
I am at a quandary at the moment..I have looked and studied several sheets that are ready now...and I have several options...


I like the idea of this...and since it will have to be offered in several PDF's this would be do-able...:) BUT...

there are problems...and I have to decide how to deal with them ...

one way is to just add the fold lines..( easy solution ! )
or remove the fold lines and create the layered PDF's ( lots more work...and makes the model extremely difficult to construct!)
or start over and go back to the original mesh and re-work all the problem areas that cause the difficult fold lines..and remove them ( lots more work...makes model easier to construct and removes the fold lines!) Logic really dictates the last solution..if I wish to include all the details that need to be included and maintain the level of quality I want! Luckily I am too busy at the moment with the Scammel to wrestle with logic to see who wins.:(

Gandolf,

How's everything going? Any new progress on the Vorchan? I've been designing the little purple blocks right behind the "head" and some of the surface features on the fuselage.:headbange: Trying to figure out a way to make it easy for people to build and line up the blocks. I might have something in a couple of weeks depending on work.

Just wanted to check in and say "hi".:wave:

Take care.

Sky Seeker
:tank:
 

zathros

*****SENIOR ADMINISTRATOR*****
Staff member
Administrator
Moderator
Apr 5, 2013
13,498
9,549
228
Yep...the tubes will add a lot to stabilize and strengthen the beast...and an easy addition ..make the platform as a build-up to .5 or even up to 1.0 mm to both ends / head and neck/ and add the tubes in-between!

http://www.zealot.com/threads/b5-project-centauri-vorchan.179598/page-4#post-1013243 pix #7 shows a good detail of all the parts from the head to the neck....

here is an example.. texture and ..beta page horizontal wing...
View attachment 156679


...Have not decided as yet to cut out for wing boxes ( more than likely will ) rather than cutting boxes. as well as the engine parts at rear......thing is complicated..and may end up being a single piece cut wing out to fit...and vertical wing attached to it....still playing with that, as well as the egg-crate former for inside. I really hate the fold lines..but what are you going to do on such a complicated thing!! any lighter and they vanish! Edge lines are the same..as large as can go before the cut lines vanish....If it ends up..going to 1/4 wing per A4 sheet to double the size..then things will be a bit better..but then ..the main fuselage and horizontal body will have to be cut up to several sections and spliced together..on mat board or such...

For now..I have a house to get prep as I want to try and get it on the market this spring! and have been playing with a PrintRbot my wife bought me..too many irons in the fire as usual!!

Superb Texturing!!! :)