

This is one og those areas of the hobby I would love to be able to do. I just can never figure it out. I have had good advice from several people (including the master modeler Doc Wayne) but now I have more technical problems with doing the actual painting. I have a MR article that would give me WONDERFUL help, but of course, I cant find it. Anyway, when I paint, the paint will, well, I dont know, it just is really bad. It goes on real spotty, and tends to gather in certain areas. I dont know if the fact that I use a can of propellant makes a difference, but here are some so-so pics, can anybody think of any ideas of what I need to try?
Airbrush Help
- Thread starter Kevinkrey
- Start date
You are using an out of date browser. It may not display this or other websites correctly.
You should upgrade or use an alternative browser.
You should upgrade or use an alternative browser.
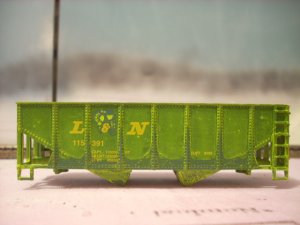
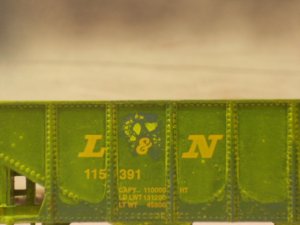
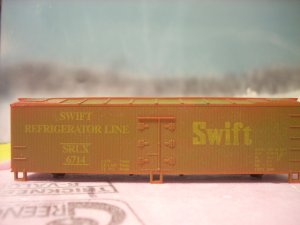
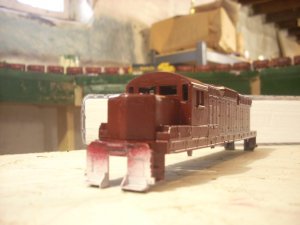
All three of these cars were ones that I wanted to see how well I coud paint over. I want to paint a loco, that is in BN colors, any help for prep?
Were the cars cleaned really thoroughly? Don't handle them after cleaning. Use cotton gloves. We used to call them undertakers gloves.
Make some kind of holder to turn the model without touching it. The glossy plastic will not take paint very well. Just some of many available suggestions.
Make some kind of holder to turn the model without touching it. The glossy plastic will not take paint very well. Just some of many available suggestions.
Hi...What paints are you using..?? Some paints don't take too well to plastics. In those cases I spray a light coat of Dullcote to give the paint something to grab on to. Also several light coats will give you much better results than a couple of heavy ones.
Also...don't tackle the loco until you're sure of what you're doing...Taking paint off that you've just put on is no fun....wall1
Also...don't tackle the loco until you're sure of what you're doing...Taking paint off that you've just put on is no fun....wall1
Kevin, I'll tell ya exactly what it looks like to me:winki: , looks like one of two things:
1- your not reducing your paint, its just to thick, it need to be reduced/ mixed up well.
2- OR, the reducer your using is not compatible with the paint your using, thus its coagulating(clotting up):winki: .
just my thoughts:winki:
:deano: -Deano
1- your not reducing your paint, its just to thick, it need to be reduced/ mixed up well.
2- OR, the reducer your using is not compatible with the paint your using, thus its coagulating(clotting up):winki: .
just my thoughts:winki:
:deano: -Deano
The paint is the paint offered from badger, model master or something. I tried to mix it with another airbrush paint. I bought some Poly Scale paint and will thin it 15% as directions say, but how do you measure it?
I will make sure the model gets a good soaking in dawn soap, or something similar.
OK, first, Modelmaster paints don't mix well with anything but Modelmaster paints.
Second, MM paints are ready to spray from the bottle, but you need to crank the pressure up to about 30 psi to get them to spray well.
It looks to me like you haven't cleaned your models well enough before painting, and it looks like on the hopper you're laying the paint on too thick. Several thin coats are much better than one thick one.
Does it matter that I use a can of propellent (for now), and I was not putting paint on thick, it simply would move around on the model, and leave the originall blue in spots and build up in others. Sounds like the problem could be washing it?
Kevin: Just soaking will not do the job. A soft toothbrush and a good scrubbing are necessary, followed by a thorough drying. are you trying to completely cover the lettering on the cars? The lettering may show through the airbrushed finish.
You can use an eyedropper and count drops or find one that has graduations on it.
You can use an eyedropper and count drops or find one that has graduations on it.
Kevin, I should also add the can of propellent may work, but unless you've got a regulator in line, you're not going to get very consistent results with ModelFlex.
Go with PollyS if you need to use waterbased paints, but you should also prime your work first before putting your finish coat on. Primers are designed to bind to plastic or metal a little better than the finish coat, and give the colour coat something to grab onto.
Go with PollyS if you need to use waterbased paints, but you should also prime your work first before putting your finish coat on. Primers are designed to bind to plastic or metal a little better than the finish coat, and give the colour coat something to grab onto.
")
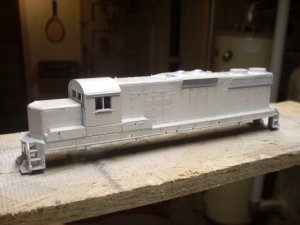
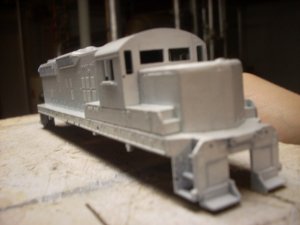
Kevin, if I could make a suggestion: one of the side benefits of using a primer is that it makes it easier to see areas that would be improved by a little touch-up. Before you apply any more primer, take the opportunity to do a little body work on the joint between the sides and top of the low hood. There are several fillers available that are suitable for use on plastic models - Squadron Green putty seems to be quite popular, and is easy to use. On deep or wide areas, several light applications are easier than one heavy one, and apply it only in the areas where it's required, as sanding is the tedious part of this particular job. I've found that an old X-Acto #17 chisel blade is a good tool for applying the putty where you want it.
I can almost guarantee that if you don't do this touch-up now, you'll eventually start to regret it every time you look at your diesel, no matter how nicely you paint it.
The other thing I notice is that you've not installed any headlight casting yet - is it meant to be a different colour than the rest of the cab?
It looks like you've got a nice, even coat of primer on the diesel, so, other than the touch-up, I don't think that there's any need to re-coat the whole loco.
Wayne
Thanks, I do have some putty, I used it in other areas, just didnt realize how big the gap was until it was primed. I will give it some tomorow, I did just touch up the primer in SOME areas today.
I Will give it a headlight mount later, but I need the model in a photo ready condition for the current photo contest. And there has been debate about what model to take it from because there is no add on like what I want, so I will probably scratch one up later.
Shes Painted!
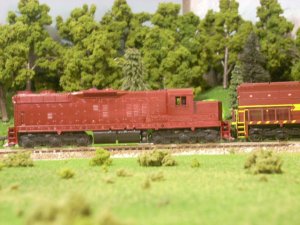
I got a coat of MM DMIR Maroon, but I dont like it isnt a real close match.
It turned out pretty good for my first REAL painting project, bt there are several minor bad spots on it. But I will weather this one fairly heavily, because the period I am modeling was when the first SD-Ms (mine will be 301, the first SD-M) were getting older and the new tunnel moters were comming along, so they will not get alot of weathering.
The one pic shows the color difference between it and mt Athearn loco. As you can see the front and back are still white, but they will be getting a coat of black.
Attachments
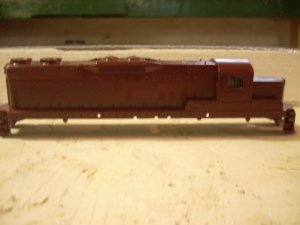
Looks pretty good for your first attempt, Kevin!
As far as the colour goes, it's a tough call... paint fades, pictures are taken in different lighting situations, and different manufacturers paints look different under different lighting situations.
Speaking of lighting, it may be an effect of how you lit your last shot, but it looks like the front half of your loco is a tad lighter than the rear? It looks from the pic if you were to put your loco tail-to-tail with the other, the colour would be much closer.
The other thing to consider is that how you perceive the colour will change with the addition of decals and a shot of Dullcote.
Thanks, I still need to buy an overhead light for that area, and for now its a lamp without the shade, HORRIBLE lighting. That is what seems to have caused the darker affect in th back.
The funny thing is, I recently picked up a bottle of Poly-Scale EL maroon, which I have been told is a closer match, but I didnt want to pour out the paint into the airbrush jar, so I used the MM paint that could screw directly into the airbrush infeed, thats what I get for being lazy.