Adding a car float to the layout

Ralph

Remember...it's for fun!
Jun 18, 2002
5,134
0
36
64
St. Paul, MN
Visit site
I've long complained about not having enough staging tracks and no place to add any. I still wanted to create a way for freight traffic to come from "off layout" so I decided to add a car float scene. The inspiration for my model came from a picture I found on a web site about the Hoboken RR. Here's the link:

http://hbs.railfan.net/hbs21.jpg

Below is an overall picture of the new operation, a two track barge that docks at West Mill Jct. on my layout near Hudson Cement.
 

Attachments

  • float1.jpg
    float1.jpg
    60 KB · Views: 72

Ralph

Remember...it's for fun!
Jun 18, 2002
5,134
0
36
64
St. Paul, MN
Visit site
The car float's apron is at the opposite end. The little Atlas tower seemed the perfect structure for high sight line supervision of the loading and unloading operations. Locomotives working the float are not permitted to cross on the apron so a flat car is coupled up front.

The small warf in the foreground is a popular place for fishing and train watching.
 

Attachments

  • float2.jpg
    float2.jpg
    63 KB · Views: 61

Ralph

Remember...it's for fun!
Jun 18, 2002
5,134
0
36
64
St. Paul, MN
Visit site
I built this tug boat out of wood blocks and carboard. It needs more details and weathering but overall I'm happy with how its shaping up. I'll call it the Robert H. after my father in-law who loved watching barges and tugs on the locks and dams in Iowa. As you can see, the car float barge itself needs details...like bumpers at the end of the tracks to keep freight cars from landing in the drink! :D
 

Attachments

  • float3.jpg
    float3.jpg
    56.5 KB · Views: 72

Ralph

Remember...it's for fun!
Jun 18, 2002
5,134
0
36
64
St. Paul, MN
Visit site
I've set a rule that no more than two cars can be loaded or unloaded from one side of the float to avoid capsizing the barge. Cars pulled off the float are backed onto the track immediately behind the float and eventually become part of a transfer run over to Williams Yard in Kings Port. After that they'll be set out at local industries.
 

Attachments

  • float4.jpg
    float4.jpg
    61 KB · Views: 68

Ralph

Remember...it's for fun!
Jun 18, 2002
5,134
0
36
64
St. Paul, MN
Visit site
I owe Glen Haasdyk a debt for his clever idea of a fold-away harbor shown in this thread:

http://www.the-gauge.com/thread13578-fold-away-harbour.html

I added the car float scene on to the edge of my layout to a section that is a little more than two feet wide. There are hidden tracks behind the cement plant that I need to be able to reach. The car float shelf would make this difficult except for the fact that its on hinges and can be lowered down. I remove the tug and the Atlas tower (and all freight cars of course!! :) ) before lowering it. The float itself is permanently attached to the shelf.

Thanks for the inspiration Glen!! :thumb:
Ralph
 

Attachments

  • float5.jpg
    float5.jpg
    48.7 KB · Views: 58

zedob

Member
Dec 26, 2004
757
0
16
62
Chicopee, MA
Ralph,

LOVE IT. What do you think about the gloss medium? It looks great from here. I've been contemplating using it for a stream on my layout, but haven't decided.

Any input?
 

ausien

Active Member
Sep 14, 2004
1,000
0
36
Sydney, Austrailia
neat idea, Ralf, it looks good from my point of view. You may have solved a problem for me without even nowing I had one.... have a good one.. and thanks...steve
 

Ralph

Remember...it's for fun!
Jun 18, 2002
5,134
0
36
64
St. Paul, MN
Visit site
zedob said:
Ralph,

LOVE IT. What do you think about the gloss medium? It looks great from here. I've been contemplating using it for a stream on my layout, but haven't decided.

Any input?


Thanks everyone for the compliments. zedob, I like gloss medium. It has virtually no odor, is easy to paint on (althought it takes about 5 or 6 coats to get a convincing look of depth) and I used less than half of a $10 bottle for this project. For folks not familiar with this method of making water, I spread joint compound over a wood base and then use a damp sponge to create ripples and waves on the surface. Once the joint compound is dry I paint it with undiluted Woodland Scenes Stone Gray which creates a murky dark green, brown, black color that I think looks great as deep water. I then brush on several coats of Acrylic Gloss Medium (letting each dry in between coats) until I'm happy with the effect. For white water such as the ripples against the tug boat I pull out a little cotton batting and stick it on the wet gloss medium surface. I then brush more medium on the cotton and shape it as appropriate.

Ralph
 

capt_turk

Member
Nov 14, 2004
138
0
16
74
Green Cove Springs, Fla.
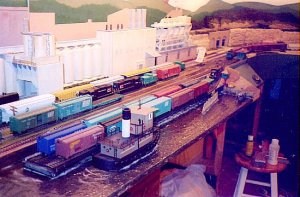
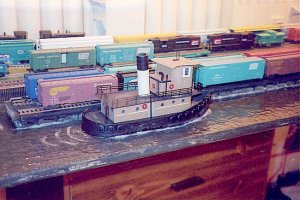
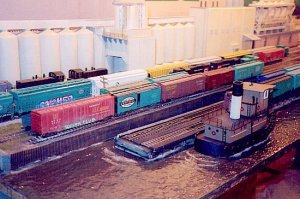
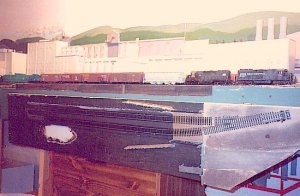
A little tip from a prototypical tugboat captain. In this situation, you would not have any white water along the sides of the barge, nor on the sides of the tug. Behind the tug, you will see alot of white water.
After the tug gets the float notched up to the ramp, it pushes hard to help hold the barge in the notch to keep the loco from pushing it away from the ramp. There are cables that are strung from the barge to the dock to hold it but they are usualy not strong enough by themselves to resist the push of the loco.
Since the barge is not moving, nor is the tug, there would be only white water at the stern of the tug from the wheel wash, and it would be considerable.
Try adding some details to the barge. Barges almost always have a double post on each corner. This is called a bollard. Spaced along the sides of the deck of the barge just farther apart than the tug is long, are cavels. These are what you are used to seeing as cleats on small boats. Just one heck of a lot bigger. About three feet long, and 6 to 8" tall. The lines from the tug will be one leading forward from the bow of the tug. One leading aft from the quarter bit on the tug, and one from the stern of the tug to the bollards on the corner.
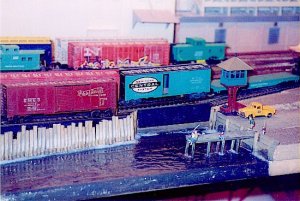
Another detail you could add is the running lights on the barge. The bow of the float is the end at the stern of the tug. The left side light is red, the right side is green. In the center of the stern of the float would be a white light. If my description leaves you in the dark, let me know and I'll try to draw up pic of the details.
Great idea, and nice execution. Lets see some more pictures when you have it finished.