2nd build, SB Yamato, EDF Borodino

bigemugamer

New Member
Oct 9, 2011
38
0
6
47
Winnipeg, Manitoba
So for my 2nd build i decided one Space Battleship Yamato ships in my fledgling fleet wasn't enough, i will need adequate firepower to defend my growing collection in the years to come. So im building the EDF 'Borodino' class battleship. when completed, her 37 pieces wil come to a length of roughly 7 inches long.

582396929421ca60b70fz.jpg


and AGAIN, i had a problem with sizing, you may notice some cut off on the bottom and right sides (there is suppose to be a black circle near the bottom right) i was hesitant to do this build cause of low ink and the chance i wont be getting ink for a month, but i couldn't NOT build... (sigh) and ended up printing this out 3 times, the third time everything was .5 inches from border, grrr, i went with it anyways :(

gedc0045.jpg


once again i have these schematics to go by but now it shouldn't be as confusing.
battlshipyamotogearingd.png


So far everything cut out nicer than the 1st build, been up all night probably wont have it done till Monday night, here we go :mrgreen:

gedc0044.jpg
 

Rhaven Blaack

!!!THE MAN BEHIND THE CURTAIN!!!
Staff member
Administrator
Moderator
Jun 12, 2009
12,516
9,892
228
Oregon
www.deviantart.com
Well, like your first build, you look like you are off to a good start.
I would like to ask, did you score the fold lines, before you cut the parts out?

Good luck with it. I will be following this build.
 

bigemugamer

New Member
Oct 9, 2011
38
0
6
47
Winnipeg, Manitoba
once again i did not score the fold lines first :nope: i think i was just comfortable not scoring till after they were cut but now after carefully weighing the pros and cons of scoring i believe your right that scoring first would be better, for a few reasons i can think of, the next build i will score first, perhaps i kinda consider my first 2 builds as trainers (wanna get the 'cutting it out' right first), my 3rd build will be a much larger battleship, nearly a foot long, 3 sheets, that one i will want to baby more as my skills are improving (i feel as though the experience of building near 100 plastic models as a kid never left me)

I just wish i could get ma damn printer to print right to the edge without cutting pieces off >=[
 

Rhaven Blaack

!!!THE MAN BEHIND THE CURTAIN!!!
Staff member
Administrator
Moderator
Jun 12, 2009
12,516
9,892
228
Oregon
www.deviantart.com
Regardless of pre-scoring or not, I am certain that you will do just as good a job as you did on your first.
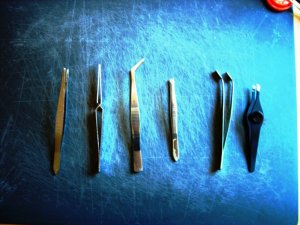
If I may also suggest that you get a variety of different tweezers for your tool box. they can help in folding, clamping, for just getting those small parts into those tight places that even tiny fingers can not get into.
You can get them at any hobby shop, medical supply store, or hardware store that carries small tools.
Here is a photo of what I use ( do plan on getting more).

DSCN4685.jpg

ENJOY!!!
 

bigemugamer

New Member
Oct 9, 2011
38
0
6
47
Winnipeg, Manitoba
OK, so Monday night (Tuesday morning) im calling it quits for now and will finish her tomorrow, as you can guess there seems to be something wrong, well, from the schematics above you kinda have to guess how things are placed, so, i realized that this center piece was suppose to be glued to the underneath of the top dech on the inside, i was not happy about this realization and it took me 5 mins of noggin scratchin and looking at a few pics to realize this.

gedc0046h.jpg


large deep incision along the sternum, you can see the roughness of the cut glue on the inner flap.

gedc0048o.jpg


Now it looks a little better, even got the underneath intake and grills on as well as the 2 outer circular hull coverings, those were kinda difficult, the starboard side (the side your looking at now) looks better than the port side, only by a bit though.

gedc0059v.jpg


If your thinking "that one side near the bow looks higher on the right", your correct, it wasn't glued yet, this is a pic before i glued that part. In this picture, notice the center part of the hull with the noticeable white center line its causing a 'peak'? there is currently nothing preventing this so i decided to reinforce that. I slid my knife between the layers of a 1 inch long piece of the card stock and glued 4 pieces 2 forward 2 aft, 1 on each side of the 'backbone' (see pic below this one for 'backbone' reference)

gedc0049h.jpg


here you can see somewhat clearly the 2 pieces of card stock on either side of the 'backbone' piece jutting inward, those with great vision may be able to see the one in the forward section.

gedc0052i.jpg


Now the engine is on (minus 4 rudders) the lower section of the superstructure, the forward deck piece that extends further forward than the main hull, 2 of the whatchamacallits (what... its 4:45 am :p ) on either side of the circular hull plating, and the 2, im guessing their launchers (4 launch tubes each) on the port and starboard side of the upper forward hull and an additional lower hull intake noticeable in the next picture.

gedc0068z.jpg


And this is it so far, noticeable along the lower aft portion between my thumb and fore finger is the 2nd intake. tomorrow I will finish applying the last 18 pieces... then play with it like a little kid "pew pew"... what?... WHAT!? Oh, like you don't! =P (Nappy-nap time, I'm being to silly)


gedc0070.jpg


P.S. That's a nice collection of tweezers Rhaven Blaack, though I'm a little surprised you don't have a loooong pair, i to was also thinking about buying a couple, the regular ones and ones that have locking clamps, I'll definitely increase my supply of items in the near future, plus other items like a fine brush for applying glue, this nozzle is just a bit clumsy and clumpy. perhaps even a magnifying glass on an adjustable arm, hmmmm.
laterz :mrgreen:
 

Rhaven Blaack

!!!THE MAN BEHIND THE CURTAIN!!!
Staff member
Administrator
Moderator
Jun 12, 2009
12,516
9,892
228
Oregon
www.deviantart.com
It is looking really good so far. You are doing a great job (even with going back through and making corrections).

I do have a pair of locking hemostats that I use now and then, but like I said before, I do plan on getting more tweezers of different shapes and configurations. They really do help out quite a bit.
 
Z

Zathros

To be honest, these kind of models scare me.:eek: You mess up one fold, and there is no way of coming back. That being said, you got it right, because it looks right!:thumb:
 

bigemugamer

New Member
Oct 9, 2011
38
0
6
47
Winnipeg, Manitoba
thanks Rhaven Blaack and Zathros, I'm a bit of a perfectionist (just a bit) and i can do the minute details fair enough as i do have a steady hand and some patience, though you may notice with the intakes and the folds inside the intake on the bow of the ship, its white (because its the bottom non printed side of the card, but you know that ;P ) I wish i had taken one of my sharpie black markers to those so as to look black as it does in the art picture top of this post, imo that would have changed the whole look of it) i may cut the intakes off and do that yet, haven't decided yet. I'll eat first then complete it ;)
 

bigemugamer

New Member
Oct 9, 2011
38
0
6
47
Winnipeg, Manitoba
FINISHED!!! I didn't time it but I'm guessing it took roughly 6 hours again, this build had its own issues just like the first build:

- This superstructure and the only 3 guns were far easier to construct due to the fact the pieces were larger.

- The engine was far less complicated.

- There were sections of the hull that were a bit tricky due to the fact the directions looked to be hand drawn by a semi talented 2 year old.

gedc00g71.jpg


you may notice it the forward and mid section intakes on the lower hull are white, I ended up deciding not to marker them in black in an attempt to simulate a shadow cast inside it.

gedc00b85.jpg


You may notice the center divider in the intake at the front is black and not white like the lower section, i used a sharpie on it and now think I shouldn't have, np :)

gedc00c83.jpg


gedc00d87.jpg


gedc00e81.jpg


gedc00f82.jpg


Overall this was a fun build, I'm pleased with the way it turned out. Im looking forward to my next build and according to a comment and picture I posted in another thread about it, I believe a few of you will be to, peace.
:mrgreen:
 

Rhaven Blaack

!!!THE MAN BEHIND THE CURTAIN!!!
Staff member
Administrator
Moderator
Jun 12, 2009
12,516
9,892
228
Oregon
www.deviantart.com
Simply AMAZING!!! Again, you have done an OUSTSTANDING job. I commend you on a job well done.
I too have these kits in my computer, and have been wanting to do them, but do to other project, I just have not been able too.
Once again, congratulations on a job well done. I am looking forward to seeing your next build.
 

blaar

Member
Mar 9, 2008
143
1
16
Now that is how you should build, seems like you have been doing it for years. Even if I would attempt that model 10x mine will not look half as good. Nicely done.
 
Z

Zathros

Pretty darn cool there! I would now begin running around the room making rocket and shooting sounds!! Yes, at 54 I still play. I have an 11 year old son, and right now he is my excuse. :)
 

Danscrew

Danscrew
Oct 10, 2011
212
260
58
Rouyn-Noranda, Québec
Zathros, there is no age to play. I'm 46 and i'm like a little boy when i do my paper work thing.

Bigemugamer, have you built this model in one day ?

Have a good life
"So say we all"
 

bigemugamer

New Member
Oct 9, 2011
38
0
6
47
Winnipeg, Manitoba
no Danscrew this model was built over the course of 3 days but it may have taken a total of 8 hours to build.

Thanks everyone for your praise, it was a joy to build, its the next one I'm currently working on which will take some time, but I have the next 3 days off so I will be making progress over those 3 day and posting pics (maybe I'll complete it, i anticipate 4-6 hours to actually build it) ;)