U-Don's U-Boot typ VII C
- Thread starter Papa Mashy
- Start date
You are using an out of date browser. It may not display this or other websites correctly.
You should upgrade or use an alternative browser.
You should upgrade or use an alternative browser.
- Apr 5, 2013
- 13,499
- 9,551
- 228
Just to show it hasn't been plain sailing..

When wrapping the ribs I started on one side getting correct alignment then following round to the other side. Unfortunately on this section no matter how much jiggling and persuading I tried it would not match up on the opposite side. Therefore I had to cut it to keep it true for the following sections.
This was a calculated cut though as I knew the keel and the subsequent outer panels would cover it.

Mischief managed!

When wrapping the ribs I started on one side getting correct alignment then following round to the other side. Unfortunately on this section no matter how much jiggling and persuading I tried it would not match up on the opposite side. Therefore I had to cut it to keep it true for the following sections.
This was a calculated cut though as I knew the keel and the subsequent outer panels would cover it.

Mischief managed!
Yes. I plan to fully paint it . Current idea is to get as close to RAL colours as possible and then add a small amount of weathering.So, I take it by the sanding marks, you are going to paint over it.
I maybe overreaching here, but unless you try....
One thing I have learnt with this paper medium modelling, even though I used relatively heavy paper was that heavy finger pressure will push the paper around causing slight bowing between the ribs.
I read another thread somewhere (probably on here, where someone was filling in between ribs to ensure smooth hull lines) I think I would try that in a future paper marine model or even possibly and airframe with the same type of wider spaced rib construction.
Anyway, as I want a smooth as possible finish, I needed to sand the joins and level out where ribs are obvious.
Surprisingly I have only used filler on the second bow section so far which was a result of my heavy handedness, but since then nothing. Great testament to the designer!
- Apr 5, 2013
- 13,499
- 9,551
- 228
If you apply strips of paper to the ribs, glued on well, it will prevent the "skeleton" effect, that can show of the rib structure. By giving more glue area, the tensile strength of the paper will then be realized. Some people fill these with Construction foam, but you have to really make sure you leave space for the foam to escape as it expands, which isn't hard to do if you go slowly, and make sure you can go all the way down the center line. It doesn't have to be chock full of foam either, to work. 
cant download pages G and M... or is it just me??:Computer:Work from the ends towards the center, as it is easier to fix center pieces than end ones. Also, to keep the Hull straight, make the ship symmetric, to keep the tension from wracking the hull. Looks like your off to a great start. I like the stand. Thanks.
p.s. Here's a link for this model if anyone else is interested.http://udonfactory.the-ninja.jp/paper/down/Udown.html
THE DC
Highly Esteemed Member
What I love about your thread is you are really detailing the challenges with this kit, and your solutions. Its very informative and appreciated.
- Apr 5, 2013
- 13,499
- 9,551
- 228
cant download pages G and M... or is it just me??:Computer:
I just downloaded those pages without problem. Try "Right Clicking" "Save Link As", and save to folder of your choice. That worked for me.
Got em... my fumble fingers did the walkingI just downloaded those pages without problem. Try "Right Clicking" "Save Link As", and save to folder of your choice. That worked for me.
That's great advice Zathros. I tried from one end to the other and made a mess. I'll try this on my next try. Thank you.Work from the ends towards the center, as it is easier to fix center pieces than end ones. Also, to keep the Hull straight, make the ship symmetric, to keep the tension from wracking the hull. Looks like your off to a great start. I like the stand. Thanks.
p.s. Here's a link for this model if anyone else is interested.http://udonfactory.the-ninja.jp/paper/down/Udown.html
That's great advice Zathros. I tried from one end to the other and made a mess. I'll try this on my next try. Thank you.
What I did was lay the deck top down on the desk, then I glued the central spine on in stages. The deck isn't flat along the total length of the boat. The last stern section drops down but you have the centre piece to guide you.
I used tacky glue for the first 8 to 10" and ensured it was accurately perpendicular by using a square and then supporting both sides while it set. (Ensuring also that the lines on both parts for rib position are aligned)
I worked my way aft and once I got to the section that dropped down, I just raised the bow end with scrap material so I could continue the process flat on the desk.
After this it was just a case of ensuring the rib pieces were cut accurately and then they slotted over the spine and a combination of the top edge of the rib and using the guide lines on the spine ensure it all stays true. (Working deck down still)
I did work bow to stern. There is a lot of play in the centre section until the reinforcement laterals go on, even then there is still some wiggle room to adjust.
Work has slowed lately for me, but an update is on the way.
OK. I haven't spent a huge about of time on this lately, but progress so far:
Have painted the stand and created a new plaque for the front. I didn't like the brown colour and prefer black as it recedes from focus and shows off the model more in my opinion for functional stands like this.
As it's going to be a representation of u552 I thought I add some info rather than the generic specs of the type.
Rubbing strips, keel, prop entry points, rudder/keel aft support and vent details added before giving it a quick blow over with primer.
Plenty of work to tidy it up. (Not too much though) I want to weather it later and the imperfections will lend themselves to areas of corrosion e.t.c
From what I've read the lower hull colour is RAL7016. Which by some chance is a currently in vogue colour which is also known as "anthracite grey".
Obviously there are going to be a range of shades from different suppliers so I'm going to be searching for one with the most blue tone I can find. (Apparently anti-foul paint contains large amounts of copper which leach out to keep plant and animal life at bay and also gives the blue/green tone)
Next steps: paint and begin working on hydroplanes, rudders and props.


Last edited:
- Apr 5, 2013
- 13,499
- 9,551
- 228
Very nice looking Hull. It'll be perfect when you fill the gaps. One of the best sub hulls I've seen! 
High praise indeed! Thanks! thumbsupVery nice looking Hull. It'll be perfect when you fill the gaps. One of the best sub hulls I've seen!
Need to hunt down the paint now so I can push on and start on the interesting/really challenging bits..
For anyone else looking to build a U-boat or any other Kriegsmarine vessels, I found this exceptional pdf on the web which is full of useful paint colour information.
https://amp.rokket.biz/docs/u-boat_colours_with_photos_5.pdf
https://amp.rokket.biz/docs/u-boat_colours_with_photos_5.pdf
I've managed to get the two colours in aerosol for the painting (RAL 7016 and 7038) from a specialist aerosol paint UK company so painting has begun on the hull.
In the meantime I started work on building the prop shafts.
This turned into a bit of a frustrating exercise! Rolling strips of paper to get correct diameters and uniformly smooth almost seemed beyond my skill.
Then I stopped, went away and thought about it and came up with a new tool and technique which I'm sure most of you already know.
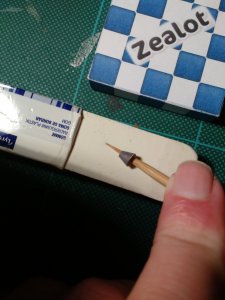
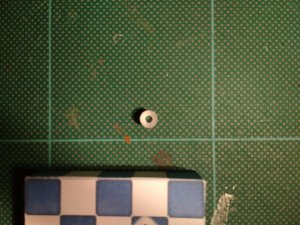
Firstly, using a bamboo skewer, I could shape the cone section by rolling the piece into an eraser.
This produced uniform curvature without lumps


Then the next obstacle was rolling the long strip of paper for the main shaft. No matter what amount of pre-forming and coercing, it always ended up with flat spots.
Finally, I twigged that I could wet the paper to soften it and so the tight inner roll edge was more flexible.
After a couple of soggy efforts I got the level of wetting right ( just inside edge) and I was finally happy with the end result. (licking it like a rolling cigarette most definitely does not work!)
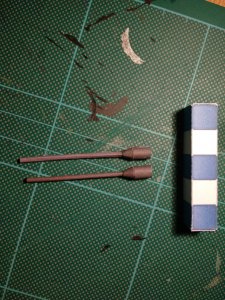
Here are the before (top) and after.

As you can see the after (bottom) prop shaft is much more uniform without as many creases.
and finally....
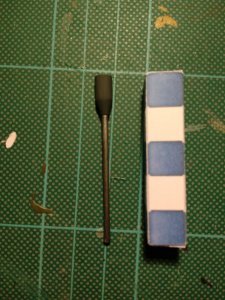
Painted up

Sorry it's a bit blurry, but you get the drift.
Got to get on with the painting of the hull now.
In the meantime I started work on building the prop shafts.
This turned into a bit of a frustrating exercise! Rolling strips of paper to get correct diameters and uniformly smooth almost seemed beyond my skill.
Then I stopped, went away and thought about it and came up with a new tool and technique which I'm sure most of you already know.
Firstly, using a bamboo skewer, I could shape the cone section by rolling the piece into an eraser.
This produced uniform curvature without lumps


Then the next obstacle was rolling the long strip of paper for the main shaft. No matter what amount of pre-forming and coercing, it always ended up with flat spots.
Finally, I twigged that I could wet the paper to soften it and so the tight inner roll edge was more flexible.
After a couple of soggy efforts I got the level of wetting right ( just inside edge) and I was finally happy with the end result. (licking it like a rolling cigarette most definitely does not work!)
Here are the before (top) and after.

As you can see the after (bottom) prop shaft is much more uniform without as many creases.
and finally....
Painted up

Sorry it's a bit blurry, but you get the drift.
Got to get on with the painting of the hull now.
Last edited:
- Apr 5, 2013
- 13,499
- 9,551
- 228

