Hello folks,
first of all please let me apologize for my lack of activity in this section. My plan was to start a "First steps in Gimp" thread but life interfered. This thread is not forgotten, it just needs a bit more time. Sorry for that.
Well then, lately my trusted HP Officejet 6700 scanner/copier combination has become a bit unstable. Whenever I scan a document the result has bright vertical lines on it. I suppose this is due to dust that has accumulated between the scanner lights and the scanner glass. Unfortunately the HP device is designed in such a way that the glass cannot be removed without tearing it apart, so I am unable to clean it from the inside. I haven't contacted HP's customer service yet because I assume that a repair will cost more than a new printer - IF a repair is possible at all.
The good thing is that bright documents are not affected. I can scan text and bright images without problems. The lines show up only on dark elements.
Yesterday I was thinking about getting rid of them using a filter similar to the auto-correction of a digital camera whose image sensor is not working properly. Some cameras have the ability to correct defective pixels by auto-detecting the faulty areas and rendering the flaws invisible. This is done by deactivating the defective pixels and interpolating them using the light and colour values from the surrounding areas. The first step to do so is to photograph a completely white or black canvas. So the errors become visible and can be filtered. I was thinking of applying the exact same trick to my scans.
To fix the scan it is important that only the brighter areas are toned down and the other areas are left unaffected. The HP tends to scan a document a tad brighter than it is supposed to be in order to capture all details which normally hide in the dark. Black appears not black but dark grey. This doesn't bother me much because I often have difficulty getting my images printed with the correct brightness so I keep them a bit brighter as they should be. And if I don't like the result I can always correct the exposure. It is easier to darken an image than to lighten it up; once an image is too dark it will loose detail which cannot be retrieved. (The same goes for too bright images.) I learned that from "Terminator 2: Judgment Day": The whole movie was shot a tad overexposed in order to preserve dark detail because of the high amount of night shoots. The images were darkened later during post-production.
Enough talk - now it's time to swing into action!
I chose a fairly dark image to give you an idea how the bright lines affect the scan:

Then I needed an image with all the bright lines only. I therefore scanned a completely black canvas at the same resolution and of the same size which looked like this:

Usually a scan is affectd by dust which is on the original and the scanner glass. That cannot be avoided no matter how careful you are and how dustfree the scanning environment is. A little dust is always there. Since this dust would affect the filter result I had to remove it first. To do so I loaded the image in Gimp.

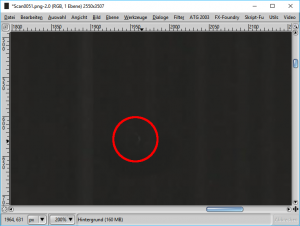
I zoomed into the image at 200 % to locate all inconsistencies (marked in red). Using the clone tool I removed all major spots. Use a fuzzy brush to avoid sharp edges. It is best to have the clone tool directed (I hope this is the correct English term, just refer to the following image):

Choose an area right below the defective spot, hold down the Shift key, move up the cursor (straight up!) and click. Since the clone direction is set you may continue by just clicking on any other spots to remove them. You have to choose a clone point straight below the cursor because you want the bright lines stay vertical. Once you choose a reference point beside it the line will not stay straight when you clone over it.
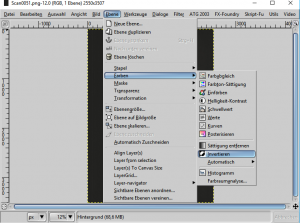
Once the image is cleaned up go to Layers > Colours > invert:

and save as *.png image (to avoid compression artifacts).

You can see that the filter sheet is not white but grey. This is due to the scanner scanning brighter and will help us in two ways now.
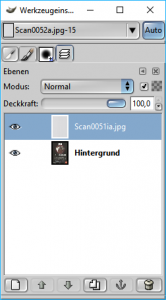
Load the scan into Gimp and drag and drop the bright filter sheet into the frame so that it ends up on top of the scan:

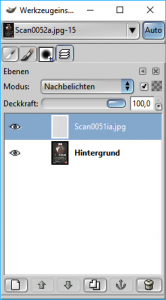
Switch the layer mode of the top layer to "exposure":

Et voilá:

No bright lines any longer AND the image exposure was corrected as well! Save the image and you are done.
first of all please let me apologize for my lack of activity in this section. My plan was to start a "First steps in Gimp" thread but life interfered. This thread is not forgotten, it just needs a bit more time. Sorry for that.
Well then, lately my trusted HP Officejet 6700 scanner/copier combination has become a bit unstable. Whenever I scan a document the result has bright vertical lines on it. I suppose this is due to dust that has accumulated between the scanner lights and the scanner glass. Unfortunately the HP device is designed in such a way that the glass cannot be removed without tearing it apart, so I am unable to clean it from the inside. I haven't contacted HP's customer service yet because I assume that a repair will cost more than a new printer - IF a repair is possible at all.
The good thing is that bright documents are not affected. I can scan text and bright images without problems. The lines show up only on dark elements.
Yesterday I was thinking about getting rid of them using a filter similar to the auto-correction of a digital camera whose image sensor is not working properly. Some cameras have the ability to correct defective pixels by auto-detecting the faulty areas and rendering the flaws invisible. This is done by deactivating the defective pixels and interpolating them using the light and colour values from the surrounding areas. The first step to do so is to photograph a completely white or black canvas. So the errors become visible and can be filtered. I was thinking of applying the exact same trick to my scans.
To fix the scan it is important that only the brighter areas are toned down and the other areas are left unaffected. The HP tends to scan a document a tad brighter than it is supposed to be in order to capture all details which normally hide in the dark. Black appears not black but dark grey. This doesn't bother me much because I often have difficulty getting my images printed with the correct brightness so I keep them a bit brighter as they should be. And if I don't like the result I can always correct the exposure. It is easier to darken an image than to lighten it up; once an image is too dark it will loose detail which cannot be retrieved. (The same goes for too bright images.) I learned that from "Terminator 2: Judgment Day": The whole movie was shot a tad overexposed in order to preserve dark detail because of the high amount of night shoots. The images were darkened later during post-production.
Enough talk - now it's time to swing into action!
I chose a fairly dark image to give you an idea how the bright lines affect the scan:

Then I needed an image with all the bright lines only. I therefore scanned a completely black canvas at the same resolution and of the same size which looked like this:

Usually a scan is affectd by dust which is on the original and the scanner glass. That cannot be avoided no matter how careful you are and how dustfree the scanning environment is. A little dust is always there. Since this dust would affect the filter result I had to remove it first. To do so I loaded the image in Gimp.

I zoomed into the image at 200 % to locate all inconsistencies (marked in red). Using the clone tool I removed all major spots. Use a fuzzy brush to avoid sharp edges. It is best to have the clone tool directed (I hope this is the correct English term, just refer to the following image):

Choose an area right below the defective spot, hold down the Shift key, move up the cursor (straight up!) and click. Since the clone direction is set you may continue by just clicking on any other spots to remove them. You have to choose a clone point straight below the cursor because you want the bright lines stay vertical. Once you choose a reference point beside it the line will not stay straight when you clone over it.
Once the image is cleaned up go to Layers > Colours > invert:

and save as *.png image (to avoid compression artifacts).

You can see that the filter sheet is not white but grey. This is due to the scanner scanning brighter and will help us in two ways now.
Load the scan into Gimp and drag and drop the bright filter sheet into the frame so that it ends up on top of the scan:

Switch the layer mode of the top layer to "exposure":

Et voilá:

No bright lines any longer AND the image exposure was corrected as well! Save the image and you are done.
Last edited:

