

Eastern Tn logging on the DG CC & W RR 1928
- Thread starter Bill Nelson
- Start date
You are using an out of date browser. It may not display this or other websites correctly.
You should upgrade or use an alternative browser.
You should upgrade or use an alternative browser.
lets hope so I'm struggling with the lead to the trail track near the log camp, and the lead to the log loading tracks. I keep doubting that it will fit as drawn. I may split the lead to the log reload on the east side of the wye, rather than on the southern lead. it would give me lots of extra room, but a logtrain coming out of the reload area would have to make an other couple extra moves, it would not be a straight shot through the wye, and down the helix. I have the switch in place on the upper end of the passing siding at the top of the helix. the upper switch, the inside track on the siding, and the spur to the Strong and Perry lumber company will all be on the Ridgemont block, which is looking like it will encompass the wye, a passing siding on the back end of the wye, and the logging camp .

I have started the roadbed in the New Ridgemont block. the outside track beyond the switch is a part of the Helix block, The inside passing track track will be the ridgemont block all the way down to the siding going to the Strong and Perry siding, so someone can run a train onto one side of the passing siding from the Helix block, and another from the ridgemont block.. at the switch, the rail changes from code 100 on the helix block to code 83 on the helix block. as soon as I spike the code 83 flex track to the bridge deck I can start laying track on the Wye. I'll want to do basic scenery under the bridge real fast, because I like to have some scenery under the bridge before I tack down the bridge. I also need to get to the other side of the aisle, and continue the roadbed. I'm thinking this creek under that bridge will have to cross into the middle of the wye somewhere, and out, so that will be three bridges on the standard gauge, and two high bridges in the narrow gauge, one on the main line, and a slightly lower one on the siding to the log reload.

I carved some rocks yesterday. I can put the bridge down, and get tracks onto the wye area on the upper deck now. also I carved rocks near the ore transfer, so I should be able to start installing the narrow gauge main in the corner by the ore transfer. that way both the narrow gauge and the standard gauge mains can start creeping down the upper shelf on the east wall toward the central peninsula. have a couple more bridges to do in the wye area, but only one is on the main. that bridge deck will become a priority soon. the rocks are kind of glossy, that is the basic latex house paint first coat, and it is still wet in the photos. it will get some acrylic artist and craft store paint on top of that. this stuff is just to insure that no white shows through.


We have some serious cold and snow for these parts anyway this week. I had the day off on Monday, for MLK day, and we had school on Tuesday, so I had a one day work week. snow and sleet has closed school the rest of the week. we new it was coming, so I moved some of my best firewood to the front porch on friday, so I have some awesome firewood I don't have to leave the porch to get . not been up in the RR room as much as I had hoped, but I have made some progress. I got land forms in around the new south fork of crooked creek where it crosses the wye. I like to get rocks carved under the bridges before they go in. IT slows down the extension of the main line considerably; but leads to a much beter looking finished product. I'm ready to apply a base coat of hydrocal in this area, in advance of the second layer of hydrocal, which I will carve the rocks into. I have built a 19 inch radius curved trestle deck, where the main crosses the creek, and spliced it into a section of flex track. As soon as the rocks are carved and painted under the bridge, I can cut the rails to fit on the flex track , and install the flex and the bridge. I have also put a blue point manual controller under the first switch to the wye, and have a hole cut for the linkage for the second switch. With the blue point controllers, I can have a cable to the opposite side of the peninsula, and a rod for the near side, so an operator will hopefully be able to turn a train on the wye from either the front or back aisle without having to walk around the central peninsula. I am almost ready to cut the piece of sub roadbed that will turn the corner to the upper standard gauge shelf on the east wall. I have the plywood already cut for that shelf , so progress down that shelf to the connection with the existing track @ Stateline GA. will be relatively quick. it's all on a nine inch shelf, that looses a lot of useable space to the sloped ceiling, so there might only be enough room for a passing siding there. Soon I will need to study my control panel. I know I'm going to need a 6 position rotary switch wired up for the Ridgemont block, which will encompass the wye. I may set up another block up there for the top of the logging camp; not really sure. This is so much fun


Attachments
carved some rocks and got a coat of my basic paint on it (latex interior paint, bought on sale, a gallon goes a long way) Later after this dries, may take longer than usual in the cold attic) I'll give the rocks a layer of darker and flatter acrylic Pewter gray, and some washes to bring out the shadows, as well as some drybrushing to bring out the highlights. once the rocks are painted, I can install the bridge, and get the track pushed farther toward the east wall's narrow shelf.


on the upper deck, in the NE corner, hard against the helix nook I've cut a notch for the stream that will come out of the mill pond for the new location of my water powered mill. the sub roadbed is smack down on top of the open grid benchwork, so the stream has to be cut into the open grid bench work, this was the first try, which wasn't cut deep enough. I came in and cut it out deeper later.. a bridge will be cut into the main later. this is a 19 inch radius so I can use the same template used on the last curved bridge!
Note all the sawdust on the main level. On a well ordered model universe, the upper shelves are built first.

as a sign of how crazy tis is going to be I put in a short section of the narrow gauge main's subroadbed. this shirt section is flat, as there will be a switch on it going down to the log reload, while most of the narrow gauge main will be going up toward the fourth level.

the same from the back aisle

The string is a surveying tool for getting the long skinny shelf installed that will let the narrow gauge climb the sloped ceiling
on the east wall. there are three standard gauge shelves that will be below this, so this will be one of the two areas of the layout that will be four levels deep; with the shelf on the west wall being the other. the radius on the narrow gauge is 17 inches , so all my Hon3 equipment will be able to handle it easily, unlike the 16 inch radius Gegokayoosa return loop; which my Keystone/NWSL shay does not like.

Note all the sawdust on the main level. On a well ordered model universe, the upper shelves are built first.
as a sign of how crazy tis is going to be I put in a short section of the narrow gauge main's subroadbed. this shirt section is flat, as there will be a switch on it going down to the log reload, while most of the narrow gauge main will be going up toward the fourth level.
the same from the back aisle
The string is a surveying tool for getting the long skinny shelf installed that will let the narrow gauge climb the sloped ceiling
on the east wall. there are three standard gauge shelves that will be below this, so this will be one of the two areas of the layout that will be four levels deep; with the shelf on the west wall being the other. the radius on the narrow gauge is 17 inches , so all my Hon3 equipment will be able to handle it easily, unlike the 16 inch radius Gegokayoosa return loop; which my Keystone/NWSL shay does not like.

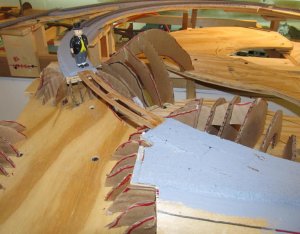
I’ve simplified there plan for the log reload off the narrow gauge. the first track on the outside is the tail track off the wye. the wye will be used, among other things, to turn passenger trains as they reach the top of the mountain. they will then back the last ways into State Line Georgia. State Line is exceedingly cramped with only one dual gauge passing siding, and the dual gauge turntable. turning locomotives and head end cars would be an excruciating pain., so we will back the trains in. the second track in, at the same level I had planned to use for camp supply, and for overflow passing siding on the wye. I had originally planned on two higher tracks at the reload, one for the surrey parker loader, and another for either empties or loads waiting to be loaded, or taken down the mountain. as I laid out the mock cardboard mock you of the roadbed , I decided it would be too crowded, when the narrow gauge main, and a narrow gauge passing siding on the spur to the narrow gauge side of the reload . I’m only building one standard gauge line to the reload. the narrow gauge will have a gravity dump, and one of my Surry-Parker skidded/loaders will load up the standard gauge cars. If I have another full or empty log train it will either go to the second track, if there is room, the long passing siding to the right of the wye, or even the passing siding on the far side of the aisle. that last option will be used as a passing siding for the main, as well as a marshaling area for the Strong and Perry Lumber company, and the Ore transfer off the Narrow gauge;( The Stong and Perry water powers mill will be at the far end of the right aisle. It’s temporary foundation is just a ways in front of the orange Timber Jack Hard Hat The ore transfer is at the opposite corner of this east wall), There is a long passing siding coming off the Helix (near the hard hat), and the long passing siding on the right of the wye, as well as the one on the shelf on the east wall, but things could get tight quickly if two of them are jacked up by a train being marshaled there .
Barely visible in the photo is a string for surveying purposes, easiest to pick up half way up on the left. this string marks the level of the bottom of the narrow gauge main, which will snake gently from it’s roadbed in the back to where it will leave the central peninsula on a walk under the bottom of which will be approximately six feet two inches off the ground. The narrow gauge main will cross over the creek and the wye on a kit bashed steel bridge that is close to 48 inches long . On the existing roadbed at the far end of the central peninsula, the log reload spur splits off the main. it will descend slightly. It will cross over the creek and the wye on a combination trestle logy bridge that I will piece together out of three existing slightly curved narrow gauge bridge decks. If I splice them together the resulting bridge deck will be almost six feet long, and the slight curves gives me the opportunity to build it on a slight curve, or with a delightful meander.
This is going to be a lot of fun!! It does not show well in this photo, but there are two bridges near where the sawmill scene will be, a 19 inch radius curved bridge on the main, and a short straight bridge on the lumber loading siding at the mill. I’ll want to get to work on the scenery under those bridges so I can get them in place. I have a portion of salvaged bridge deck I have cut to fit for the straight bridge, but will need to build the curved one. I have about seven pieces of Peco code 83 flex pre painted so I’m ready to paint the roadbed that isn’t painted yet, and start getting the track down. I’ll have to build theta curved bridge deck, and I’ll need to fire up the table saw to cut the lumber for that, as I’ved used up all my stringer and bridge tie material on the last two bridge decks I built.
I have gotten considerable work done on the layout, in spite of many trips to Kentucky Lake , Tax season, and the end of the Hockey regular season, and the first round of the NHL Playoffs. Getting the main line to the eastern shelf was complicated by a needed bridge on the mill creek in Perry's Gizzard. although I am cheating and using flex track, bridge ties are longer, and spaced closer than regular ties. it is best to hand lay the bridge deck to get it right. This one, like the last one was on a 19 inch radius, so you can look at earlier posts for construction details; the process was the same.

Here is the bridge deck ready to be installed. one neat tool I found is a fiberglass scratch pen, shown below. it is great for knocking the paint off the rail head of painted track, and for cleaning the webbing on the end of a rail where the rail joiner will go

I like to do the basic scenery below a bridge before installing it. this slows me down a lot, but If I don't do that, I either mess up the bridge by getting plaster or paint on it as I do scenery around it; or I skimp on the scenery trying to protect the bridge. Every bridge will be a focal point; so I try to take the time to do it right.

besides working on the mill creek bridge on the main line ( there will be another on the siding to the lumber loading area @ the Strong and Perry Mill) I also did some work with masonite backdrops.

The second level of the railroad in the south eastern corner of the room is a very narrow shelf, just wide enough for the main line. This short stretch of track is all that separates Crooked Creek TN. (The Berghausen-Shoemaker Lumber Companies saw mill company town) from the Yard @ Harlow TN. Harlow and Crooked Creek will likely be the busiest areas on the railroad, some some feeling of separation will be helpful in creating the illusion that this railroad goes some where. I minimized this shelf in this area, as scenic opportunities were very scarce on the first level's West, South, and east walls. putting this river crossing in near the tannery in the SE corner helps break up what other wise would all be flat narrow shelfs. Had I had a wider shelf on the second level of this corner, it would seriously degrade the visual impact of this lower river crossing. Making a good scene on the second level, with the skinny shelf will require that almost all of the scenery on the second level will need to be on the backdrop. on the lower level I was able to fill the corner will a cliff, and paint around it. I did not think that would work on the second level so I added a masonite backdrop curved through the corner, just behind the track. not sure what I'll paint there, but it will include mountains, to make the six feet or so from the Harlow Yard to the Crooked Creek yard limits seem like a trip that goes some where.

I got the masonite cut to size and fitted in place, and then painted it with my basic sky color paint Sherman Williams Brisk Day. this is also the color the room is painted, although I sheet rocked and painted this room close to 20 years ago and the Brisk Day fades with UV exposure from the skylight in the room. I also installed a short section of backdrop below the narrow gauge in the corner by the helix. just in front of this back drop is a long passing siding just off the top end of the helix. I will paint a back drop there as well. this is very close to the Strong and Perry Lumber company's water powered sawmill. the narrow gauge is directly over the standard gauge. I don't want to do another tunnel, there is one near State Line, that is inescapable, and they are exceedingly rare on logging RRs; so this back drop will help separate two scenes, and add some scenic depth to the passing siding off the helix, and the lead to the logging camp for the Strong and Perry outfit.
Time for me to go up stairs and work on screwing down the plywood on the third level shelf on the east wall so I can start putting down roadbed to unite the dual gauge track in State Line Ga to the mid level of the layout for the first time since I tore out my old central peninsula.
Nelson

Here is the bridge deck ready to be installed. one neat tool I found is a fiberglass scratch pen, shown below. it is great for knocking the paint off the rail head of painted track, and for cleaning the webbing on the end of a rail where the rail joiner will go
I like to do the basic scenery below a bridge before installing it. this slows me down a lot, but If I don't do that, I either mess up the bridge by getting plaster or paint on it as I do scenery around it; or I skimp on the scenery trying to protect the bridge. Every bridge will be a focal point; so I try to take the time to do it right.
besides working on the mill creek bridge on the main line ( there will be another on the siding to the lumber loading area @ the Strong and Perry Mill) I also did some work with masonite backdrops.
The second level of the railroad in the south eastern corner of the room is a very narrow shelf, just wide enough for the main line. This short stretch of track is all that separates Crooked Creek TN. (The Berghausen-Shoemaker Lumber Companies saw mill company town) from the Yard @ Harlow TN. Harlow and Crooked Creek will likely be the busiest areas on the railroad, some some feeling of separation will be helpful in creating the illusion that this railroad goes some where. I minimized this shelf in this area, as scenic opportunities were very scarce on the first level's West, South, and east walls. putting this river crossing in near the tannery in the SE corner helps break up what other wise would all be flat narrow shelfs. Had I had a wider shelf on the second level of this corner, it would seriously degrade the visual impact of this lower river crossing. Making a good scene on the second level, with the skinny shelf will require that almost all of the scenery on the second level will need to be on the backdrop. on the lower level I was able to fill the corner will a cliff, and paint around it. I did not think that would work on the second level so I added a masonite backdrop curved through the corner, just behind the track. not sure what I'll paint there, but it will include mountains, to make the six feet or so from the Harlow Yard to the Crooked Creek yard limits seem like a trip that goes some where.
I got the masonite cut to size and fitted in place, and then painted it with my basic sky color paint Sherman Williams Brisk Day. this is also the color the room is painted, although I sheet rocked and painted this room close to 20 years ago and the Brisk Day fades with UV exposure from the skylight in the room. I also installed a short section of backdrop below the narrow gauge in the corner by the helix. just in front of this back drop is a long passing siding just off the top end of the helix. I will paint a back drop there as well. this is very close to the Strong and Perry Lumber company's water powered sawmill. the narrow gauge is directly over the standard gauge. I don't want to do another tunnel, there is one near State Line, that is inescapable, and they are exceedingly rare on logging RRs; so this back drop will help separate two scenes, and add some scenic depth to the passing siding off the helix, and the lead to the logging camp for the Strong and Perry outfit.
Time for me to go up stairs and work on screwing down the plywood on the third level shelf on the east wall so I can start putting down roadbed to unite the dual gauge track in State Line Ga to the mid level of the layout for the first time since I tore out my old central peninsula.
Nelson
- Apr 5, 2013
- 13,499
- 9,551
- 228
The investment in time and money here is self evident. The execution of your project makes me want to come over and play with you with you trains!! This is so far beyond what I can do, all I can say is, incredible!! The fabrication of the rocok features is just mind boggling! ")
Have been busy. the school year is out, so I am just starting . couple months off, and have been at work in the RR room. I got the bridge deck installed for the bridge to the lumber loading siding @ the water powered sawmill. In the old Gizzard the sawmill only had one track, in this installment, it gets two, with the siding for unloading the logs peeling off at the switch just behind # 2.

I soldered on a lot of power drops, and hooked them up. I added some temporary jumper wires to the Ridgemont sub block down the east wall, so it is a part of the Gizzard block right now. Eventually I will have it powered off of a SPDT switch, so it can be a part of The Gizzard, or State line, depending on the operational need.

I have the main line hooked up all the way to State line, and the Ridgemont siding in. I had hoped to put two track on this nine inch wide shelf, but there wasn't room for that without clearance issues, and or pushing the outside track too close to the edge; as can bee seen in this photo, where I have propped up an NMRA standards gauge on the siding track. this will make operations here a tad tight, as this siding will be needed as a passing siding, and also to marshal cars to and from the ore transfer to the right up hill in State Line GA., and to and from the small sawmill to the left in the Gizzard .

With the jumper wire in place, trains are operational into Ridgemont. I tried to wire up state line, but it did not work. I'll need to check my connections, and possibly look behind the control panel, and do some trouble shooting. so far I have just run this track cleaning train up there. My next goals are to do the needed trouble shooting for State Line, and extend the roadbed farther onto the central peninsula to get the wye operationl, and the tracks into the logging camp at the log reload off the narrow gauge. I have been piecing together a massive steel bridge, which with the masonry ends, will be over six feet long. it will cary the narrow gauge about a foot to a foot and a half above the standard gauge at the wye ( I have yet to do the final surveying). this is going to be fun!!

I soldered on a lot of power drops, and hooked them up. I added some temporary jumper wires to the Ridgemont sub block down the east wall, so it is a part of the Gizzard block right now. Eventually I will have it powered off of a SPDT switch, so it can be a part of The Gizzard, or State line, depending on the operational need.
I have the main line hooked up all the way to State line, and the Ridgemont siding in. I had hoped to put two track on this nine inch wide shelf, but there wasn't room for that without clearance issues, and or pushing the outside track too close to the edge; as can bee seen in this photo, where I have propped up an NMRA standards gauge on the siding track. this will make operations here a tad tight, as this siding will be needed as a passing siding, and also to marshal cars to and from the ore transfer to the right up hill in State Line GA., and to and from the small sawmill to the left in the Gizzard .
With the jumper wire in place, trains are operational into Ridgemont. I tried to wire up state line, but it did not work. I'll need to check my connections, and possibly look behind the control panel, and do some trouble shooting. so far I have just run this track cleaning train up there. My next goals are to do the needed trouble shooting for State Line, and extend the roadbed farther onto the central peninsula to get the wye operationl, and the tracks into the logging camp at the log reload off the narrow gauge. I have been piecing together a massive steel bridge, which with the masonry ends, will be over six feet long. it will cary the narrow gauge about a foot to a foot and a half above the standard gauge at the wye ( I have yet to do the final surveying). this is going to be fun!!
Pretty much, I have a couple friends that serve in advisory positions, but almost all of the actual work over the last 20 years or so has been done solo..
I got into my control panel and found a check list. the box for running the control wire to the State line box was not checked off. a careful study of the crowded terminal strip showed no wire for the State line control attached. I took a multi meter to the rails in State line, and I had continuity between them. once again careful notes, and a check list saved me considerable diagnosis time.
I figured out what my mistake was. when I ran common rail busses for this level of the railroad, I ran one down the shelf on the east wall, and one down the shelf on the west wall. one was properly labeled, and the other just had an SL flag on it, and not the proper SL comm. when I first attempted to wire up the State line block, I mistook the partially labeled lead for a control wire, and hooked it up to the control rail.
the good news is I know exactly what I need to do to get the dual gauge yard in State line working. The bad news is I have to run close to 40 feet of wire; and fishing the wire through the roll top dispatcher's desk is a long frustrating job. besides the State line Dual gauge block, I also need to run control leads to a block for the narrow gauge mainline, and two or three blocks for the lower level of my central peninsula. So while I urn that one wire, I need to go ahead and run four, so I won't have to deal with that struggle any more
I'm well on the way to snaking six heavy stranded wires through the roll top desk, have them about half way through, past the first obstacle, but hung on the middle one. I'll have to crawl in there and manipulate it past the tight curve by hand. yesterday I was fixing my lawn mower, but I did order some supplies needed to finish up the main, some details to play with and some motors to re motor some of my locomotives I did some mowing yesterday finally, and today I have fixed my elderly tractor, so I'm ready to do some serious yard work, will get to fishing those wires through the desk later. once I have done that, there will be enough wires to run all the planned block, plus an extra, in case I want to wire a separate block for the narrow gauge part of the log transfer, of course, now that I think about it, a extra block on the lower pa of the log transfer would be nice also, it will only be one or two tracks, but the wye and the rest of the gizzard block will be the busiest place on the mountain division.
last night I spiked some code 55 center rails down my monster bridge deck, used about all my remaining code 55 rail. that helped stiffen up the bridgedeck. I'm test fitting the bridge deck on the bridge now.

here is the whole thing

this AM I got up into the RR room, and after a little prep time, started getting cork roadbed down on the back side of the wye. the tail track to the wye will lead to a semi permanant logging camp at the reload off the narrow gauge. I'll be able to get one of my Surry-Parkers on the layout soon perhaps.

the switch coming off the side of the wye will go to the log loading spur at the reload.

I already have bridge decks built, so it won't take too terribly long to get the long passing siding on the east side of the wye. in place. It's not perfectly situated, but will be very useful, as this is going to be the busiest area on the mountain division.
here is the whole thing
this AM I got up into the RR room, and after a little prep time, started getting cork roadbed down on the back side of the wye. the tail track to the wye will lead to a semi permanant logging camp at the reload off the narrow gauge. I'll be able to get one of my Surry-Parkers on the layout soon perhaps.
the switch coming off the side of the wye will go to the log loading spur at the reload.
I already have bridge decks built, so it won't take too terribly long to get the long passing siding on the east side of the wye. in place. It's not perfectly situated, but will be very useful, as this is going to be the busiest area on the mountain division.
got the cork roadbed sanded to round off the top edge, and smooth out the sided, and then painted with my base color latex house paint. The roadbed won't show when ballasted, but this is a big build, and I have a lot of track yet to lay, and it may be a long time till I get around to ballasting . I also paint the plywood near the track. that way if scenery does not get 100% of the way to the roadbed no bare plywood shows. next I will spray paint those bridge decks with the same gray and tan mix I use on my flex track so it blends. real progress! next I will be starting to put track down on the painted roadbed, and also push more cork into the log reload semi permeant camp, where I still have some tricky carpenty needed to reuse a segment of log cribbing and a log bridge from the old Terrapin camp.


I'm getting the big narrow gauge bridge close to the point where I can start to plan where it crosses over this wye, and the creek, at which time I can start planning the scenic land forms. there will be a ridge running down the center of this peninsula, cut through by the creek and the wye, tha will make a scenic divider down the center of the peninsula. . It will be tricky to pull off, lots of stuff will be going on here, and I don't want to make any of it look improbable or crowded.
I'm getting the big narrow gauge bridge close to the point where I can start to plan where it crosses over this wye, and the creek, at which time I can start planning the scenic land forms. there will be a ridge running down the center of this peninsula, cut through by the creek and the wye, tha will make a scenic divider down the center of the peninsula. . It will be tricky to pull off, lots of stuff will be going on here, and I don't want to make any of it look improbable or crowded.
I got the bridge decks for the bridges on the passing siding on the back side of the wye painted, and then I spiked some track on them. . I got most of the siding put in, but instead of working on the other leg of the wye, or working on the roadbed that will go to the tracks or the log reload off the narrow gauge ; I test fit the narrow gauge bridge. I think this is going to work!!
Nelson


Nelson