Star Wars T - 4 7 S n o w s p e e d e r 1:20 building thread

starbuck

Well-Known Member
Aug 15, 2013
898
1,825
93
Austria - Carinthia
Hi again,
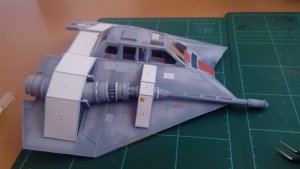
another beautiful model found on "paper-replika.com" - the T-47 Snowspeeder. Only short appearance in SW - EP V - but a cool mashine.

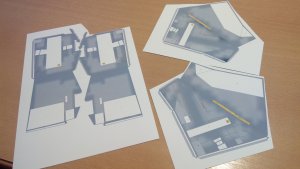
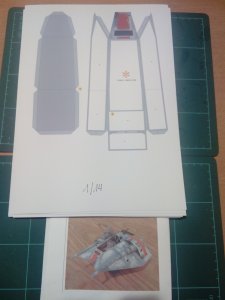
The model consists of 14 sheets and over 100 parts. Puuuh - how long will it take and how difficult will it be?
But there is also a description which will guide me through the building process.
May the force be with us.
---------------------------------------------------------------------------------------------------------------------------------
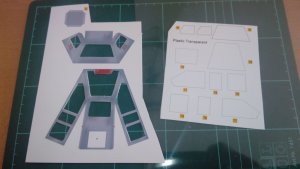
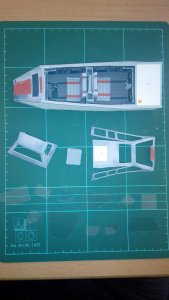
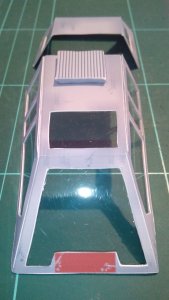
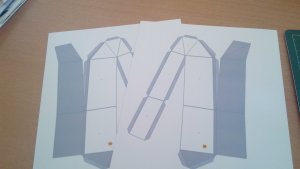
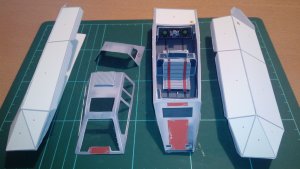
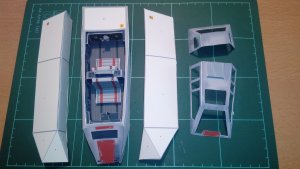
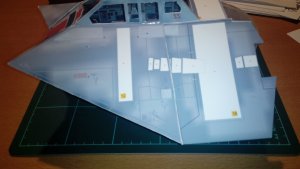
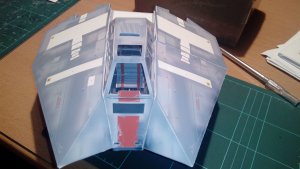
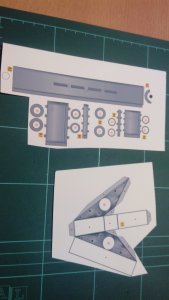
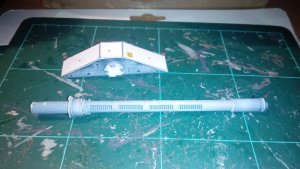
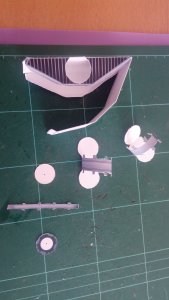
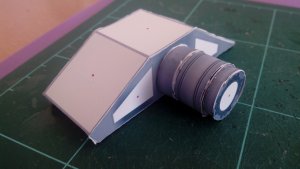
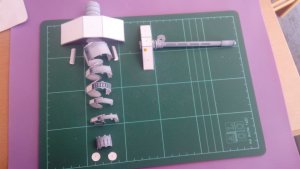
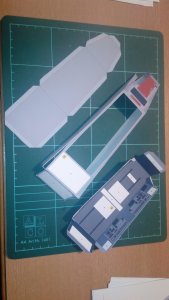
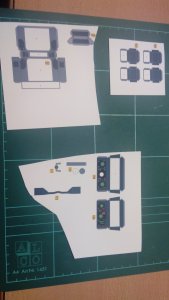
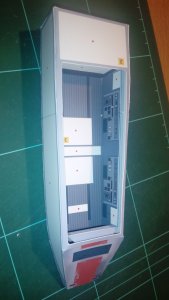
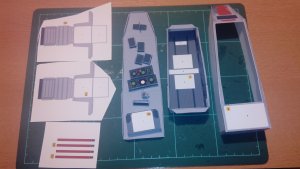
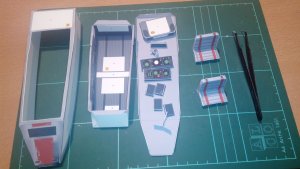
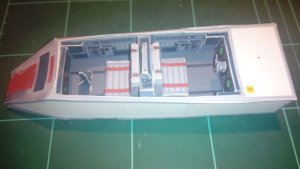
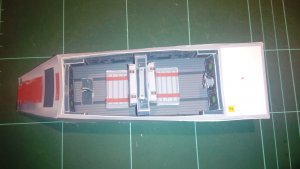
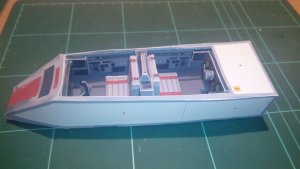
Now the pictures for the start - did not get any troubles so far.
Maybe the front-panel has to be corrected - I think it should not be round. I will decide when the next parts are coming.
 

Attachments

  • IMG_20140903_192541.jpg
    IMG_20140903_192541.jpg
    756.4 KB · Views: 35
  • IMG_20140903_201054.jpg
    IMG_20140903_201054.jpg
    749.6 KB · Views: 34
  • IMG_20140903_203605.jpg
    IMG_20140903_203605.jpg
    737.9 KB · Views: 34
  • IMG_20140903_203629.jpg
    IMG_20140903_203629.jpg
    635.8 KB · Views: 34
  • IMG_20140903_213826.jpg
    IMG_20140903_213826.jpg
    697.8 KB · Views: 34
  • IMG_20140903_222247.jpg
    IMG_20140903_222247.jpg
    861.1 KB · Views: 35
  • IMG_20140903_223950.jpg
    IMG_20140903_223950.jpg
    557.5 KB · Views: 32
  • IMG_20140903_224002.jpg
    IMG_20140903_224002.jpg
    624.9 KB · Views: 33
  • IMG_20140903_224014.jpg
    IMG_20140903_224014.jpg
    782.1 KB · Views: 41

zathros

*****SENIOR ADMINISTRATOR*****
Staff member
Administrator
Moderator
Apr 5, 2013
13,499
9,551
228
Off to a start, but before this comes back to bite you in the "end", fix the part I have circled, in the very least. Cut off the tabs. Make your own with scrap pieces of paper, that way you can line up the endges perfectly.This is is one of those models where everything has to be squared and the angles have to be right on the money. It may be better to cut parts than fold them. You will get an accrued intolerance which will make your model very unsatisfactory to yourself, based on the standard you have shown to us, and that you build at. Even if it means cutting it out and doing it again, it is too primary a feature to leave curved like that. Straight lines, and sharp crisp angles are the hallmark of this particular subject. Some of these spots should be reinforced with balsa wood strips if possible, anything to beep them straight. Color the edges of the parts too. This is where you might think of end result first. If you make a box, which will you see. Should the top of the front panel be visible from the top? Obviously not. Make the top the top, then you only have one edge you have to color in to match up. Any color works, it does not have to be a perfect color, but any color other than white, unless the parts is white, is better. You will have to build the outer box again, or disassemble this one, and remake it absolutely squared up. It will save you much trouble in the end. I follow what you do, I like your builds. I don't offer up critiques unless the modelers is worthy and has shown themselves to be a solid person. The picture I inserted shows how squared, and on the money the lines and angles must be. Each assembly builds on the priors connectedness. In reality, these models are harder than models with many curves, where much can be hid, it is not a simple model to build, and have it look good, that is. The space between the back and front seat (marked with "X") is a bulkhead. That part should be perfectly squared, and go all the way across. It is structural and will make the tube square up, and give it strength. That is why the white space on the floor goes all the way across. That is a part that if you use that tabs, will be almost impossible to make straight. It would be a great spot to stick a wing spar through to help when mounting the wings. You don't have to make these things exactly as they are shown. Plan ahead, Dnalor's thread is a great reference, those his is so big, you can get in it!

Get a good metal straight edge to fold with, and only fold as far as you need go. Symmetry is paramount. The wings will maintain symmetry. mounted to the fuselage, or "body tub" as it stands now. Good time to greeble too!

You cut those parts out perfectly, then somewhere, probably with the tabs, it started going off. Tabs are the bane of modeling. I always cut them off. Take this all with a grain of salt, or start over again, and make each part perfect. you will then want to put the model in a glass case and years from now, you will wonder how you had the patience to make it!

The boat picture which seems to have no relevance is the oldest model that I still have. I made it 24 years ago. It is still straight as an arrow. One of the seats fell out of the topside and got lost during a move, but I will restore it. It also sailed really well, yup, this boat has been on many a pond, and except for the Balsa strips on the sides edging, it is all paper. I used to let her go then go after it in a canoe. It is leaning to the left, 1/8th of an inch, in this picture, but is straight as an arrow. The bow curves up slightly. :)


pic-content.jpg


Fixthis.jpg

Excellent.jpg

Boat1.jpg
 

Cybergrinder

Member Extraordinaire
Jun 24, 2014
2,385
3,992
113
48
Johannesburg, South Africa
Nice job! Another one I've built as well :) I actually got frustrated with it, (also made some rather obvious mistakes as well) all the structal faults that Zathros mentioned reared their ugly heads. :( I did finish it but didn't cry too much when the toddler got hold of it.... (and we know what happened next)
IMGP0560.JPG

I have the old micro machines model of the snow speeder and when comparing them....(spoiler alert :)) there is absolutely no detail on the underside of the paper-replika model!
 

dnalor

Well-Known Member
Oct 28, 2011
917
186
58
Belgium Europe
Yeah a new thread...and it looks nice :)
but listen to Zathros...all the panels have to be straight and not saggy....normal paper is to thin.
i have builded all the panels with carton where i glued the main hull to...and after that i did a layer of thin carton with grey paper for the armour plating..
with that it became very stiff......and great to hide mistakes
I did build the wing carrier boxes on the side wrong....and i had to be very creative to fix it with a lot of gap-filling glue :)

the only wood i used under the floorplan of the cockpit..
the rest is carton and paper...(except the large guns, that are plastic rods)

and start thinking for a underside of the speeder :)

SO GOOD LUCK..and i enjoy looking to this build
 
  • Like
Reactions: starbuck

starbuck

Well-Known Member
Aug 15, 2013
898
1,825
93
Austria - Carinthia
@ Zathros and dnalor - many thanks for the given hints. Be sure that I will never understand as criticism but as friendly tip to help.
I use inkjet carton (not normal paper) for all my models. And so far I did not have too many problems with it.
As I am still a "young padawan" in modelling I still have much to learn. Also I am not (until now) experienced enought to make amendments for given models.
So I am listening to every tip and hope to get able to see problems myself (mostly I do) and to solve them (this is what I have to learn - help appreciated).
-------------------------------
Before reading the posts I already made the next parts including the assembling. (Cockpit and side parts)

As mentioned by Zathros and danlor - the not 100% exact cut or fold parts, caused problems by the assembling. I tried my best to "repair", but as I am not that experienced I have to live with my unprofessional solution.

But....this is a model I find worth making a second time when I am more experienced with paper modelling. And with the next version I will sure use the given hints. I alredy got several tips within this forum which helped very often - thanks again to all who ever gave hints.
-------
@ I did build the wing carrier boxes on the side wrong....and i had to be very creative to fix it with a lot of gap-filling glue :)
Here I was lucky - I think I made them correctly - I think.
 

Attachments

  • IMG_20140904_123526.jpg
    IMG_20140904_123526.jpg
    680.8 KB · Views: 29
  • IMG_20140904_125735.jpg
    IMG_20140904_125735.jpg
    885.3 KB · Views: 28
  • IMG_20140904_152751.jpg
    IMG_20140904_152751.jpg
    911 KB · Views: 29
  • IMG_20140904_125758.jpg
    IMG_20140904_125758.jpg
    561.1 KB · Views: 29
  • IMG_20140904_152726.jpg
    IMG_20140904_152726.jpg
    745.3 KB · Views: 30
  • IMG_20140904_153804.jpg
    IMG_20140904_153804.jpg
    770.6 KB · Views: 29
  • IMG_20140904_153832.jpg
    IMG_20140904_153832.jpg
    604.8 KB · Views: 29
  • IMG_20140905_202601.jpg
    IMG_20140905_202601.jpg
    495.4 KB · Views: 30
  • IMG_20140905_202619.jpg
    IMG_20140905_202619.jpg
    795.8 KB · Views: 33

starbuck

Well-Known Member
Aug 15, 2013
898
1,825
93
Austria - Carinthia
Nice job! Another one I've built as well :) I actually got frustrated with it, (also made some rather obvious mistakes as well) all the structal faults that Zathros mentioned reared their ugly heads. :( I did finish it but didn't cry too much when the toddler got hold of it.... (and we know what happened next)
View attachment 134785

I have the old micro machines model of the snow speeder and when comparing them....(spoiler alert :)) there is absolutely no detail on the underside of the paper-replika model!
Oh sorry to see the disaster with your snow speeder.
I agree no details on the bottom - I have to check dnalors threat to see wheter he did some "extras" on the bottom part.
 

Rhaven Blaack

!!!THE MAN BEHIND THE CURTAIN!!!
Staff member
Administrator
Moderator
Jun 12, 2009
12,492
9,854
228
Oregon
www.deviantart.com
This is really coming together BEAUTIFULLY!!!
I am GREATLY IMPRESSED with the progress that you are making on this project!!!
 

starbuck

Well-Known Member
Aug 15, 2013
898
1,825
93
Austria - Carinthia
Thank you RB. But if I see other projects I see that they are made much more precise. I am still not sure about my materials. - What is the perfect tool to prepare the folding lines?
Although I use a ruler for the folding lines and the cuts, the result is not always perfect. (I confess I do not use the ruler for smaller parts.) I think one of my "problems" might be that I am always in a hurry and therefore my work sometimes gets improper.
But I know my weakness and I am working on it. And I also collect the received tips.
Papermodelling is fun and (although not perfect) I am happy with the models I have.
 

dnalor

Well-Known Member
Oct 28, 2011
917
186
58
Belgium Europe
Offcourse, I did something special with the bottom :)
I made it like the real thing..just like the back side with the fins.

Let's see if you are as crazy as I am :)

But for now your build looks great....you are going extremely fast !

for the folding lines I also use a sharp knife with a ruler to cut the carton in half and fold it.
somethimes I glue the actual print over the carton parts..
and sometimes I glue first and and cut after that.

sometimes I try other ways...but the cutting is for me almost everytime foolproof.

And with paper..take your time...I do months before a ship is ready..
 

zathros

*****SENIOR ADMINISTRATOR*****
Staff member
Administrator
Moderator
Apr 5, 2013
13,499
9,551
228
The cockpit Canopy and glass is right on the money!! You actually did a really good save. Want to cheat a little? Print out the center section page, cut it out, back it with firm cardboard, or even cut up Popsicle sticks.
Cut out the center front piece. Don't leave any of the front center on presently there. Cut it out completely. Make two long 1/4" wide "L" shaped pieces and mount them such that when you mount the new center front piece, it will fit flush. It will not look like a repair, and in a sense, it isn't. You could do the same with the center piece, leave the old one in, and slip the new one right over it. It that proves not possible, the make sure you cut the sides, if you glued them, and gently wiggle out the center section. Score that parts just under the front and back, trying to get underneath, and if it rips out, it won't spread to the interior floor.

This model can be easily brought up to a high standard. Fix those things before you move on, it will motivate you for the rest of it. It is actually coming out really nice, if you do what I suggest, you will learn how to repair models, which is necessary if they fall or some one man handles them. When I worked at Sikorsky Aircraft, we had what was called a "File to Fit" program. It was exactly what it sounds like. This was on the first run of Blackhawk Helicopters. These were in actuality prototype aircraft, Blackhawks now only vary by 1 mm ( .039") overall on each helicopter, very right tolerances. The line workers were not allowed to alter parts. Since I was the one who made parts, I knew where they could be "fixed' and still maintain the proper dimensions. This was only on non-critical parts, door handle mechanisms, etc (I got a $600 dollar bonus for instituting a new method of manufacturing the Blackhawk door parts. That then became part of my job description, "POOF", no more bonus's. When you have +/- .005", you can use the whole tolerance up. Most stuff was +/- .002", the swash plate was a "Box" Dimension, +/- .0002 10ths of an inch. That is tight, but not too hard, when you have the machines to do it. Temperature changes of 10 degrees could mean a new set up and adjustment. This applies to paper modeling. You do what is necessary to get the project done right. The end justifies the means on paper models. :)
 
  • Like
Reactions: subnuke

Cybergrinder

Member Extraordinaire
Jun 24, 2014
2,385
3,992
113
48
Johannesburg, South Africa
Looking nice Starbuck! I also made this one with normal paper & on the whole was happy with the strength, the mistakes I made resulted in the "distortion" of the shape.

When it comes to the fins at the back normal paper isn't strong enough though, maybe "fill" the fin with another piece of paper to get the rigidity?

For scoring/cutting I use a steel ruler & empty fountain pen to score the fold lines and then craft/x-acto knife to cut. When it comes to folding tweezers are great with smaller edges, then you can get a nice tight fold by squeezing over the fold with the tweezers

For example on my 3PO all the fingers & the head were "tweezer folds" (nice pics on my introduction thread)
 

starbuck

Well-Known Member
Aug 15, 2013
898
1,825
93
Austria - Carinthia
@ dnalor - I will check and keep you updated
@ cybergrinder thanks for your helpful information - and thumb up for the Cc3PO
@ zathros - I think you should write a book titeled "tips and tricks for paper modelling". - I would buy it.
By now I am still scared to do such "repairs" - I will try your tips with an model with which I am not so happy with. (ARC fighter - also a model I decided to make a second time when I am more experienced.)
Thanks again to all for the tips - I cant get enough.
 

ASC Mclaren

Well-Known Member
Nov 18, 2011
884
369
58
Western Washington
For crisp folds score the fold line. Most of us have scoring tools, I use a pick from a nut cracker set, others use dull exacto blades, seem rippers or the like. When ever possible I use a metal straight edge to guide my scoring before cutting the parts out. I also often use tweezers or my rulers to aid in the folding. For what it's worth.

By the way, your Snowspeeder is looking good!
 

starbuck

Well-Known Member
Aug 15, 2013
898
1,825
93
Austria - Carinthia
I also use a dull blade. Because of the length it seems to be a litte too flexible - I will change to a shorter one and see whether it makes thinks easier (more exact). Thx for the info and the cheering words.

So next pics to follow: gun front side - I did not fix the parts because I am not sure how they fit, resp. how far the pipe has to go into the other part.
I will do the back parts first before assembling.
 

Attachments

  • IMG_20140905_202642.jpg
    IMG_20140905_202642.jpg
    773.1 KB · Views: 22
  • IMG_20140905_221935.jpg
    IMG_20140905_221935.jpg
    838.9 KB · Views: 21
  • Like
Reactions: Rhaven Blaack

zathros

*****SENIOR ADMINISTRATOR*****
Staff member
Administrator
Moderator
Apr 5, 2013
13,499
9,551
228
Dnalor deciphered and documented the gun assemblies very well! :)
 

starbuck

Well-Known Member
Aug 15, 2013
898
1,825
93
Austria - Carinthia
Thx zathros - I always check dnalors threat. He does his models alway so perfect and with additional details - wonderful and helpful for sure.

dnalor wrote: Let's see if you are as crazy as I am :) - I would like to be, but I will not. I will be happy if I am able to finish the model as is. I saw that you added many additional details - great work.

Now the back part of the guns. Not difficult if you follow the instruction, but small parts...... always the assamble-problems with small parts.

Damn problems with the upload .... will deliver later on.

Now a little rest for you - as I will do the second gun and it does not make sense to describe it as it is the same procedure as for the first one.