Buck Rogers Thunderfighter built by CrimsonLine, model designed by Martin Saenger

CrimsonLine

Member
Aug 14, 2014
83
49
23
51
Poughkeepsie, NY
My all-time favorite small spaceship design is the Buck Rogers Thunderfighter (Starfighter) designed by Ralph McQuarrie for the show Buck Rogers in the 25th Century starring Erin Grey. And Erin Grey. There might have been other actors in the show, too, but I can't remember them. Erin Grey. Ahhhhh.

Well, other than Erin Grey, the most worthwhile thing in the show was the Thunderfighter design. Gorgeous, unconventional, sleek and slender, with a definite hint of danger amid the glamour, it was much like Erin Grey. Ahem. And was memorable.

When I started back into building models, I wondered if I could find an affordable plastic model of the Thunderfighter. Monogram released a kit back in the 70's, and I found that those were running upwards of $75 on eBay, outside of this honest young pastor's price range. I looked at resin kits, and again, I was looking at close to $100 if I wanted the cockpit as well. That's when internet searching led me to Martin Saenger's paper model kit. A trip to Staples for some card stock and glue, and I was off to the races.

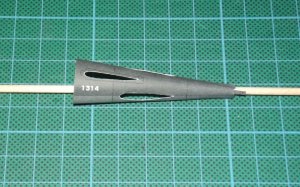
The build encompasses three pages of instructions. These are my pictures leading up to where I am right now, having finished page 1. The little vents halfway down the missile-shaped booms that form either side of the ship are bastiches, but it has been a real feeling of accomplishment getting this far. The model is elegantly designed, and the instructions give ALMOST enough information for me to figure out what to do. But at the top of page 2, I have some questions.

I am trying to figure out what part 92 does. Is it just a strip to join the ends of part 91 together? If so, why is it colored? There' say line down the middle of 92. Is that a score and fold line?

Also, the two diamond-shaped holes in part 37, what are they for? Should part 37 be glued down on the aft half?

Any input on these questions from folks who've built this ship before would be welcomed.

CrimsonLine

2014-08-07 21.19.26.jpg 2014-08-08 18.56.10.jpg 2014-08-10 15.37.50.jpg 2014-08-10 15.38.08.jpg 2014-08-11 20.39.44.jpg 2014-08-14 20.59.28.jpg 2014-08-14 20.59.39.jpg 2014-08-14 20.59.54.jpg
 

Rhaven Blaack

!!!THE MAN BEHIND THE CURTAIN!!!
Staff member
Administrator
Moderator
Jun 12, 2009
12,493
9,857
228
Oregon
www.deviantart.com
You are doing a GREAT JOB on this project so far!!!
To answer your questions:
Part 92 is used to help seal part 91 (which is rolled into a tube). The colour is there, just in case you do not get the seam just right, you will not have a gaping strip of white showing through. The line is to help with lining up the seam.

Part 37, the "diamond cut-outs", those are used to make certain that part 37 lines up properly onto part 32.

I hope that this information helps.

KEEP UP THE GREAT WORK!!!
 

Revell-Fan

Co-Administrator
Staff member
Administrator
Moderator
Aug 1, 2009
11,595
12,338
228
Vreden
... the Buck Rogers Thunderfighter (Starfighter) designed by Ralph McQuarrie for the show Buck Rogers in the 25th Century ...
:eek: EEEK - it wasn't designed for "Buck", it was for "Galactica"! ;)

Excellent progress, CL; those vents came out great! :)
 

Revell-Fan

Co-Administrator
Staff member
Administrator
Moderator
Aug 1, 2009
11,595
12,338
228
Vreden
Part 92 is a joining strip. Part 91 is rolled into a tube with the texture inside and 92 is used as some kind of (paper) tape strip to hold the piece together. It is best to pre-shape 91 first (roll it using a pencil or a rod) and then use that pencil or rod to press 92 onto 91 till glue has cured. I have attached a small pic for illustration; I'm one step ahead of you and have already attached part 90, so please imagine the felt-tip going through the whole tube.

DSCF6491a.JPG

The diamond holes in part 37 help align the parts. The straight line in the middle of part 32 will become visible through these holes. That line is no scoring / folding line. I usually glue the parts together.

DSCF6492a.JPG

I hope this helps! :)
 
  • Like
Reactions: ASC Mclaren

CrimsonLine

Member
Aug 14, 2014
83
49
23
51
Poughkeepsie, NY
Thanks, very helpful indeed! After I wrote my posts, I figured "why not?" and I went ahead and assumed that 92 was a joining strip, and glued everything together. It worked!

After all, what's the worst that's going to happen? I have to print out another page of card stock?

Sorry about my show mix-up, I was distracted by thinking of Erin Grey. ;)
 

Rhaven Blaack

!!!THE MAN BEHIND THE CURTAIN!!!
Staff member
Administrator
Moderator
Jun 12, 2009
12,493
9,857
228
Oregon
www.deviantart.com
Thanks, very helpful indeed! After I wrote my posts, I figured "why not?" and I went ahead and assumed that 92 was a joining strip, and glued everything together. It worked!

After all, what's the worst that's going to happen? I have to print out another page of card stock?

Sorry about my show mix-up, I was distracted by thinking of Erin Grey. ;)

I am glad that I was able to help.
I have to say that that is the one major thing that i like with paper models, if you make a mistake, it is easy and cheap to fix (unlike plastic).

Like @bgt01 said, NEVER APOLOGIZE for thinking of Erin Gray!!!
 
  • Like
Reactions: CrimsonLine

Revell-Fan

Co-Administrator
Staff member
Administrator
Moderator
Aug 1, 2009
11,595
12,338
228
Vreden
I have to say that that is the one major thing that i like with paper models, if you make a mistake, it is easy and cheap to fix (unlike plastic).
What? Did you say there are "plastic models" out there? I thought that was a myth..! :D:p:D
 

mcusanelli

Well-Known Member
Feb 26, 2008
374
121
58
Crimson,
It's looking really great! But be prepared, once you finish this, you're going to want to build another....and another....
And with the parts RB and RF created, you'll be able to have a whole squadron! After you have one under your belt, the rest are very easy - I like doing the tedious sections like the engines, nose cones, and those little side louver / vent things first, then the rest is smooth sailing.
 

CrimsonLine

Member
Aug 14, 2014
83
49
23
51
Poughkeepsie, NY
I figure that, once I've completed this one, I'll have a much better idea of things that can be done in parallel, rather than working through the numbers on the parts sheets one by one, in order. That'll allow me to maximize my building efficiency more.

My big problem is, I don't really have a ton of space at home to display a squadron of anything. Hmmm... maybe at my office...?
 

Revell-Fan

Co-Administrator
Staff member
Administrator
Moderator
Aug 1, 2009
11,595
12,338
228
Vreden
That's true! ;)

One more tip: The fun begins when you are getting to the nose cones. This is how you assemble them without creases or wrinkles:

Cut them out but leave the white areas intact. Pre-shape the part by rolling it over a pen or a rod multiple times. Start with a larger diameter, then switch to a thinner diameter.

DSCF6579.jpg

If you use strong paper you can make it a bit more flexible by using some water. Just turn the part around and put a drop of water (or some spittle ;) ) onto the back side. Be very careful when do you that because if you use too much water the part will become useless because the ink is affected.

DSCF6580.jpg

Unroll the part and make some small cuts into the white areas.

DSCF6582.jpg

Cut the areas out using a sharp pair of scissors. Roll the part up again and glue it together using the two joining strips. Make good use of the smaller rod when you are pressing the pieces together while the glue is curing.

DSCF6584.jpg

Et voilà, a perfect nose cone !

DSCF6585.jpg

DSCF6586.jpg

:)
 

Attachments

  • DSCF6583.jpg
    DSCF6583.jpg
    191.1 KB · Views: 14
Last edited:

CrimsonLine

Member
Aug 14, 2014
83
49
23
51
Poughkeepsie, NY
Okay, I'm having trouble figuring out how parts (90+91+92) fit in with (94+95) and 97.

I believe that part 90 is supposed to have the colored portion INSIDE the tube formed by 91+92, so that if you look down the inside of 91, you see the colored design of 90 at the far end. Then, I believe that I insert (90/91/92) up through the assembled (94/95) so that 90 is inside the barrel of (94/95) and the free end of 91 is poking out the narrow end of (94/95). I also believe that the tabs on the free end of 91 should glue in to the assembled (96+97). But then what? Do I then glue (96+97) to the tabs of 96? I have looked at all the detail pics of the end of the engine assemblies you guys have made, and I still don't understand the relationship.

And then, does the 90 end of the 90+91+92 assembly just hang out freely inside the engine? The edges of 90 not glued to anything around it?

Here's some pics of where I'm at.

2014-08-19 18.19.52.jpg 2014-08-19 18.20.04.jpg 2014-08-19 18.20.33.jpg
 

Rhaven Blaack

!!!THE MAN BEHIND THE CURTAIN!!!
Staff member
Administrator
Moderator
Jun 12, 2009
12,493
9,857
228
Oregon
www.deviantart.com
OK, at this point, go ahead and assemble parts 96 & 97. After they are dry, slide (96+97) over the glue tabs of (91+92) (making certain that the (inner) edge of 97 is flush with 91). After that drys, slide the assembly down over the glue strip (95) that you had attached to 94 earlier.
Yes, the inner exhaust assembly will hang free (so to speak). There is nothing to worry about.

GOOD LUCK with the rest of the build!!!
 

CrimsonLine

Member
Aug 14, 2014
83
49
23
51
Poughkeepsie, NY
Grr! Getting the forward part of the sponsons to actually connect to the tiny tabs at the forward end of the grill-things AND keep their shape and connect all the way to the front of the ship is very, very hard. I may have ruined the thing.
 

Revell-Fan

Co-Administrator
Staff member
Administrator
Moderator
Aug 1, 2009
11,595
12,338
228
Vreden
Oh no! I'm so sorry to hear / read this. However, there is always a way to solve the problem. If you are dissatisfied with the look of the sponsons just make new ones and cut off the first ones.

Try this: First glue one of the long ends of the sponson to the center skeleton. Nothing fancy, don't roll the part yet; let the other end "float" in mid-air, so-to-speak. Use a long rod to press the long tab against the center skeleton till glue has cured. Then apply some glue to the tiny flaps of the grill thingie (put some glue on the tip of a toothpick and cover the flaps) and the other long tab of the sponson. Wrap the sponson around. Then make sure that the long flap meets its position on the other side (take care, it must meet the center skeleton below these notches in the sponson formers). Do not apply too much pressure or you will end up with a dent. Only push where the tab begins. Don't worry about the white formers next to the sponsons which you have already glued to the center skeleton, they can be pressed back to shape later. Then push a thin rod through the notches of the sponson formers and press the long flap against the center skeleton till you feel that the glue is curing. Then push and pull the sponson to shape with a rod using the markings on the center skeleton as guide lines. Only push and pull where the tab meets the center skeleton, use your fingers to push and the rod to pull. That way you should be able to succeed. :)