

If I may give you one very important tip when it comes to handling tiny parts: Don't snee--- HA-CHOOOO! ... Oops, sorry! :mrgreen:I have got to this............ Number 102............ This is gonna take me a while .....sign1
The UHU02 Colonial Viper appreciation thread
- Thread starter Revell-Fan
- Start date
You are using an out of date browser. It may not display this or other websites correctly.
You should upgrade or use an alternative browser.
You should upgrade or use an alternative browser.
View attachment 121452
AgO2: Nice!
I have got to this............ Number 102............ This is gonna take me a while .....sign1
For those small parts, you need some help from a form. In this case, you can use a dowel, micro screw driver, metal tubes, etc. at is the same circumference as the part. You wrap the part around the form and hold until the glue sets and the form also helps in placing the part in its right place. When the part is ready, slide it onto its place. This is a trick to help those of us with big fingers. Good luck and see you around the forum.:thumb:
Whaaaat??? I'll have to build such a small part like that??? Well, since I've started it, I might as well go on and finish it!
Don't worry, pal. Dan only photographed the parts while they were sitting on top of the remains of a chopped oak. If you take a closer look at the pics you will certainly notice the tree-rings.Whaaaat??? I'll have to build such a small part like that??? Well, since I've started it, I might as well go on and finish it!
Or does anyone really believe that this was in fact his finger tip??? sign1
Don't worry, pal. Dan only photographed the parts while they were sitting on top of the remains of a chopped oak. If you take a closer look at the pics you will certainly notice the tree-rings.
Or does anyone really believe that this was in fact his finger tip??? sign1
Well, here it is, just to satisfy the arguement ..... sign1sign1

You guys made me laugh so hard at my job that everyone here started looking at me with that "there goes that nutcracker again" face...


@VBSargent: Your build is coming along BEAUTIFULLY.
It still AMAZES me that you are building this at 1:72 scale. Here I thought that 1:50 scale was small for this project. Then again AMAZING in really not the word to describe what you are doing.
KEEP UP THE GREAT WORK!!!
It still AMAZES me that you are building this at 1:72 scale. Here I thought that 1:50 scale was small for this project. Then again AMAZING in really not the word to describe what you are doing.
KEEP UP THE GREAT WORK!!!
Cant get access
A question to all participants, (excl myself, of course, as I am asking the question!:mrgreen")
I have my own ideas as to how my diorama is going to be put together for the Viper. A Viper in repair is the general idea!.
I have searched the internet to try and find a pic of a Viper in repair, but cant find one!!!!
My question is: Does the Mk II Viper have any service access panels in the bodywork ? Surely, there must of been a means to access the internal workings without having to remove ALL the bodywork.
My idea is to create something like the X-Wing that Master UHU02's friend has built....
A question to all participants, (excl myself, of course, as I am asking the question!:mrgreen
I have my own ideas as to how my diorama is going to be put together for the Viper. A Viper in repair is the general idea!.
I have searched the internet to try and find a pic of a Viper in repair, but cant find one!!!!
My question is: Does the Mk II Viper have any service access panels in the bodywork ? Surely, there must of been a means to access the internal workings without having to remove ALL the bodywork.
My idea is to create something like the X-Wing that Master UHU02's friend has built....
- Apr 5, 2013
- 13,496
- 9,548
- 228
View attachment 121452
AgO2: Nice!
I have got to this............ Number 102............ This is gonna take me a while .....sign1
View attachment 121453View attachment 121450
That better be your finger!
That better be your finger!
Oh, it is..... I dont hang out here often, it is against the rules ...... sign1sign1
A question to all participants, (excl myself, of course, as I am asking the question!:mrgreen
I have my own ideas as to how my diorama is going to be put together for the Viper. A Viper in repair is the general idea!.
I have searched the internet to try and find a pic of a Viper in repair, but cant find one!!!!
My question is: Does the Mk II Viper have any service access panels in the bodywork ? Surely, there must of been a means to access the internal workings without having to remove ALL the bodywork.
My idea is to create something like the X-Wing that Master UHU02's friend has built....
I have also looked and cannot find one that has open access panels. I will semi skin my build and will work out some kind of open panels display and probably make a full engine mock-up in a cradle to place along side the Viper. If you find any maintenance pics of the Viper, make sure to place a link to it. Good luck and see you around the forum.:thumb:
silveroxides Viper
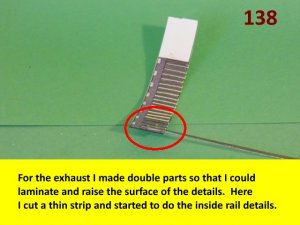
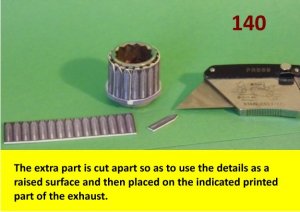
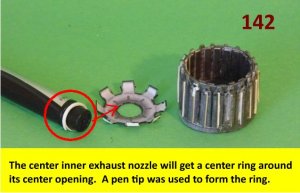
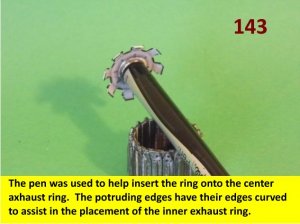
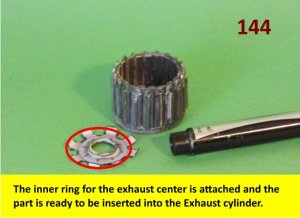
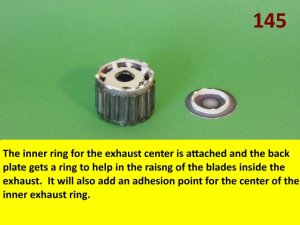
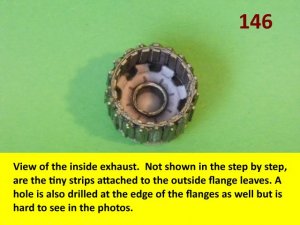
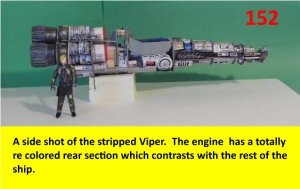
The work continues as as usual, my detail obsession gets the better of me. The exhaust should be very simple but I went overboard and super detailed the exhaust. I used the dark inactive color versus the orange flame or blue ion colors. The build process will take two posting to conclude and the rest will be coming next posting.
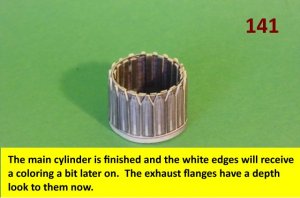
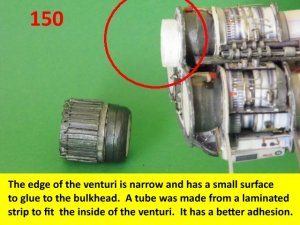
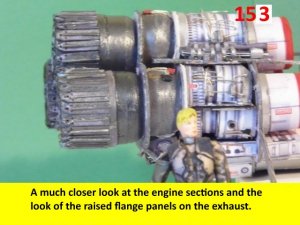
Looking at the exhaust, the designers of the Vipers, I assumed wanted to have a modern jet exhaust look to it, but in a real engine, the flanges would narrow down to restrict the exhaust flow. The flanges look nice but they serve no purpose in the model. I was seriously thinking of making the narrow exhaust but I may still do it later if I should decide to make that extra engine on a cradle. At the moment, the engine are done and I will work on the ammo trays and landing skids. I still have the ideas for making those access panels, which will make skinning the Viper a bit easier. I do not plan on making a dressing up and taking off the skin model, but a bit more static display so I will not worry too much for the skinning. The vent holes will provide a challenge, but if it does, I have another option for that. Enjoy and see you all next time with more updates.
Keep up the great work guys. There are many techniques being used in this thread and they are all very informative Enjoy and see you all around the forum:thumb:
The work continues as as usual, my detail obsession gets the better of me. The exhaust should be very simple but I went overboard and super detailed the exhaust. I used the dark inactive color versus the orange flame or blue ion colors. The build process will take two posting to conclude and the rest will be coming next posting.
Looking at the exhaust, the designers of the Vipers, I assumed wanted to have a modern jet exhaust look to it, but in a real engine, the flanges would narrow down to restrict the exhaust flow. The flanges look nice but they serve no purpose in the model. I was seriously thinking of making the narrow exhaust but I may still do it later if I should decide to make that extra engine on a cradle. At the moment, the engine are done and I will work on the ammo trays and landing skids. I still have the ideas for making those access panels, which will make skinning the Viper a bit easier. I do not plan on making a dressing up and taking off the skin model, but a bit more static display so I will not worry too much for the skinning. The vent holes will provide a challenge, but if it does, I have another option for that. Enjoy and see you all next time with more updates.
Keep up the great work guys. There are many techniques being used in this thread and they are all very informative Enjoy and see you all around the forum:thumb:
Attachments
That exhaust looks AMAZING!!!
You did a GREAT JOB on detailing it out!!!
when I rebuild this in 1:32 scale, I was thinking of doing the same thing.
You did a GREAT JOB on detailing it out!!!
when I rebuild this in 1:32 scale, I was thinking of doing the same thing.
I would screw the thing down to the work bench, I looks like it is about to flare into full afterburner mode and take off!!!!
Beautiful work on that nozzle!!
Beautiful work on that nozzle!!
silveroxides Viper
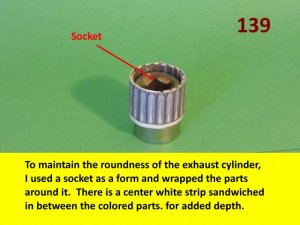
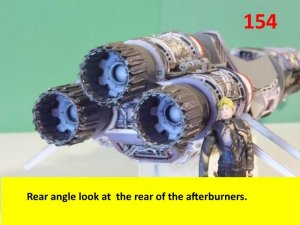
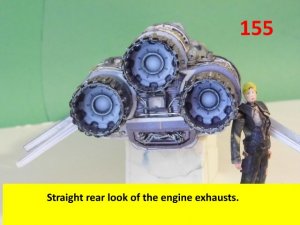
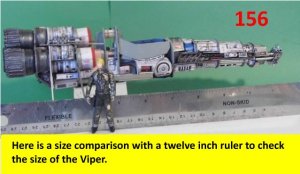
With so many modelers making the Viper, it is hard to guess who is being praised. On my behalf, thanks for looking in and for all the well wishes. Here are the final photos of the engine construction and on to the next steps. With the engine exhaust attached, The Viper is starting to take its prominent shape. With the use of the forms, The exhaust and other round parts have maintained their shape. Enjoy and see you all soon with more build updates. I will sit back and enjoy the other viper builds.:thumb:
With so many modelers making the Viper, it is hard to guess who is being praised. On my behalf, thanks for looking in and for all the well wishes. Here are the final photos of the engine construction and on to the next steps. With the engine exhaust attached, The Viper is starting to take its prominent shape. With the use of the forms, The exhaust and other round parts have maintained their shape. Enjoy and see you all soon with more build updates. I will sit back and enjoy the other viper builds.:thumb:
Attachments

@Silveroxide: The way you mounted the exhausts is a GREAT idea.
I makes total sense.
The engine section (as a whole) looks FAN(FRAKKING)TASTIC!!! Then again I would not expect anything less from you.
I makes total sense.
The engine section (as a whole) looks FAN(FRAKKING)TASTIC!!! Then again I would not expect anything less from you.
@AgO2: Those engines look bloody brilliant!!!!!
You are right, I like the contrasting gunmetal finish to the aft end too.
And a good idea on strengthening the jointing faces.:thumb:
At first you said you were following OUR builds for ideas, I think the coin has now flipped.....!:mrgreen:
You are right, I like the contrasting gunmetal finish to the aft end too.
And a good idea on strengthening the jointing faces.:thumb:
At first you said you were following OUR builds for ideas, I think the coin has now flipped.....!:mrgreen: