bsg colonial blaster (stevespaper)
- Thread starter starbuck
- Start date
You are using an out of date browser. It may not display this or other websites correctly.
You should upgrade or use an alternative browser.
You should upgrade or use an alternative browser.
I use wood glue (It is white in the bottle but after it is dry it gets transparent) That glue didn´t make those filaments.
For small parts i make a blob on a paper at take a pin or something like that for getting it on the part i will glue.
Thank you guys for your input, but I was asking starbuck in order to understand why the glue gets on his parts and to give him some advice on avoiding that.For me, I use this one. The excess of glue disappear when it dries and there is no changing on the colors. The paper does not soak it too much so I never have waves in my paper joints. Plus, it dries faster than wood or white glue.

I think he uses some glue like "UHU" or "Patex", this is a clear universal adhesivehttp://www.dict.cc/englisch-deutsch/adhesive.html which tends to pull threads.
I sometimes also use this glue but only for big parts where i must fill some gaps or which must hold more.
I sometimes also use this glue but only for big parts where i must fill some gaps or which must hold more.
Hi thanks for all the comments and tips.
As mentioned by Dopedidu I use UHU - and I usually glue the small parts to the big ones, also by making a blob on paper and using a pin to get it on the parts. Maybe I should use another glue like Dopedidu proposes to avoid the glue threads.
On the other hand by working with very smal parts my fingers (also my tweezer) are full with glue which is not helpful at all ;-)).
In next time I will change my glue and try to work more slowly and carefully - maybe my results are getting better.
Thanks again and further tips welcome.
Thanks again,
@ revell-fan: how is the status of your project Viper Mark I, did you already share some pics?
------
Regarding Tips - I will try - thx again.
---
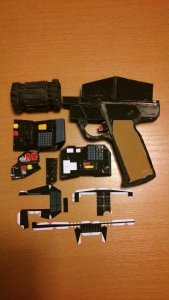
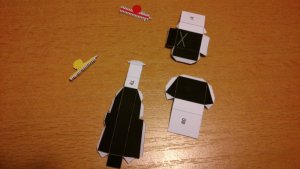
Update Colonial Blaster: parts 71-73 easy to cut but not so easy to assamble - tip first folding and assembling without gluing.
.........
@ revell-fan: how is the status of your project Viper Mark I, did you already share some pics?
------
Regarding Tips - I will try - thx again.
---
Update Colonial Blaster: parts 71-73 easy to cut but not so easy to assamble - tip first folding and assembling without gluing.
.........
Attachments
Viper Mk. I is still on hold. I'm finishing the Mk. II and the Hangar Bay dio for Rhaven and the others first.
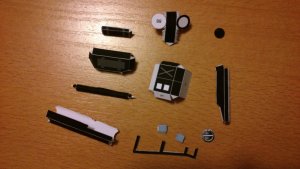
Parts 71 - 73 form a piece which can be found on the TOS Base Star and the TOS Galactica Gun Emplacement studio models, too:

Source: http://www.byyourcommand.net/cylongallery/displayimage.php?album=190&pid=18374#top_display_media

Source: http://www.modelermagic.com/wordpress/wp-content/uploads/2009/05/100_1413.jpg
They were the last parts to be unfolded and required several redesigns because in the course of the design process many many new close-up pics of the original kit part popped up.
Parts 71 - 73 form a piece which can be found on the TOS Base Star and the TOS Galactica Gun Emplacement studio models, too:
Source: http://www.byyourcommand.net/cylongallery/displayimage.php?album=190&pid=18374#top_display_media
Source: http://www.modelermagic.com/wordpress/wp-content/uploads/2009/05/100_1413.jpg
They were the last parts to be unfolded and required several redesigns because in the course of the design process many many new close-up pics of the original kit part popped up.
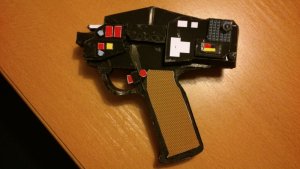
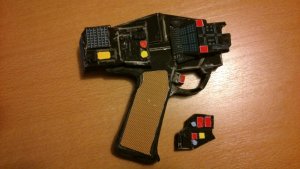
The final assembly should be a piece of cake! :thumb:
The most important thing is to align the detail parts and the muzzle correctly.
The most important thing is to align the detail parts and the muzzle correctly.
Hi again,
the final assembley took time but was not that difficult.
Til now the most difficult model I built - took a lot of time - but it is worth spending.
Best tip received during this build was to take a glue which does not make traces.
Enclosed final picture - and see you again with the next challanging model.:thumb:
Attachments

Hey, that looks really great! Congratulations! And don't worry about the stains; Galactica and Star Wars models come to life with them. :thumb::thumb::thumb:
I really like the result and I'm looking forward to seeing your next project. CU!
I really like the result and I'm looking forward to seeing your next project. CU!
CONGRATULATIONS on your build!!!
You did a GREAT JOB on it!!!
I was the one who did the test build on this model and I have to say that I enjoyed every minute of the build.
I am looking forward to seeing what you are going to do next.
You did a GREAT JOB on it!!!
I was the one who did the test build on this model and I have to say that I enjoyed every minute of the build.
I am looking forward to seeing what you are going to do next.
Thanky you for the feedbacks. It was challanging but funny to build. Congratulation to the person who created the paper model. This person is the hero.
See you.....
See you.....
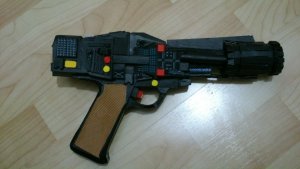
....late update - really late update:
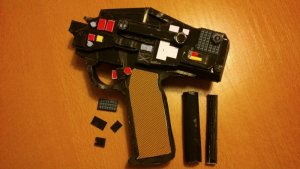
I was not 100% happy with the result of the blaster. So I decided to take acryl colours to recolour the model.
First I wanted just to correct the errors and the white lines where appearing but I had to realize that it would make things worse.
So I decided to recolour the whole model (not all parts to be honest - only those which are coloured with only one colour).
This is the result - my new refurbished blaster.