

I downloaded the instructions and history papers. Thank you Mr. Rose, not only for the model but the history lesson, too, Very impressive amount of research. I probably won't build the full size model, first because I don't have a fireplace, and two, my wife wouldn't let me build a 4 foot ISS, so I don't see her approving a 6' airplane. I may one day drop it down to 1:48 or 1:32 and make it for my office. But to everyone, whether you plan to build the model or not, you should load the instructions and history page, it's an excellent read!!
You are using an out of date browser. It may not display this or other websites correctly.
You should upgrade or use an alternative browser.
You should upgrade or use an alternative browser.
The instructions are unbelievable. I have never seen instructions so clear and precise. Brilliant effort!
Zathros, you're one up on me... There's no way my wife will let me put something that big up in the house... On the other hand, I think I'll reduce it about 50% and hang it from my office.
That way I still get to build at home, and it won't overcrowd my office.
That's what the garage is for! :mrgreen:
I have just finished mine at approx 1:17 scale (A4 card) and am now busy re-arranging the full size parts to enable me to print "A3" sized parts on A4 sheets.
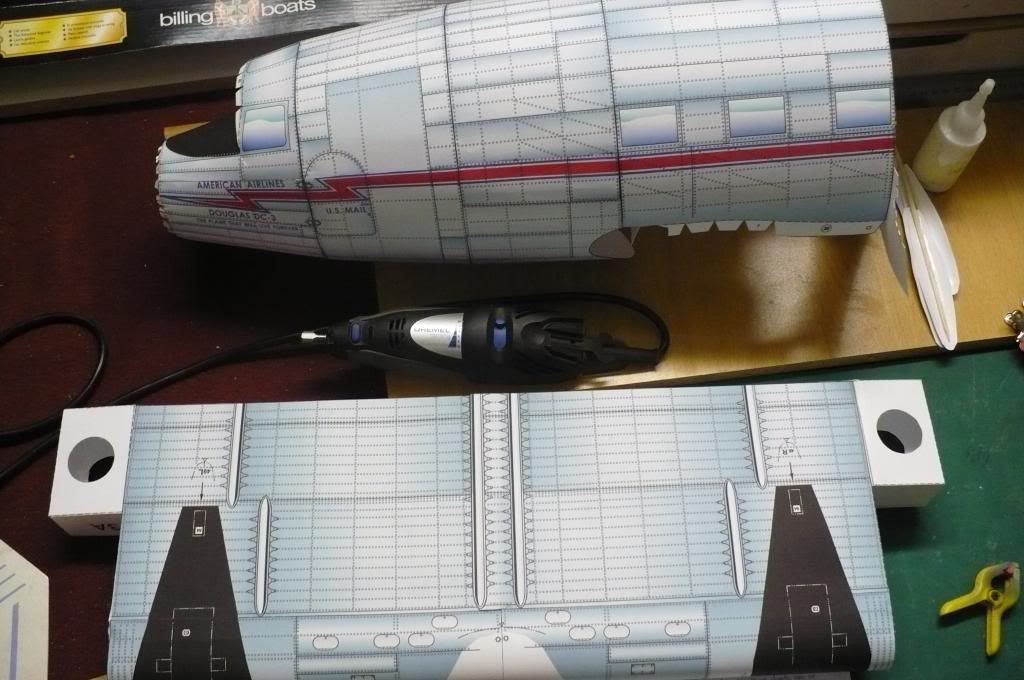
I found in step 8 that the fit of the wing skins was so tight that it creased the leading edges. I found that part No.8 was to blame and so I modified parts 1 & 3 where part 8 butted up by cutting off the tab on the top rear of part 8 and fitting a corresponding tab on parts 1 &3. The side and bottom tabs on part 8 were then bent slightly further forward to reduce the length of part 8. This allowed part 8 to "slide". Part 8 was dry fitted and when the wing skin was then fitted and glued, part 8 was pushed forward to meet the leading edge and then the tabs glued using access from the wing roots.
I found that although I lined up the engines with the registration marks on the wings, the starboard engine nacelle drooped lower than the port nacelle. This was not obvious during the build so the next time, I will mount the engine nacelles after the wings are fitted to the centre wing and fuselage sections. This way, you can sight line the nacelles with the fuselage and each other before fixing.
Z
Zathros
I think it would be far more beneficial if you posted pictures to highlight the difficult areas. , even after the fact.
The problem with the alignment of the engine is straight forward. Unfortunately, the model is completed so you cannot see the mod to part 8, however, when I start soon on the full size model, I will take pics of the part 8 mod and post.
Hello,
Adolf Pirling who did the control build has a nice report here: http://www.kartonbau.de/forum/index.php?page=Thread&threadID=28166 Maybe it would be beneficial to have a look.
I remember seeing the Alan Rose models in Waldenbooks when I was much younger.
Kind Regards,
Cris
Adolf Pirling who did the control build has a nice report here: http://www.kartonbau.de/forum/index.php?page=Thread&threadID=28166 Maybe it would be beneficial to have a look.
I remember seeing the Alan Rose models in Waldenbooks when I was much younger.
Kind Regards,
Cris
Z
Zathros
The problem with the alignment of the engine is straight forward. Unfortunately, the model is completed so you cannot see the mod to part 8, however, when I start soon on the full size model, I will take pics of the part 8 mod and post.
You did a re-size on the model? Believe it or not, not everything scales up or down the way you would expect. It wold be nice if you started a build thread and posted pictures of what you have made (in a separate thread) of your models. I would encourage anyone building this to start their own build thread and post pictures,. That would be the best way to thank Mr. Rose.
N
niebla de fuego
You did a re-size on the model? Believe it or not, not everything scales up or down the way you would expect. It wold be nice if you started a build thread and posted pictures of what you have made (in a separate thread) of your models. I would encourage anyone building this to start their own build thread and post pictures,. That would be the best way to thank Mr. Rose.
Agreed 100%.
Seeing photos would be very nice. i'm sure Alan Rose would also appreciate that.
WOW :shock: who'da thought this model would ever show up online. I have seen this model on e-bay go as high as $175. I finally lucked out and got it for $35 at a bookstore in Auburn WA. I'm still happy to have it. I may have to get busy and download this model and build this version and hoard my "book" copy. I first saw this model at a Puyallup model expo show back in the eighties sometime.
For the record I really miss paper models international. Whoever bought it must've hoarded all the kits for himself. BILL in Idaho
For the record I really miss paper models international. Whoever bought it must've hoarded all the kits for himself. BILL in Idaho
My wife has give me permission to mount this over the Fireplace!! I'm still in shock!
Hi Zathros,
over or inside ? sign1
This is the burning question.
The model is beautiful
Faithfully
Valmy
Z
Zathros
Over, it would be tempting to double up on the size but the windows of the house get in the way!
You did a re-size on the model? Believe it or not, not everything scales up or down the way you would expect. It wold be nice if you started a build thread and posted pictures of what you have made (in a separate thread) of your models. I would encourage anyone building this to start their own build thread and post pictures,. That would be the best way to thank Mr. Rose.
To print A3 sizes on an A4 printer, I "re-sized" the parts in the following manner:-
I have a virtual printer (free download) called "Bulzip pdf" installed.
I opened the parts pdf with adobe and printed each page separately to the Bullzip printer, setting the paper size at A3 and no scaling and saving it in pdf format.
After doing all 27 pages, I then opened each "full size" pdf page in Paintshop pro (set to 600 dpi), and then saved them as a pspimage files.
I then created a blank image at 600 dpi and A4 dimensions.
Now starting with page 1, I copied the parts to blank A4 sheet images, re-arranging the parts as necessary.
Some parts were small enough to fit several on a page but others required splitting over 2 pages. They were split at panel lines so that it would not be obvious when joined.
The wing box sections which required 2 sheets each, I drew a line across them as a registration mark for joining.
One thing I have found with the fuselage bulkheads is that because of the large size, the tabs were too wide and caused "flats" on the fuselage sections. I remade the fuselage, dividing each single tab into 3 and this cured the problem. As you near the front of the fuselage, you can divide the tabs by 2. This was also done with engine nacelles.
I had slight lining up problems with the fuselage "red stripes" but overcame this by gluing the panels from the top registration mark, around to the red stripes and then cutting the panel along the top of the stripe, lining it up to the adjacent section and then continue gluing.
The problem that I had with part 8 on the reduced scale model did not happen with this large scale one.
I am unable to create a build diary as I can only spend 5 minutes at a time building as I am a caregiver and am writing this at 23:15 at night.
Z
Zathros
You could have just opened up the files with Photoshop, and set up a new canvas to the size you want, lasso the pieces, rearrange them how you want, then flattened the image and saved it as a .jpeg or any other format you wished? The new canvas size and dots per inch would have determined the size of the final output. That is how I upscale images. I would suggest removing those tabs and making your own. You can form them to not warp the fuselage. Your doing a great job and if you are a caregiver and getting so much done in 5 minutes a day, you must be an awesome caregiver! My Hat's off to you!
Thanks, Zathros.
That would be too easy but a 27 page pdf is too big to open, not enough memory! That's why I converted the book to single pages.
I spend more than 5 minutes per day, it's 5 minutes here and 5 minutes there!
I am only a beginner in Paintshop, (copy & paste, create new layers etc.) so my graphics abilities (tabs) is limited, I've just figured out how to draw a straight line!. I find the Help useless as it does not show the things you search for, but something else!
Z
Zathros
Not sure what kind of hardware you have. I misread and thought you posted Photoshop, as that would open in seconds. Therefore, none of what I said applies, sorry about that. That is an interesting method you chose.
Cforrest900
Well-Known Member
Someone should design the rest of the plane in that scale to make the WHOLE THING!,!,!,!,!,!,!,!