Building my own x-wing

dnalor

Well-Known Member
Oct 28, 2011
917
186
58
Belgium Europe
ok..
got a problem i can't figure out how to program the arduino that i can use the fade lines for more LED-outputs.

I just want to enter the outputnumbers so that the program-lines of the fading don't need to be reprogrammed...

Anybody?..

i thought that i can use the part of:

Init cockpit = {1,2,3,4}
but that doesn't work..
after that i tried the

Init cockpit1= 1
init cockpit2= 2
But also didn't work..

Damn i can't find the solution.

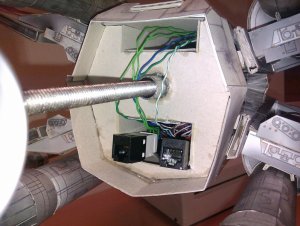
Also i'm thinking to let the arduino outside of the x wing.
First i wanted to seal in the arduino.
but he doesn't fit anymore..
i think i will use Rj45 connectors for attaching the arduino.

so instead of an electric cable to the xwing..
there will be an network cable to the xwing.
i think it sounds ok...but still thinking about it.

[YOUTUBE]33GW0OevkYY[/YOUTUBE]
 

scyeige

New Member
Feb 3, 2012
71
0
6
Wow! I was kinda expecting to see R2's head turn in that video! It is so real that it's unreal!!!!! Cool!
 

thegreek270

Active Member
Aug 7, 2010
211
478
41
Greece
Hi there dnalor,

i was following your progress on this X-Wing and it is just faszinating what you have done with it.

:thumb::thumb::thumb::thumb:

Thanks for the link. I checked it out and noticed that the original is in 1/48 scale.

Yours is much bigger than that :rolleyes:.

What scale did you actually use ??

It looks like 1/24

And again A really great modell.
Keep up the good work
Maybe i will make this modell too someday ???:p


dnalor

Well-Known Member
Oct 28, 2011
917
186
58
Belgium Europe
Hi....
well some say it's 1:20...
i hum..i don't really know.i only know that it's a nice size to display :)

i used the x wing sheets A4 and printed them on A1..and it looked great so i build it.
Maybe A0 was more epic...But for the learning curve this size was GREAT :)

This is one of...uh .....this IS the best x wing you will find on the internet at this moment....
 
Z

Zathros

I think keeping your Arduino outside of the model, and running a connector through the stand is wise. If in the future, you decide to tie a couple of ships together, electronically, the external nature of the connectors, possibly wired to a header pin located behind an access panel on the model, will facilitate such a thing. Imagine a scale service cart housing the Arduino, and what looks like a service cable running to the ship, and to a couple of other ships. Just thinking out loud. :)
 

dnalor

Well-Known Member
Oct 28, 2011
917
186
58
Belgium Europe
Sounds really great..
But the ship is so big i don't have the space for a space-port..:)

my arduino friend helped me with the sketch and i'm gonna try if it works what i want..
then i can start to build the connectors.
 

dnalor

Well-Known Member
Oct 28, 2011
917
186
58
Belgium Europe
ok this is it.

[YOUTUBE]ovaIq20IyK0[/YOUTUBE]

All the leds work ..
they do what i want :)
All with thanks to my arduino friend PJH from http://arduinoforum.nl
it's a dutch forum..but a good one.

this is the final sketch

int red[] = {12,7,2}; //
int green[] = {11,3,4}; //
int blue[] = {8,5,6}; //
int flickerLED = 10; //
int steady = 13; //

int redNow[3];
int blueNow[3];
int greenNow[3];
int redNew[3];
int blueNew[3];
int greenNew[3];
int flickertime;

void setup()
{ randomSeed(analogRead(0));// houdt het lekker willekeurig.

//this sets the output pins
for (int i=0; i<3; i++){
pinMode(red, OUTPUT);
pinMode(green, OUTPUT);
pinMode(blue, OUTPUT);
pinMode(flickerLED,OUTPUT);
pinMode(steady,OUTPUT);

redNow = random(255);
blueNow = random(255);
greenNow = random(255);
redNew = redNow;
blueNew = blueNow;
greenNew = greenNow;
}
}

#define fade(x,y) if (x>y) x--; else if (x<y) x++;
void loop()
{
for (int i=0; i<3; i++){
analogWrite(blue, blueNow);
analogWrite(red, redNow);
analogWrite(green, greenNow);
redNew = random(255);
blueNew = random(255);
greenNew = random(255);
// fade to new colors
while ((redNow != redNew) ||
(blueNow != blueNew) ||
(greenNow != greenNew))
{

fade(redNow,redNew)
fade(blueNow,blueNew)
fade(greenNow,greenNew)
analogWrite(blue, blueNow);
analogWrite(red, redNow);
analogWrite(green, greenNow);
delay(20);

flickertime = random(20);
digitalWrite(flickerLED,HIGH);
delay(flickertime);
digitalWrite(flickerLED,LOW);
delay(20-flickertime);

}

digitalWrite(steady, HIGH); // deze kan uit de loop worden gehaald en naar de setup, omdat er nooit iets aan veranderd.

}
}

Next week the connectors and backplate.
 

dnalor

Well-Known Member
Oct 28, 2011
917
186
58
Belgium Europe
My x wing is almost ready..
and i'm looking for a next project :)

Does anybody know if there is an Y wing which is the same details as the imcold X wing?..

I found an a-wing at papermodelers.com which is great but still WIP..
and the imcold Tie fighter is also still WIP..

or maybe another super detailed star wars papercraft model
 

dnalor

Well-Known Member
Oct 28, 2011
917
186
58
Belgium Europe
great but this one isn't that detailed.
i want to make him a little bigger then standard. :)

the same is with the at-st..also a great walker but the model isn't made to scale up.
 

Attachments

  • at at.jpg
    at at.jpg
    68.6 KB · Views: 29
Z

Zathros

I forgot about the size, I guess a service cart would be like parking a large baby carriage in your living room! :)
 

dnalor

Well-Known Member
Oct 28, 2011
917
186
58
Belgium Europe
I try to make things i never had..or could pay..
A large falcon....master replicas was to expensive.
x wing.......captain cardboard was to difficult for me.....and to expensive :)

and so on.......

and this is my moment....:)
 

dnalor

Well-Known Member
Oct 28, 2011
917
186
58
Belgium Europe
backside installed..
i had to cut it up a little for the 2 rj45 cables..
but i did it this way so that i can fold back the pieces..
now the arc piece on the outside for closing the gap

Now, only i need a wall mounting thing
And then he is ready for his final and last flight. :)
 

Attachments

  • side installed.jpg
    side installed.jpg
    163.9 KB · Views: 58
Z

Zathros

Thanks for posting the code to the Arduino, I think many people will reference that, and the link you gave! This ranks as one of the best build threads I've seen! :)
 

dnalor

Well-Known Member
Oct 28, 2011
917
186
58
Belgium Europe
Thanks for the kind words..
I have tried to get a new project pass my wife..
but it didn't work.

I wanted to build the x wing (or try to build) 1:2 when i calculated correct.

On the picture you see one sheet (A0) with double the size i have build now, and the large nose cone would be 1:2..

the wife said, no. damn :)
 

Attachments

  • RESIZE NOSE.jpg
    RESIZE NOSE.jpg
    93.9 KB · Views: 41

Rhaven Blaack

!!!THE MAN BEHIND THE CURTAIN!!!
Staff member
Administrator
Moderator
Jun 12, 2009
12,492
9,854
228
Oregon
www.deviantart.com
1:2 scale? That would be HUGE!!! The detail on such a model would be absolutely breath taking. That you most definitely be a museum piece. Where would you put such a LARGE fighter like that?
For structural integrity, you would have to use (at the least) 2mm card board.

Either way, good luck with continuing to convince your wife that building this is a good thing.
 

dnalor

Well-Known Member
Oct 28, 2011
917
186
58
Belgium Europe
In our house my rooms where i am king :) are the computer room..and the attic.
the attic will become my star wars room..i still have to rebuild it..
and my idea was to place in the top of the roof/room as much of the x wing as possible would fit.

But that idea was shotdown :-(..