The Whiskey River Railway

gbwdude

General Manager, W.R.Ry.
Jun 14, 2010
377
31
33
Omro, WI
www.facebook.com
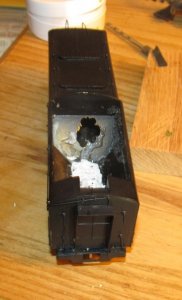
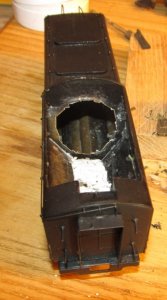
The way the cavity was filled makes sense. I believe I have some coal in my storage unit from Lake Superior that I found when I was a young lad. I know real coal will look the best, but are there any potential issues with using it in a model environment? I'd imagine as long as it's glued down and stays off the tracks it'd be fine.

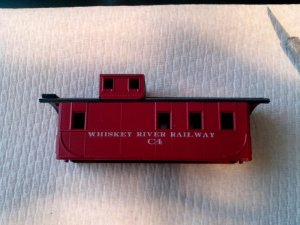
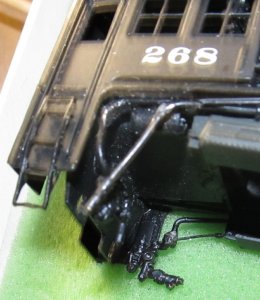
In other news I've lettered WRRy's first caboose to be almost finished. This is one of the cars I received from my now late neighbor and I felt that since he was also a rail buff that I keep the car operating. All that remains is to rebuild the underframe for it then put her into active service, as the original was a zamac cast one that came to me in pieces. We at the WRRy don't necessarily like modern but there can be a few exceptions to the rule, as most of the caboose roster consists of wooden cars (except for three, the pictured C4, and C5 and C6, my Athearn projects that I chopped the sides on). So my next project is to cobble up a new underframe from the leftover frames from the other Athearn cabeese and other parts.

Tyler
 

Attachments

  • 2012-01-16_15-47-46_562.jpg
    2012-01-16_15-47-46_562.jpg
    149.9 KB · Views: 14

Bill Nelson

Well-Known Member
Dec 14, 2008
2,680
467
78
Clarksville Tn
That caboose looks good. realgood works fine, the problem is sizing it correctly. there is a guy on the narrow gauge lists who salvaged a truck load of coal from the ruins of an old RGS coal pocket. He crushes it, and screens it to the proper size in several scales, and sells it to the RGS modelers, so they can have genuine RGS coal in their RGS locomotives.
 

Bill Nelson

Well-Known Member
Dec 14, 2008
2,680
467
78
Clarksville Tn
MY LAST POST WAS UNREADABLE, THE RESULT OF TYPING, AFTER A GRAVEYARD SGHIFT, WITHOUT READING GLASSES, ON A KEYBOARD WITH THE LETTERS 1/2 OF THE WAY WORN OFF . (pardon the caps loc) similar situation.


I have figured out how I'm going to open the tender up, as soon as I can find my hand nibbler, I will drill a hole in the rear sloped surface of the coal hopper on the render, and nibble out as much as I can, this should open up the room for the electronics, and keep the structural integrity of the tender minimally affected. The hand nibbler is something I got from Micro-mart, and it has proved to be a very useful tool. My work bench is piled up to the angle of repose. and my storage cabinet has just been replaced with an antique wardrobe. to better fit my 130+ year old farm house, so my tools and projects are at a maximum disorganization level. I will have to clean and organize my workbench before I can do serious work on anything, and the monster is close to the top of my list, as I have to support Tyler's military service, and I'd support his modeling work anyway, as he has a vision of what he want's to do that is remarkable .


Bill Nelson
 

Doctor G

Well-Known Member
Sep 1, 2008
1,415
298
78
Clarksville, Tennessee
Like the 'boose

Hi Tyler,

I really like the nice caboose. Neat paint and lettering job. It will look great on the "business end" of a freight train.

I do not think you need worry about real coal secured with white glue. It will look real nice and should not interfere with anything after it is secured with the glue.

Ever seen those modelers who use real crushed coal in their hoppers and use it for very authentic loads???

Tom
 

gbwdude

General Manager, W.R.Ry.
Jun 14, 2010
377
31
33
Omro, WI
www.facebook.com
Gents,

Glad you guys like the caboose, it's the first of many more to come. My first batch of boxcars didn't turn out, the paint was thinned maybe too much and made it look like crap being smeared on the cars. I mixed it as it said on the bottle, but the only part of the instructions I didn't comply with was using Scalecoat's brand of thinner, going with Testor's instead. Would that have made the difference? To me model paint thinner is model paint thinner.

On the coal bit, I was pretty sure that I wouldn't have had any issues but just wanted to "double-tap" as us Army folk say.

Tyler
 

Doctor G

Well-Known Member
Sep 1, 2008
1,415
298
78
Clarksville, Tennessee
Thinning paints

Gents,

Glad you guys like the caboose, it's the first of many more to come. My first batch of boxcars didn't turn out, the paint was thinned maybe too much and made it look like crap being smeared on the cars. I mixed it as it said on the bottle, but the only part of the instructions I didn't comply with was using Scalecoat's brand of thinner, going with Testor's instead. Would that have made the difference? To me model paint thinner is model paint thinner.

On the coal bit, I was pretty sure that I wouldn't have had any issues but just wanted to "double-tap" as us Army folk say.

Tyler

"Double tapped" isn't that what happened to Osama B????

On the thinner issue here is an interesting thread about this same question on the MRR fora. http://cs.trains.com/TRCCS/themes/trc/forums/thread.aspx?ThreadID=190220

I hope this helps a little.

Doc Tom
 

gbwdude

General Manager, W.R.Ry.
Jun 14, 2010
377
31
33
Omro, WI
www.facebook.com
Doc Tom,

Indeed thats what happened to Osama. I have a interesting story to share about that next time we meet at the club, due to certain details I'm not sure if I can share it on the world wide web.

I read the thread and from what Darth Santa Fe posted is what I felt as well. In theory it should have worked but who knows, maybe I did mix it wrong or maybe I just got a weird batch of paint. I never had a issue with Model Flex paint but then again that's a water based paint.

Tyler
 

Bill Nelson

Well-Known Member
Dec 14, 2008
2,680
467
78
Clarksville Tn
I got a hole started in the big tender. I started with small drill holes, widened them up some, and , then got in there with the nibbler. I will have to finish up with a hand saw of some sort, but will want to wait till my patience is at a maximum.

I may bring it to train club so we can discuss stratagies
 

Attachments

  • SNLA-1Tndr hole#1.jpg
    SNLA-1Tndr hole#1.jpg
    68 KB · Views: 16
  • SNLA-1Tndr hole#.2.jpg
    SNLA-1Tndr hole#.2.jpg
    72.4 KB · Views: 17

gbwdude

General Manager, W.R.Ry.
Jun 14, 2010
377
31
33
Omro, WI
www.facebook.com
Gents,

Well I'm taking a new plunge. Yesterday I ordered my wife a z scale decoder for my Thomas project and one of those n scale Digitrax sound decoders for one of my steamers for Valentines day. Ain't I thoughtful? Anyways, if the sounds aren't as great as expected from this trial it may go in my Harry Potter steamer, but if they're just short of the quality that a Tsunami puts out, then my '35 Hiawatha gets it. The test lokie is going the be the Hi since it's DCC ready and the decoder comes with a plug. If the sounds are as good as the price, then more will be purchased for the WRRy fleet.

I'm also considering picking up a Digitrax PR3 programmer sometime not just to load my sounds into the decoder but to smoothly program my other locos.

Tyler
 

gbwdude

General Manager, W.R.Ry.
Jun 14, 2010
377
31
33
Omro, WI
www.facebook.com
Bill,

The Tsunami I got from DCC Hobby Supply in PA, they had a internet sale so I scooped it up for about $20 cheaper than normal. The decoders I just purchased I bought them off of eBay, YankeeDabbler is the store you'd be looking for. They have the best prices and FREE shipping. For both the z scale decoder and the n scale sound one it cost $60. Purdy darn good if you ask me.

Plans for today include studying the Hustler that Bill donated to my collection. That one has the Ernst gearing kit already installed in it but there seems to be either a motor mount issue or something else as the worm gears jump from the gear towers. If there is success with the modifications, DCC will be added, bodies shall be painted and I'll bring them back to the club to be used as the paper mill (or where-ever-for-now-since-there's-no-tracks-going-to-the-mill) switcher.

Tyler
 

Bill Nelson

Well-Known Member
Dec 14, 2008
2,680
467
78
Clarksville Tn
I got Tyler's big monster out of the box again. Getting a little braver, I cut the wires to the headlight, and removed the DC constant headlight circuitry.

the locomotive frame now comes all the way off the body, which will make it easier to work on. I cut four pc board tabs for mounting pickup whiskers, but still don't know where I will mount them. the brake hardware on the cover plate is in the way on the underside, and the insides of the flanges are painted any way, so unless I wanted to carve that paint off, I don't have a good wiper surface anyway.

The motor and gears run pretty smoothly, if the broken link on the valve gear is held out of the way. I was hoping to work on electrical pick up issues, but the broken link is probably the most important thing to try to deal with right now.

I have a tsunami for the southern 2-8-0 @ the club, so I have two tsunami intalls on the work bench now (well the 2-8-0 is still at the club, but I'm thinking about it.


Bill Nelson
 

Bill Nelson

Well-Known Member
Dec 14, 2008
2,680
467
78
Clarksville Tn
Valve gear link

I took the screw that fastens the valve gear link to the crosshead and measured it with a caliper. a #61 drill (.o39) was closest.


I drilled a hole in some brass bar stock (it is almost impossible to get these tiny drills to start where you want them to; so I drilled a hole first and then started to shape the brass with neddle files around the hole. Next time I am this brave I will try to replicate the bends in the existing linkage, and screw this piece to the cross head, and solder the stub of the original linkage on top of this piece of brass. the result will be a little too thick, but it beats rebuilding the whole valve linkage, which might result if I went further.


once the valve gear is operational, I will proceed to try to improve the electrical pick up by adding pick ups to some of the insulated wheels.


Bill Nelson
 

Attachments

  • SMLA-1 VG link #1.jpg
    SMLA-1 VG link #1.jpg
    103.2 KB · Views: 10
  • SMLA-1VG LINK #2.jpg
    SMLA-1VG LINK #2.jpg
    117.8 KB · Views: 17

Bill Nelson

Well-Known Member
Dec 14, 2008
2,680
467
78
Clarksville Tn
I got the link fixed, t is an ugly repair, but I did not want to keep the torch in the area, didn't want solder getting to the screw or the rivet, I may touch up the joint with my resistance solder


I also got a cosmetic repair made, this thing sticking down on some pipes under the cab, I believe the technical name is a dohicky. the pipes were broken, and it is no wonder why, this thing hangs down and tangles with the frame whenever the boiler is installed/removed.


Tyler we are getting there, I will try to bring it to the club to discuss strategies.

Bill Nelson
 

Attachments

  • SMLA-1 ugly  repair.jpg
    SMLA-1 ugly repair.jpg
    152.7 KB · Views: 10
  • SMLA-1a  dohicky#1.jpg
    SMLA-1a dohicky#1.jpg
    101.8 KB · Views: 11

Bill Nelson

Well-Known Member
Dec 14, 2008
2,680
467
78
Clarksville Tn
more work on the monster!

I got off of work this morning around 8:30 am. I went and took a nap, as we were planning on picking up an antique bed. as suspected that led to another round of musical furniture, but once that was done, and I had the wife fed with some excellent leftover lassangnia, I had a little time, and a little less energy, but I forced myself to make some progress on the monster. I had already cut four small printed circuit board pads. I tinned them with solder, to make attaching the pick up whiskers , and wires easier, and attached two of them to the gear tower, one to a valve gear support bar, and one to the frame just under the motor, using JB quick (5 minute steel filled epoxy) These will allow me to add electrical pick up whiskers to all four insulated drivers.


I also removed the bottom of the coal pocket in the tender, to open up more space in the tender for the decoder and speaker.


Next will be to add the insulated pick ups, and to start work wiring in improved electrical pick up into the tender.


I will need to start work on building a transport box for this locomotive , as it's original box is set up for the locomotive and tender to be separated, and with six wires between the two planned, the locomotive and tender are going to spend most all of thier time together from here on out.
 

Bill Nelson

Well-Known Member
Dec 14, 2008
2,680
467
78
Clarksville Tn
Thanks Tom, it is a solid fix, not as neat as I'd like, and the linkage is a tad long. I'm not ready to try and do better though, as it is one of those jobs that requires four hands in a space where there is only room for two. I was lucky to get both pieces parallel to each other when the torch was nearby, and to keep the solder off the screw on one end, and the rivet on the other.

I am hoping to get the electrical pick ups added on the insulated side of the drivers today. If I can do that, I will try to hook up power in DC format temporarily, and try to assemble this monstrous thing, so we can test it at the RR club and see if there are any problems before I do the ugly work in the tender, getting the tsunami and speaker set up. the worst will be wiring the tender and the locomotive together. I'd like to set them up so they can be easily separated for maintenance, but that might be a lot harder than just wiring them up..


just putting it together will be a challenge, as it was partially disassembled when it got to my shops, so some of the pieces are a real puzzle.


Bill Nelson
 

gbwdude

General Manager, W.R.Ry.
Jun 14, 2010
377
31
33
Omro, WI
www.facebook.com
Bill,

I can't wait for tomorrow, I really enjoy seeing the progress on my ol' girl.

On this front I made some progress too. Thomas got his decoder and a little bit of extra weight, to finish him up I just need to permanently glue his face in the smokebox and sand out the cab so my weights will fit properly where they are (I put two 1/2 oz tire weights in the top of the cab piece). I also started my evaluation on Bill's old 0-6-0t that became WRRy property in partial exchange for the Bowser PRR Atlantic. I think I'm going to decommission it as a tank engine, give it a new boiler and tender and assign it to the Merrick yard as its switcher. Although I really do like the current body on it and might change my mind later on, I already have a tenderless steamer and very few Midwestern railroads had a full roster of tenderless switchers... let alone switchers period.

Tyler
 

Attachments

  • 2012-02-18_14-46-23_391.jpg
    2012-02-18_14-46-23_391.jpg
    158.5 KB · Views: 12
  • 2012-02-19_10-33-07_388.jpg
    2012-02-19_10-33-07_388.jpg
    187.5 KB · Views: 11

Bill Nelson

Well-Known Member
Dec 14, 2008
2,680
467
78
Clarksville Tn
electrical pick up isn

I got the electrical pick ups installed. I tinned the little pcb boards before installing them, as it is a lot easier to get to them on the work bench.

note the electrical pick ups on the front and rear have a little piece of Phosphor bronze wire sticking past the pad. this has two purposes. the first is I can hold that end with a pair of pliers , and use the pliers to get some tension on the wheel before soldering the wire to the pad, so I get better pressure soon the wheel with the pick up whisker.


also when I go to solder a wire to the whisker, I can do that on the extension, with a heat sink on the pad, so I don't loose the tension on the whisker.


I like the Thomas! one problem is by our system Thomass's address should be 01, which the system won't allow. My Thomas's address is 10
 

Attachments

  • SMLA_1  elct pickups  #476.jpg
    SMLA_1 elct pickups #476.jpg
    101 KB · Views: 10
  • SMLA_1a bcb pads.jpg
    SMLA_1a bcb pads.jpg
    164.2 KB · Views: 9

Doctor G

Well-Known Member
Sep 1, 2008
1,415
298
78
Clarksville, Tennessee
. the worst will be wiring the tender and the locomotive together. I'd like to set them up so they can be easily separated for maintenance, but that might be a lot harder than just wiring them up..


just putting it together will be a challenge, as it was partially disassembled when it got to my shops, so some of the pieces are a real puzzle.


Bill Nelson

Hi Bill

When we rewired my Large Scale Shay tender to the Shay fuel bunker we used a "computer" 4 pin jack. Some of these are quite small and are robust enough for frequent uncoupling and coupling.

On LRRR #1 I used a permanent tender/loco draw bar and ran a complete course of wiring in to teh tender for the future battey control.

Good luck in your endeavors.

Tom