Build Report for PaperArts 737

knife

Member
Jun 23, 2007
91
0
16
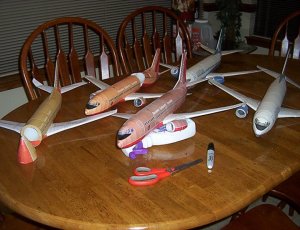
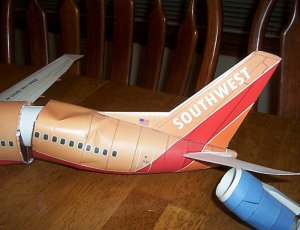
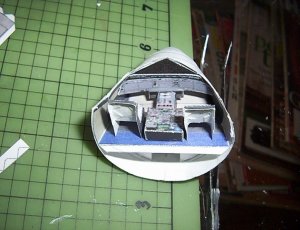
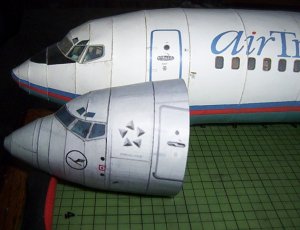
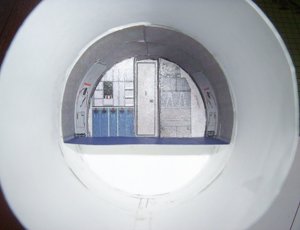
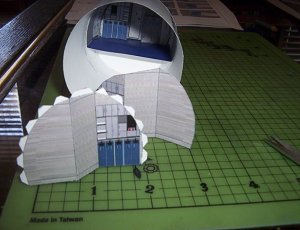
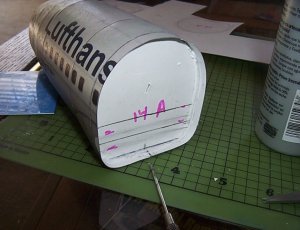
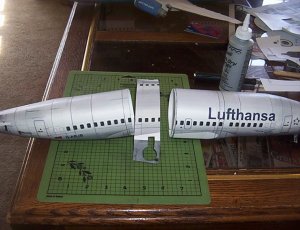
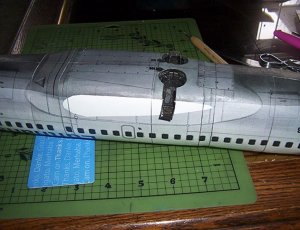
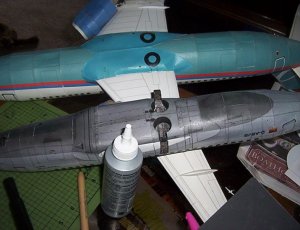
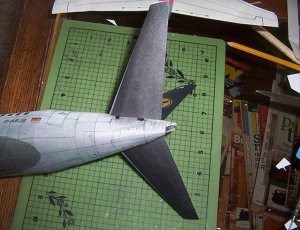
I haven't completed any models in over a year, so I thought I would do a build report to keep me motivated to actually complete a model. My current fleet of 737 have been crushed and mangled over the years, so I'm going to try building the PaperArts 737. Cybermac, you're not off the hook, I want to build your version too once you get it done.

There is a thread on Zealot when the Paperarts model was originally released in 2008. I got my model from http://3d-paper-models.blogspot.com/2008/07/papermodel-of-boeing-737-500-d-abjb.htm, but the link there is now dead. The model is still available at rapidshare:

http://rapidshare.com/files/163103195/737-500_rheine_pw_165437.pdf

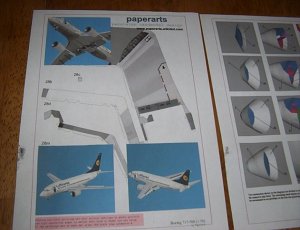
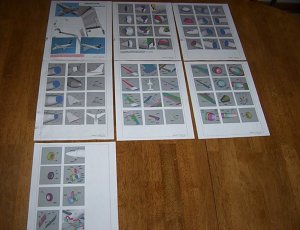
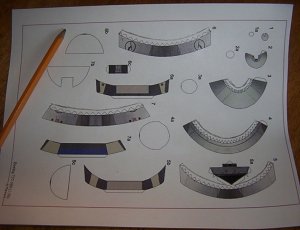
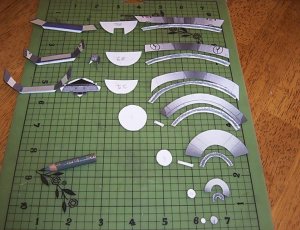
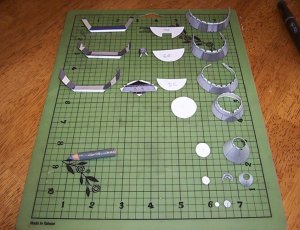
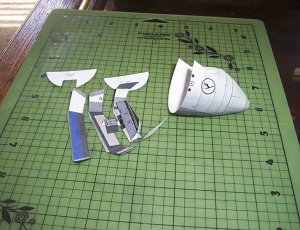
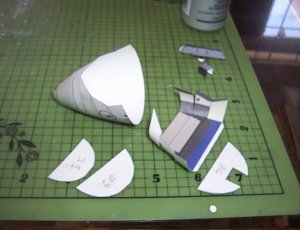
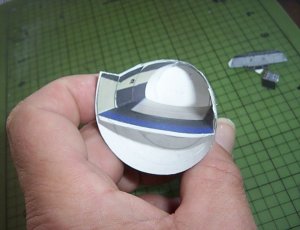
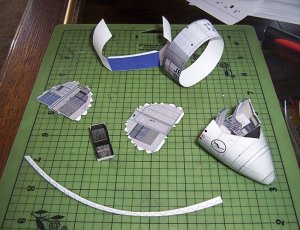
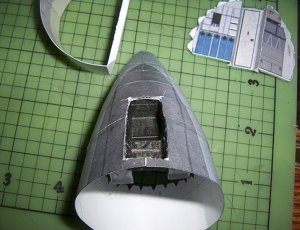
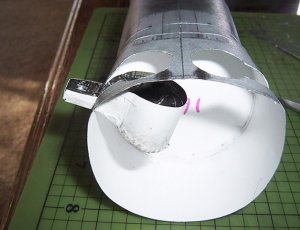
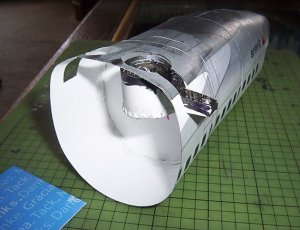
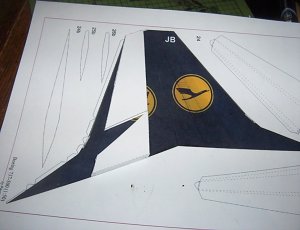
The model comes on one PDF file. It has a total of 32 sheets, the first seven sheets are the instructions. The instructions state that it is designed for A-4 paper. To get it to fit on the U.S. standard notebook size paper, it has to be shrunk to 44% it's original size.

The instructions are color coded for the section you will be working on. Very easy to understand, no need to have the Polish/English dictionary nearby. This should be the standard in paper models in the future.

I'm going to print out the sheets tonight and coat them with a light misting of Future floor polish applied with a small airbrush.
 

Attachments

  • SW2.jpg
    SW2.jpg
    195.6 KB · Views: 64
  • sw3.jpg
    sw3.jpg
    173.5 KB · Views: 53
  • 102_1896.jpg
    102_1896.jpg
    142.1 KB · Views: 47
  • 102_1895.jpg
    102_1895.jpg
    173.4 KB · Views: 48

Bengt F

Active Member
Nov 26, 2005
177
0
36
PaperArts Boeing 737-500 'Rheine' Lufthansa Airliner

Hi knife,

This seems like a very attractive jet airliner model. I´d like to build it too some day. I downloaded it from your link. And, I found the PDF digit code (to open it with) when I Googled 'PaperArts Boeing 737 card model download'

Best,
Bengt :thumb:

Addendum:
I just noticed above that the PDF number code is in fact included in the end of the file name!
 

knife

Member
Jun 23, 2007
91
0
16
I printed out all the sheets. My yellow ink ran out for the last three pages. When I replaced the cartage and reprinted them, the color didn't match the first run. So I will have one engine slightly different color from the rest of the plane.

I sprayed all the color sheets with Pledge floor polish to give it a shiner finish. I oversprayed one wing panel, so it has a blemish. This is not a problem with the kit, just a slow finger on the airbrush. Luckily, this will not be a museum quality build.

I cut out all the pieces from the first sheet and glued them together. The plans show using overlaping flanges to glue the pieces together, I prefer making an internal brace and butt joint the pieces.

I chose to glue the cockpit pieces together before gluing them into the nose section.

Fit for all the pieces was good. The internal bulkheads are printed out of round, you need to use your imagination to smooth them out when you cut them out. I laminated three layers of cardstock to make the bulkheads.
 

Attachments

  • 102_1902.jpg
    102_1902.jpg
    136.8 KB · Views: 39
  • 102_1903.jpg
    102_1903.jpg
    199.9 KB · Views: 28
  • 102_1904.jpg
    102_1904.jpg
    198.3 KB · Views: 36

knife

Member
Jun 23, 2007
91
0
16
I find the best way to get the bulkheads in position is to stab them with a knife, put glue around the edges, then use the knife to position the stab in position. The knife will pull out of the bulkhead easily, then you can use the back blunt end of the knife to get the final position right.

The instructions are a little hard to understand when it gets to the cockpit walls and instrument panel. I think my panel is a bit too low in relation to the center console.
 

Attachments

  • 102_1905.jpg
    102_1905.jpg
    173.6 KB · Views: 30
  • 102_1906.jpg
    102_1906.jpg
    196.8 KB · Views: 30
  • 102_1907.jpg
    102_1907.jpg
    130.2 KB · Views: 31
  • 102_1908.jpg
    102_1908.jpg
    130.8 KB · Views: 32
  • 102_1909.jpg
    102_1909.jpg
    181.9 KB · Views: 36

knife

Member
Jun 23, 2007
91
0
16
Still waiting on your model, Cybermac! The Turkish Airlines model in your second link is a real work of art. This build is just a quick and dirty build to see how this model works out.

I think this model is not based on photos of a real airliner, but rather on a flight sim model. It's really hard to find good photos to map to the frame when designing paper models. By using a flight sim model, you get realistic textures and can move your virtual camera to any surface. I've used this technique myself, and this model looks more like a flight sim model than a real airplane. You really get better looking textures this way especially for bare aluminium.

Continuing the build, the cockpit gets a grade of B for effort. The instrument panel is poorly detailed, a shame since this is one of the easiest areas to map a decent bitmap to. The model is missing the control yokes, and the back bulkhead of the cockpit is completely made up. The back panel is where all the circuit breakers are, the model shows a couple of Flight Attentant jump seats! Unless you cut out the windows, once you seal up the airplane you will never see the cockpit.

If you plan to have the landing gear down, I would cut out the front landing gear doors before gluing the body together. I didn't, and the cut ended up rather ragged.

The most difficult part to get right on the 737 is the fuselage immediately above the windshield (or windsreen if you're British). This model almost got it right, but the cuts to make the complex curve didn't unfold properly. Consequently, once built is has a very unsymetrical look about it.

The main cabin door didn't get projected right on the fuselage, it has a taper to the rear for some reason. I was going to cut it out so you can see the interior, but the shape is too deformed.

On the plus side, all the markings between the various pieces lined up spot on.
 

Attachments

  • 102_1909.jpg
    102_1909.jpg
    181.9 KB · Views: 29
  • 102_1910.jpg
    102_1910.jpg
    198 KB · Views: 30
  • 102_1911.jpg
    102_1911.jpg
    164.3 KB · Views: 32
  • 102_1912.jpg
    102_1912.jpg
    172.1 KB · Views: 28
  • 102_1915.jpg
    102_1915.jpg
    139.2 KB · Views: 29

knife

Member
Jun 23, 2007
91
0
16
Here's a couple of comparison shots of the PaperArts model and my own. Please note the difference above the cockpit windows, and the top side of the main cabin door.

The 737 has a triangular nose section, the PaperArts is more rounded.
 

Attachments

  • 102_1916.jpg
    102_1916.jpg
    180.5 KB · Views: 35
  • 102_1917.jpg
    102_1917.jpg
    120.8 KB · Views: 35
  • 102_1918.jpg
    102_1918.jpg
    194.8 KB · Views: 36
  • 102_1919.jpg
    102_1919.jpg
    143.3 KB · Views: 38

knife

Member
Jun 23, 2007
91
0
16
I got up early today and completed the fuselage through parts 15. Just a matter of making paper tubes and gluing them together. My only real complaint is that there should have been a center line printed on the bulkheads. If you don't get them lined up correctly, the fuselage will lean to one side. This is especially important with this model. If you end up with a crooked fuselage one wing will be higher than the other.

The instructions aren't clear on how the last wall panel in the cabin area should be mounted. Since you won't see them, I just left them out along with the emergency chute containers at the base of the cabin doors.

I like the way the landing gear sponsons are formed from the fuselage. On my model, this was a separate piece. It works, but the PaperArts model looks more like the real airplane. Also note the better under-fuselage detail on the PaperArts model.
 

Attachments

  • 102_1923.jpg
    102_1923.jpg
    103.4 KB · Views: 28
  • 102_1924.jpg
    102_1924.jpg
    158.9 KB · Views: 31
  • 102_1929.jpg
    102_1929.jpg
    160.3 KB · Views: 29
  • 102_1930.jpg
    102_1930.jpg
    171.4 KB · Views: 27
  • 102_1931.jpg
    102_1931.jpg
    175.4 KB · Views: 27

knife

Member
Jun 23, 2007
91
0
16
Here's a better photo of how the fuselage over the window is crooked. Also, a photo of the completed fuselage so far. From this point, I'm going to build from the tail forward. It is easier to fit the fuselage tubes from small to large and part 15 is the widest fuselage section. Also, the model doesn't have a wing spar connecting the wings through the fuselage. By leaving this section open I can easily add one later if I think it will be necessary.
 

Attachments

  • 102_1928.jpg
    102_1928.jpg
    197.9 KB · Views: 28
  • 102_1932.jpg
    102_1932.jpg
    183.4 KB · Views: 30

knife

Member
Jun 23, 2007
91
0
16
Today was spent in building the back half of the fuselage. I started at the tail end, and worked forward. Some of my comments on this review may seem negative, but they are not meant to be. I'm just commenting on things as I build. Overall, this is a very detailed model, and the fact that the designer released it free for anybody to build should be recognized. Bravo.

Sometimes I have to scratch my head over why it was designed a particular way. A good example is the tail cone. The way the model is unfolded results a "S" shaped joining line. Wouldn't a straight split down the bottom make a better seam? It's kind of like the area over the cockpit window being unsymetrical.

Most of the work is just forming tubes and joining them together. The final piece includes the wheel wells, which are a bit tricky to assemble. There's no indication on the pieces of where to crease to form the curves. The pilot seats had the same problem, come to think of it. If you take your time and trial fit the pieces eventually you can figure out where to make the bends.

After all the work, the fuselage itself looks good, and is highly detailed.
 

Attachments

  • 102_1934.jpg
    102_1934.jpg
    184.4 KB · Views: 34
  • 102_1935.jpg
    102_1935.jpg
    183.9 KB · Views: 35
  • 102_1938.jpg
    102_1938.jpg
    196.9 KB · Views: 35
  • 102_1939.jpg
    102_1939.jpg
    131.8 KB · Views: 33
  • 102_1940.jpg
    102_1940.jpg
    151.5 KB · Views: 36
  • 102_1943.jpg
    102_1943.jpg
    182.2 KB · Views: 34

knife

Member
Jun 23, 2007
91
0
16
I thought I would post a photo showing the difference between the PaperArts model and my own. The PaperArts version is much more advanced.

I also wanted to show how I join the fuselage tubes. I smear a bead of glue around the piece without the tabs, bend the tabs inward, then join the two pieces together. I then take a small metal shaft and press the tabs into the glue. I then rotate the pieces while pressing down on the shaft, effectively welding the two pieces together. When I roll the pieces, I start at the top of the fuselage and roll to the bottom seam, then reverse directions and roll back to the bottom seam.
 

Attachments

  • 102_1944.jpg
    102_1944.jpg
    160.5 KB · Views: 33
  • 102_1937.jpg
    102_1937.jpg
    139.8 KB · Views: 36
You're right - a lot of detail work (and it looks like a bit of edge gluing too on those wheel wells).

Nice technique - and very clean work. Going over the outside of those seams with your tool - backed up with a solid round form inside - will also "sink" the overlap and give you a smoother tube even with tabbed connections.

Yogi
 

knife

Member
Jun 23, 2007
91
0
16
Today's installment is the horizontal and vertical stabs. All three surfaces are built using the same technique. Basically there are the outer skins, an internal box spar, and an end piece to give it the right airfoil shape.

All three surfaces are designed to fold at the trailing edge, and have glue tabs to fasten the front edges. Personally, I would have designed it to fold at the leading edge and glue the trailing edge together. That way, the front edge has a nicer curved shape and the trailing edge narrows to a point. The control surfaces themselves are not well detailed in relation to the rest of the model. The bottom surfaces are almost totally black and the top surfaces lack many of the panel lines and the trim tabs.

The design for the internal box spar for the vertical stab doesn't make a lot of sense. I may be missing something, but why make a two part spar when a single straight spar would be easier?

Instead of gluing the end pieces into the control surfaces, I laminated them (4 layers) and glued them to the fuselage. I then glued the control surfaces to the laminations.
I also fabricated a horizontal wooden spar from a craft stick to reinforce the horizontal stabs. This should keep them from drooping as the model ages. Also makes them harder to knock off.

"She who must be obeyed" gave me THE LOOK today, so with company coming I may not get a chance to get to the wings until tomorrow.
 

Attachments

  • 102_1947.jpg
    102_1947.jpg
    172 KB · Views: 29
  • 102_1946.jpg
    102_1946.jpg
    128.1 KB · Views: 29
  • 102_1948.jpg
    102_1948.jpg
    148.3 KB · Views: 26
  • 102_1950.jpg
    102_1950.jpg
    182.9 KB · Views: 27
  • 102_1951.jpg
    102_1951.jpg
    189.9 KB · Views: 28
  • 102_1953.jpg
    102_1953.jpg
    172.2 KB · Views: 28

knife

Member
Jun 23, 2007
91
0
16
Here's some photos of the horizontal stabs. My model in the background shows the additional details that could have been included in the PaperArts model. I've also included some photos of the real stabs so you can see the details. I hate to nit-pick, but once again this is an area that could have easily been improved. Still very happy with the model.
 

knife

Member
Jun 23, 2007
91
0
16
Oops, hit the wrong buttons. Here are the photos.
 

Attachments

  • 102_1954.jpg
    102_1954.jpg
    178.1 KB · Views: 36
  • 102_1955.jpg
    102_1955.jpg
    196.5 KB · Views: 24
  • Horizontal Tail 1.jpg
    Horizontal Tail 1.jpg
    20 KB · Views: 163
  • Horizontal Tail 2.jpg
    Horizontal Tail 2.jpg
    39.4 KB · Views: 161

Elliott

Senior Member
Jul 18, 2006
645
1
36
You're a fast builder Knife. I like this kind of build thread where good and bad points of a model are both described.
 

knife

Member
Jun 23, 2007
91
0
16
I don't think I'm such a fast builder. I still have a SMS Rhine/Mosel model that I started in 2000 which I haven't finished. Not to mention all the plastic models I have from 40 years ago. I'm picking up the speed on this kit so the momentum can carry me to the finish line.