A deities eye veiw of the soon to be Desolation & Eastern (AKA The learning curve)

S class

Member
Jun 9, 2009
88
0
16
I said in a previous post that I would publish some construction photos of my 1st layout and having failed to do so have come to the attention of the moderators :)

so upload willing here are the first shots of the Desolation & Eastern (note working name only and may change in future) also known as the Learning curve because of all its taught me (and i haven't laid any track yet!!)

attachment.php


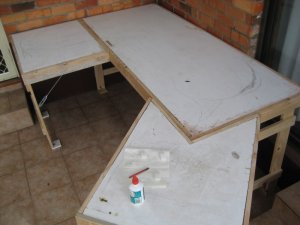
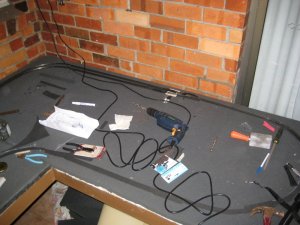
The first is of the left hand side showning the standard L configuration of the bench work, its made from a recycled internal door that started life swinging in, was changed around in configuration by a previous owner of the house (who moved knob and lock so the ply is full of holes!!) then it was moded again to become a sliding door which my dad replaced.
I cut it up found some off cuts from his concreting project (which is why some of the wood is grey) bought what i needed and set to work tying up his shed from november last year to now
attachment.php


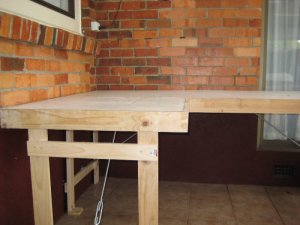
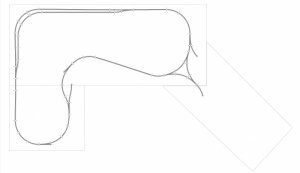
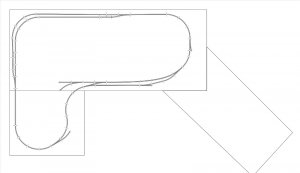
same as above but the right hand side of the layout, showing my novel 45 degree angled off shoot, this was put in to accomodate the sliding door behind and a passage from another door not seen to the left. this I plan will be where the layouts main centre and yard will be located, also can be seen is the spartan arrangement that comes with having your layout in the Queensland room out the back.
attachment.php


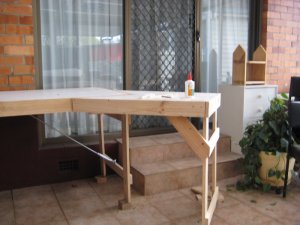
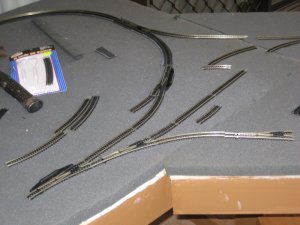
a Nice high oblique to give an overall impression of size total area is something in a square 1530mm wide by 2970mm long (give or take) actuall square footage of RR space yet to be determined. near the glue and up near the L module the tables former profession can be seen.

attachment.php


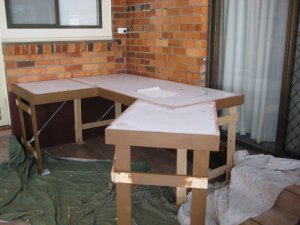
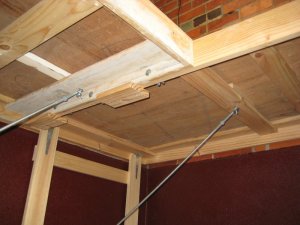
an under bench shot showing my 75% self taught carpentry skills (yeah i know your jealous :thumb:) the main table was completly rebuilt with a new frame and outside side braces only the door ply remained. the other side of the door with its frame was cut up and boxed to make the L and 45 modules. with the work ive done to that door it should survive a direct hit should the US start bombing. shown are the connect bolts for the L module (the layout is designed to be broken up and moved at least once, its living with dad while i attend uni but once i have my own place its with me or to the tip it goes) the same system is used for the 45 module. also shown are the homemade braces courtesy of the D&E backshops crew(dad).

attachment.php


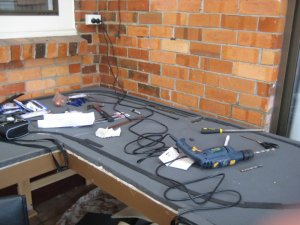
and finally current progress showing the paint job which in terms of presentability has made the table look 50 time better than it was, you'll note unpainted sections thats because the temp has been about 10 C around here so i forgot to prime the screws on the legs:eek:ops: - thats mondays job now provided the wether gets to double digits, very soon im going to be on this forum complaining about how the down under summer has buckled my track.
next time ill take you through my prototype theme, but until the next update i bid you fond adieu
Tony, founder and president of the D&E Lines
 

Attachments

  • high oblique2.jpg
    high oblique2.jpg
    106.1 KB · Views: 402
  • Layout left2.jpg
    Layout left2.jpg
    115.8 KB · Views: 403
  • layout right2.jpg
    layout right2.jpg
    120.1 KB · Views: 397
  • same as above  but with paint2.jpg
    same as above but with paint2.jpg
    121.3 KB · Views: 385
  • under bench2.jpg
    under bench2.jpg
    136.1 KB · Views: 393

steamhead

Active Member
Apr 16, 2005
2,360
0
36
75
Brownsville, TX
That's a good start..!! Your carpentry skills are pretty good...noobie or not.... Look forward to your updates as this layout progresses.
Do you have a track plan you can post so we have a better idea as to your intentions..??
Lastly...Is this layout outdoors..?? :eek:
 

S class

Member
Jun 9, 2009
88
0
16
Hi steam ahead thanks for the feedback in answer to your question its not quite outdoors but located in the houses queensland room (which is what we in Australia use to refer to a enclosed back porch) so its more or less protected from rain and wind, but i expect the temperature extremes we get, about 0C in winter and 40+C in summer are going to play havoc but while its dry im sealing as much exposed wood as i can to lessen the impact of humidity on the wood. the big problem im going to have is that as the layouts out back ill have to ether hid the rolling stock in the back wall staging yard and /or remove it all when im not operating to lessen the chance of theft - the idea of a $100 loco going walkabout does not rate highly on the list of things i want to think about.
As for your question on the track plan ive been playing around with the anyrail program that fifer posted in i his thread about his layout De-struction, but i only have the free version which only allows 50 pieces of track in play at once so ill up a picture when i can of my stagging yard as it appears (when i work out how to turn it into jpg format) but ill have to pencil a plan for the rest of the layout.

Tony
 

S class

Member
Jun 9, 2009
88
0
16
greetings all sorry i haven't updated, unfortunatly uni's back to top priority so work is now at a crawl. in this small update I want to show my subroadbed which is going in. Due to the extruded pink stuff you see in model railroader and the like is not availible in australia i wanted to use plain old styrofoam, but - get this- you can't get it anymore thanks to the environmentalists so in desperation im using foam rubber, which although spongy is proving to be quite adiqute for my needs as shown in the photos the white suff going down acts as a underlay for the black - its more expensive but denser so it holds its shape better. As can be seen in the top photo there is also a roll of thiner black foam, i got this as it was cheap ($10 sq/m) with the intention of using it as track bed insted of cork, flexibility and ease of cutting are the two imediate adavntages but i'll let you guys know if it works.
finally in answer to steamahead the botom photo shows the D&E's environment - protected from most of the elements in the queensland room, model trains and the distances we go to have them ey guys :p
IMG_0333.jpg

IMG_0334.jpg

IMG_0335.jpg

IMG_0336.jpg
 

S class

Member
Jun 9, 2009
88
0
16
okay guys been playing around with the anyrail trail addition and have arrived at this. standard loop with lots of stuff coming off in all directions.
the important things to know is that the back two tracks qwill serve as some form of staging, and future expansion. on the corner of the L the track breaks off and limbs over itself (not shown due to track limits) to serve a phosphate loader and possibly a log loader.
a couple of other sets of poins aim tracks in between the turnback curve which will be the main town site but will have a wharehous or something and on the edge in the curve is another set which serves a oil company yard with steal and supplies for offshore rigs.

on the 45 module the leg of the wye will house the main yard - not shown here - which hopefully will be four tracks with diesel servicing in one corner. up to the right in another curve is another set of points aimed at the back of the 45 which will serve one industry type yet unknown and a car ferry slip which in my operating scheme under development will be the start and end point for all cars on the layout.

comments, critisms and suggestions will be appriciated and acted upon.
 

Attachments

  • Track5.jpg
    Track5.jpg
    39.4 KB · Views: 22

S class

Member
Jun 9, 2009
88
0
16
blarg seanm ask a hard question why don't you??? :)

well after some thought and experimentation ive decided that i will have to cut and access hole which will be hidden by the foam ridge that will hide the staging tracks.

though im hoping that a combination of atlas rerailers and slow speeds will prevent the need to reachback there.

as an FYI thanks to school ive made no progress beyond the track plan and my LHS isn't stocking the track i need, not that it matters other costs keep coming up to steal my money. this hobby is supposed tobe FUN :Razz:
 

seanm

Member
Oct 11, 2004
358
0
16
65
Sunny CA
www.pegnsean.net
S class,

I can guarantee that your train will jump the rails in the worst possible spot. Happens all the time. (grin) Having an access hole as a backup is a great idea. I made my layout track no further then 2.2 feet from any edge for that reason. An access hole for me to get through would take up too much real estate. (smile)
 

S class

Member
Jun 9, 2009
88
0
16
well unis finished for the moment so I can get back to it, laid the first 2 meters or so of the road bed and this week, I'll get the parts i need for stage 1 of the project.

made several improvements to the track plan which i'll stick up as soon as i start actually laying track!
 

S class

Member
Jun 9, 2009
88
0
16
Glory, glory track comes to the d&e!

hi every body just updating with progress, by the time you see this hopfully the iron gangs would have laid more track, included in this is the 6th and final version of the plan which simplifies a lot of issues that the old one had and as such is going down.

That said its not without issues, I'm not sure if I put in the wrong data into the program but I have a gap on the L module of about 7 cm where the S Curve would be but now its diffused somewhat (so a good suprise) and at the bottom were the passing loop is sees one of the turnouts reversed to fit aganin as above the not show sections include a branch and yard as I mentioned above.
 

Attachments

  • IMG_0338.jpg
    IMG_0338.jpg
    150.3 KB · Views: 36
  • IMG_0341.jpg
    IMG_0341.jpg
    147 KB · Views: 36
  • IMG_0342.jpg
    IMG_0342.jpg
    149.7 KB · Views: 35
  • track 6 zealot.jpg
    track 6 zealot.jpg
    45.6 KB · Views: 40

S class

Member
Jun 9, 2009
88
0
16
Just a quick question gents and ladies
does anyone know a workable conversion formula that will allow me to work out what a 1:1 measurement will equat to in 1:160? as such I would like to know how many 1:160 milimetres does 2 milimetres 1:1 equal (metric would be the prfered scale conversion but I'll work in imperial if I have to.
you would think the internet would have such a wondeful useful tool but alas not cigar for me - it must be too busy putting up stupid videos of cats on youtube rather than doing things that benifit humanity as a whole
 

S class

Member
Jun 9, 2009
88
0
16
also on the subject of advice with styrene models do I need to prime them before paining? specifically these are walthers models
also should I paint then assemble or should I assemble then paint?
 

boppa

Member
Jul 21, 2002
98
0
16
australia
au.geocities.com
a heads up- the pink/blue foam that is often mentioned in american sites/magazines is available in Australia from any hardware shop (we just dont have to colour it, we can read the bead size apparently so its all white..)

pink is 0.5mm bead, blue is 1.2mm

bead size is writen on both the sheet and the packaging and they are definately available at BBC, Bunnings and Mitre 10
 

boppa

Member
Jul 21, 2002
98
0
16
australia
au.geocities.com
btw there are 2 types of foam used- closed and open- open is a good `filler' for hills etc, closed is `structural' foam that can basically support itself

look for xps or eps in the part number (eps is more common and cheaper)- xps is the `ducks testicles' when it comes to foam substrates

all are affected to some degree by various `paints' or colouring- shortterm includes `melting' when paint is applied (try an offcut first with your paint/colouring of choice to see if it goes all `blobby')

longterm (ie several months to years) they can cause foams to `harden' where the underlying substrate will become very rigid and crack with any movement or temperature swings
 

S class

Member
Jun 9, 2009
88
0
16
Hey boppa thanks I will try a hardware shop next time I go for tools (rather than those lying idiots at bunnings) But in all honesty unless it is relitivly cheap I think I may stick with the mattres foam as its really easy to work with, albeit quite messy
 

Bill Nelson

Well-Known Member
Dec 14, 2008
2,680
467
78
Clarksville Tn
could you recomend a primer mountain man or just any old brand thats safe for plastics?


What some of my more intelligent cohorts have done is to go to a paint store with a dirt sample, have a gallon of interior latex paint mixed up that is that is the approximate color, and then you have too much of one color, which is handy, cause nothing is harder than try to match some paint you mixed up on the fly with no notes. The stuff seems to work well on foam.


Bill Nelson