Eastern Tn logging on the DG CC & W RR 1928

Bill Nelson

Well-Known Member
Dec 14, 2008
2,680
467
78
Clarksville Tn
a note about the white gorilla glue

There is a note on the bottle saying it will stain skin and clothing. I doidn't pay much attention as I had worked with the brownish Gorrilla glue, and sanded the discoloration off my hands afterwards,

Wear rubber gloves when using the white Gorilla glue if there is a chance it will contact your hands. on the enginehouse frame it dried a milky translucent white, which sanded flush relatively easily. On my fingers it dried in various shades of brown, leaving my hands looking like I was a leper who hadn't washed his hands after wiping. I have been sanding my fingertips off and on for three days, and don't have it all off yet.

because of the way the stuff foams up as it sets up, there is a lot of clean up with it, but those walls are strong and flexible.

Bill Nelson
 

Bill Nelson

Well-Known Member
Dec 14, 2008
2,680
467
78
Clarksville Tn
SML cc EH 4wls up.jpg SML CC EH wdr vw.jpg SML EH D #1.jpg SML EH d #2.jpg SML H EH dtl.jpg SML cc EH 4wls up.jpg SML CC EH wdr vw.jpg SML EH D #1.jpg SML EH d #2.jpg SML H EH dtl.jpg
Wow, very intricate work. :thumb:


Thanks ,and it was done without plans!

in test fitting it it is just a tiny bit long, I will need to sand some off the frame members on the ends of the rectangular walls, or 45 degree the corners. all in all I'm very pleased.

here are pictures of the test fit, some pictures of enginehouse details, which will be spread out here and in the Harlow engine houses. also there is a detailed shot of #1 in it's stall in Harlow, showing the need for cleaning and spider poison in the engine houses! Note the broken hinges for the heavy cast doors on this fine scale miniature kit. If I can design some good brass hinges for the shops in crooked Creek, I will have to retrofit some onto this enginehouse too

Bill Nelson
 
Last edited:

Sawdust

Member
Nov 11, 2008
232
1
16
69
Cincinnati,Ohio
Looking real good Bill. I know what you mean when it comes to using commercial windows. Most of mine are as well but with a little imagination they cut up very well into most any size. I don't know if I mentioned this before but a few yaers ago at a swap meet I met two really nice ole guys from the Cincinnati Union Terminal that were selling some stuff they didn't need. I bought several large freezer bags full of windows for just $2. a bag. I probably have a couple of hundred dollars in windows but most are commercial but I won't complain at that cost. If you ever want a Dairy on your club layout I would highly recommend the " Sterling Consolidated Dairy" kit from Walthers Cornerstone line. Not only is it a very nice project it has tons of extra windows, freight doors, entry doors & brick wall sections. Keep us posted & don't forget your bathroom, it's getting cold out!
 

Bill Nelson

Well-Known Member
Dec 14, 2008
2,680
467
78
Clarksville Tn
don't forget your bathroom, it's getting cold out!


more than half of the floor down with insulation under it. (It never has had insulation under the floor before). Tomorrow morning I rough in the plumbing for the tub, and insulate under the rest of the floor and get the rest of the floor down. once the floor is down, I'm going to put in the wall. I'll do a quick and dirty framing, just enough to hang the plywood, and then I'll do the careful framing for the windows later.

on the train front I'm working on modifications to an HON3 FED 4-4-0, and a project to convert a Bachman GE 70 tonner to HON3, as well as the engine house , and track cleaning and repairs trying to get the RR operable again

Bill Nelson
 

Bill Nelson

Well-Known Member
Dec 14, 2008
2,680
467
78
Clarksville Tn
SML engineshops  10:09.jpg from the engine shops to in the engine shops

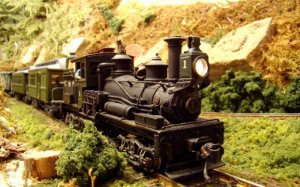
I'm messing with engines. If you look back at the Harlow/ Southside photos you can see the Harlow switch engine #9, a West-side models Westside lumber company #3. It had an outrageous 1890's style stack until this afternoon. It has carried that wildly inappropriate stack for perhaps 10 years.

In this photo, you can see the HON3 FED 4-4-0 I'm working on. It just got a stack identical to the one removed from #9 soldered on. The FED 4-4-0 was imported in the early 70s and it was the last HON3 4-4-0 imported MMI was considering importing some 4-4-0s in ON3 and HOn3 I had reserved two in HON3 and one in on3 (before I got laid off) I had money in the budget for one of the Hon3 locomotives, and the other locomotives would have tied up the expected train budget for a long time.

if you look in the fireman's window of #9, there is a dog scratching it's ear in the fireman's seat. once upon a time, back in the dark ages there was a dog on every single DG, CC, & W RR locomotive, as far as I know, #9 and # 15 are the only locomotives that still have dogs on them.

Bill Nelson


MMI just announced that they did not get enough reservations, and will not be producing the models . With the recession, the prices were down on the FED's and I was able to pick one up for less than half of what a MMI would have cost me. this FED will need a $100 micromotor kit from locodoc, but with that upgrade it will still be $100 cheaper than the MMI's expected cost, which means there is money in the train budget!

Unfortunately I don't have a brass casting of an oil headlight in my bins. I have an early arc headlamp, but that would require a generator, and I don't have one of those either. ai may try to scratchbuild an oil lamp for the 4-4-0. I did find a number plate with a #3 cast in it, so this may become Stateline RR #3. so far I have a Keystone/NWSL shay that is Stateline #2, and a Concor Galloping goose that I scratchbashed a pierce-arrow body for (Concor has since released a goose with a pierce-arrow body), wich si State line motor #5. A PFM 25 ton Shay, and an FED 2-6-0 have yet to be lettered and numbered..

There is another HON3 outfit on Iron mountan, a 3 foot gauge branch of the Marrietta and North Georgia. the theme for the M & N G narrow gauge is outside frames. I have a MDC outside frame consolidation (as of yet yet lettered and numbered, and at the club until I can replace it with the Bachman GE 70 ton diseasil I'm working on regauging ), a (pfm? ) puffing Billy outside framed 2-6-2, which has been outfitted with a cabbage stack to Americanize this Baldwin export locomotive, and a 0-4-4 outside framed Forney of unknown origin.

I still am not sure what stack Heisler #9 is going to get. it came with a straight stack, and has worn a cabbage stack, and a diamond stack, as well as the monstrosity I just removed from it. I have the diamond stack on hand, and it is painted to match, although #9 is well over due for a trip to the paint shops. It was painted over 30 years ago when I modeled in the 40's. my time period has migrated to the late 20's, and this machine should be cleaner, and better maintained.

The bathroom wall is up. and I have figured out where my roof leak is . An hour worth of work will fix it (I love metal roofs); but I'm going to wait untill it is dry to fix it, as that tin toof gets slick when it is wet. Tommorow I work on placing the tub and the windows, and try to figure out how to extend the roof so there is an overhang,


Bill Nelson
 
Last edited:

Bill Nelson

Well-Known Member
Dec 14, 2008
2,680
467
78
Clarksville Tn
SML #9 w nw old sk st..jpg #9's new old smokestack!

This stack isn't ideal, but A straight stack is out of the question, and it looked a little weird with a cabbage stack . It was wearing this stack when it was painted and weathered in 1973 0r 74. You can tell the splatter patterns from the poorly functioning cheap airbrush match between the stack and the domes (click on the picture for a larger view where this will show).

I was able to solder this on due to the modern miracle of resistance soldering, with minimal damage to the paint job. I used a dowel inserted in the stack to keep me from burning my tiny little fingers. the balloon stack on the 4-4-0 I was able (barely) to hold in place with my bare hands (it is filled with lead shot, which helped make it a massive heat sink, as well increasing locomotive weight for traction- I'll have to pack the cab with lead to re balance it on it's tiny drivers.)

Bill Nelson
 
Last edited:

Bill Nelson

Well-Known Member
Dec 14, 2008
2,680
467
78
Clarksville Tn
next

There is a hose reel that fell off of it years ago, that I need to reinstall on the back of the fuel bunker, along with the wood racks which need to be replaced or reinstalled (right now I can only find one of the two).

One nice touch here that I like to do when modifying locomotives is to open the roof hatch for better ventilation
 

ytter_man

Member
Jun 12, 2008
151
0
16
Montana
The stack on that heisler is ideal to my eyes, it being a woodburner and all! :thumb:

I dont know what i'd do with a brass loco lol... probably sit there and stare at it until i went blind :eek:
 

Doctor G

Well-Known Member
Sep 1, 2008
1,415
298
78
Clarksville, Tennessee
Painting Brass

I dont know what i'd do with a brass loco lol... probably sit there and stare at it until i went blind :eek:[/QUOTE]

Hi Ytter_man,

Yes it does take some courage to put paint on all that lovely brass detail work.

Bill Nelson has a real knack at rebuilding and painting these little HO brass steamers.

Here is a shot of the magic he worked with #1 on the old C&S RR.

Doc Tom:mrgreen:
 

Attachments

  • painted shay.jpg
    painted shay.jpg
    196.3 KB · Views: 27

Bill Nelson

Well-Known Member
Dec 14, 2008
2,680
467
78
Clarksville Tn
SML view 10:09.jpg brass mods/ this mornings view

Yes it does take some courage to put paint on all that lovely brass detail work.

Bill Nelson has a real knack at rebuilding and painting these little HO brass steamers.

Doc Tom:mrgreen:

Years of practice repairing the ones I got when I was a teenager, a well paid construction worker, living @ home with no expenses, back in the early 70's when brass was relatively cheap.

It helped, that my dad was an old Forrester, and a train nut, He bought # 18 for me.


after I got out om my own with a farmhouse habit, I have only purchased about one every 4 or five years, but over a 30 year period that really adds up.


I was out in the front yard studying the pile of the best wood torn out of my bathroom, seeing If I could re use any for my current phase of the project, adding a roof overhang over the new wall enclosing the old back porch for a new and improved bathroom, when the light was real good, and I had to go in to get the camera.


this is a piece of the view from my front yard (or from the skylight in my RR room, is this a good location for a rail fan or what?
 
Last edited:

ytter_man

Member
Jun 12, 2008
151
0
16
Montana
^A darn good location! Is that tree in the middle on your property? I think it could use a little trimming for a better view... :mrgreen:
 

Bill Nelson

Well-Known Member
Dec 14, 2008
2,680
467
78
Clarksville Tn
tree trimming

that tree is just this side of the property line. two years ago the trestle approach was almost completely obsured by trees. the last two winters most of my firewood came off the bottom of that hill. more will come off this year, although I will be cutting elsewhere as well. My big old barn of a house can consume a lot of firewood.


When the leaves are down farther to the right I can see straight down the three span Cumberland River bridge, which includes a turn bridge. This is a remnant of the L&N's old Memphis line, which is operated by the R J Corman railroad company, a railroad contractor, who has bought several short lines, and operates several others by contract

Bill Nelson
 

Bill Nelson

Well-Known Member
Dec 14, 2008
2,680
467
78
Clarksville Tn
Back to the enginehouse

Last night I made it to the train club. I did a little work on my handlayed track, spiking the rails between the two switches under construction, and from one of them to the passing siding. No photo;s were added to the Tom and Bill's excellent adventure, as the batteries in the digital camera were low so it didn't make the trip.

While I was there I snagged a hand full of extra cedar bridge timbers I had cut fot the bridge over the log pond. I had some scraps on my workbench, and they are just right for the post and beam frame to hold the crooked Creek engine house up, so I may return to that project If I can find my wok table under the parts and pieces of the various disassembled locomotives.

On the house front, In the last two days I have built an overhang for the roof over my back porch/bathroom, and gotten metal roofing cut to size and slid up under the historic roof. Not only do I now have an overhang, but there is a second layer of metal roofing under the worst parts; so I can take down all the plastic sheeting, as it is dried in! as soon as I frame in the window openings, I can insulate the wall and turn the heat on.


Bill Nelson
 

Bill Nelson

Well-Known Member
Dec 14, 2008
2,680
467
78
Clarksville Tn
SMl EH frame.jpg enginehouse frame

I started the engine house frame. I need to make five of these, and then figure out how to tie them together.

the posts @ the ends will have a brass pin fitted in the center to locate them into holes drilled in the engine house floor.


Bill Nelson
 
Last edited:

Bill Nelson

Well-Known Member
Dec 14, 2008
2,680
467
78
Clarksville Tn
SML  CC E H  BM NTCH.jpg SML CC EH F 2.1.jpg oops.

That first design for the post and beam frame had to be altered, as one post was in the opening of the freight doors in the rectangular walls, so I removed one post, which worked out excellently, with a post directly between each window opening, and @ the edge of the freight door.

the other photo show shows a little shelf that will hold the little beams that separate these sub assemblies, and support a triangular structure to support the roof. I need to get off my **** and order some skylights.

I have two of these made now, and have 3 more to do, before I can locate them and start erecting the building. on that nice foundation and floor I completed years ago. this is going to look good. I'm going to have to plank the far wall. as the thickness of the planks will affect the location of the first beam, as that wall touches sheetrock @ the back of the railroad.


Bill Nelson
 
Last edited:

Sawdust

Member
Nov 11, 2008
232
1
16
69
Cincinnati,Ohio
Looks real good Bill & functional. Did you ever think how nice it would be to have a lazer cutter. I have but it probably wouldn't be as much fun.:mrgreen:
 

Bill Nelson

Well-Known Member
Dec 14, 2008
2,680
467
78
Clarksville Tn
lazer cutter

The lazer cutter is a great tool for folks producing kits. for this project, it would let me make windows, and , perhaps cut the wood pieces to length quickly and accurately, so these diagonal fame braces would be all exactly the same size. Construction would be way faster; but what would be the set up time, and would setting up the lazer be as restful as making all those cuts with a razor saw?

when the lazer is used to cheat framing for a whole wall or truss , it is not satisfactory, as many of the frame members have their grain running the wrong way, ruining the strength, and making the whole think susceptible to strange warping with moisture.

I would much rather have a lathe and a milling machine. I can already make most anything I want out of wood. I could even do windows, but it would be a royal pain.


Bill Nelson
 

Bill Nelson

Well-Known Member
Dec 14, 2008
2,680
467
78
Clarksville Tn
SML  CC E H I S #3.jpg SML  CC E H I S #2.jpg SML  CC E H. I S #1.jpg SML  CC E H tst ft bk wl.jpg SML  CC E Hwls & FR up #1.jpg Need more ceder beams

When I grabbed a hand full of ceder beams from the pile I had at the train club. I got just enough to make the first round of taming timber. I have one piece that is long enough to make one of the short beams to tie the assemblies together.

I drilled a hole in the center of each end post, and fitted a little brass pin. I stuck a sheet of basswood behind the back wall, to help me adjust for the thickness of planking, and added a hair to that to try to allow for window and door trim and battens. I was pleased to find the bass wood sheets, there should be enough of that to cut the planks for all the walls

then I marked the locations of the pins and drilled little holes. the pieces of the post and beam frame work are located by the pins in the holes; which holds them up but not straight.

Next I have to fire up the sawmill and cut more beam material. so I can get these beams to hold each other vertical, and start to figure out the next level of framing that will hold up the roof. Time to get off my *** and order those City Classsic's Skylights, as this building will deserve lots of skylights.

I'm sure Dr. Tom will want some so I took some preliminary interior shots through the doors. I think I'll build it so the outside wall will come off too.

Bill Nelson
 
Last edited: