Free Model #4 - Alexey Horoshavinn's KV-2

Status
Not open for further replies.

charliec

Active Member
Jan 18, 2004
384
1
36
75
Brisbane, Australia
Everyone seemed to have fun in Free Models #3 - thought I'd give it a try.

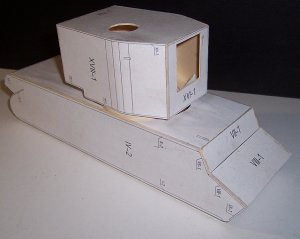
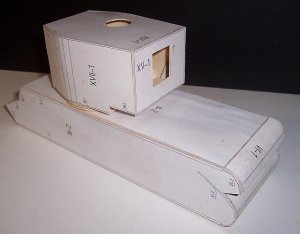
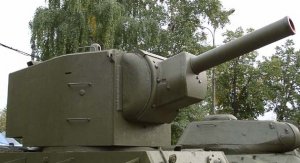
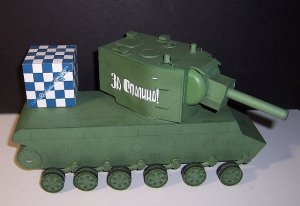
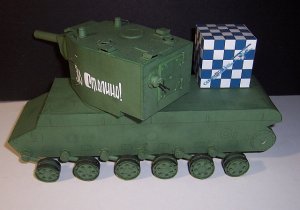
My choice is one of the KV-2s at http://www.papermodels-bg.com - I haven't figured out which one to build - the MT-1 turret version or the later turret. Both types seemed to have been in action with the RKKA in 1941-42.

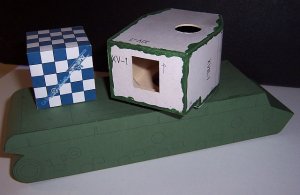
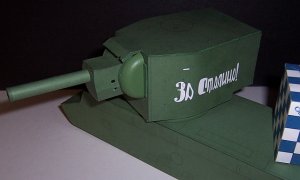
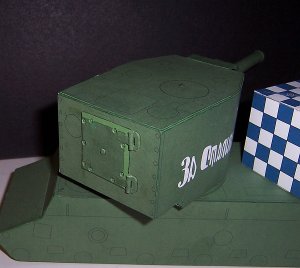
The colour of the models isn't right - Russian armour from this period was usually painted in a colour known officially as 4B0 - a dull green colour. Since the rules allow a recolour I'll change the yellow/khaki colour of the model to something like 4B0.

It's going to take me a few days to get started on this - I'm currently doing another project.

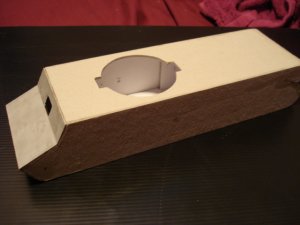
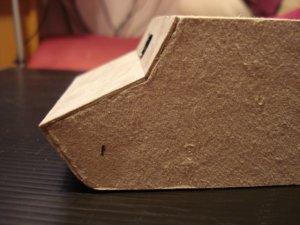
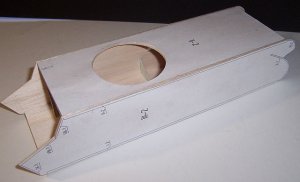
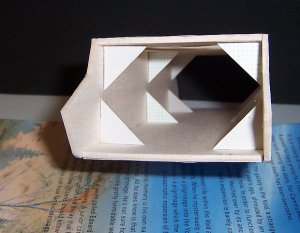
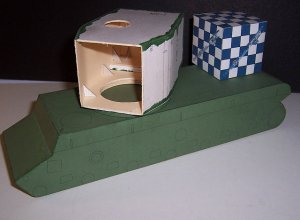
The hull frame specifies 2mm card reinforcement - I think, given the size of the hull, that balsa sheet might be better for this.

Regards,

Charlie
 

charliec

Active Member
Jan 18, 2004
384
1
36
75
Brisbane, Australia
Some basic stuff about the KV-2 model.....

The download is just under 6M and consists of:

- 6 pages of instructions - the drawings are excellent - better than most commercial kits.
- 3 pages of reinforced parts which should be printed on 80gsm - the main hull parts are specified as 2mm rather than the usual 1mm card.
- 16 pages of parts - this sounds pretty big but the size of the model combined with getting both band and individual element tracks means a lot of pages.

There are no written instructions but this doesn't look like a problem because of the clarity of the instruction diagrams. The hints in the instruction diagrams are in Russian but this doesn't look like a showstopper.

I guess I should give some context to the KV-2 so it doesn't just seem like a weird armoured oddity. The Russians at the end of the 1930s intended to replace the heavy (and fairly unsuccessful T-35) with a new heavy tank. Initially the new designs used multiple turrets (SMK and T-100). The SMK was also developed as a single turret tank and was called the KV-1. The KV designation was "political" since it acknowledged the Soviet Defence Minister - Klimenti Voroshilov. The multi-turret and KV-1 were tested in the Winter War against Finland in 1939 - only the KV-1 was successful. As a result of the Winter War it was realised that there was a need for direct fire vehicle carrying a heavy gun to attack fortifications. The KV-2 was the response to this requirement.

In spite of the 152mm gun and thick armour the KV-2 wasn't very useful during the Great Patriotic War (GPW) - it was slow and fairly unreliable. The rate of fire was fairly slow because of the 2 part ammunition and the limited space for the loader inside the turret. The huge turret was difficult to rotate on sloping ground and the height of the vehicle made it difficult to use tactically. There were 2 turret designs used in the KV-2s - the initial MT-1 design was replaced by a larger turret. Production of the KV-2 was ended when the factories were moved from Leningrad to the Urals after some 330 vehicles were produced.

The idea of a heavy gun in the KV chassis wasn't a bad one and was eventually realised in the Su-152 which didn't have a turret.

Regards,

Charlie

Edit - I was checking some details and found that Zhosif Kotin - chief designer of the Kirov factory where the KV tanks were produced was Klimenti Voroshilov's son-in-law.
 
S

Soaring

Great golly jasper's uncle the fifth! I really want to see this model built up, I'll be watching as you go along ;)
 
i made a start on this and then gave up and started something else as my printer had ran out of color ink and this kit would need a whole cartridge(the only gripe i have with this kit is that is very ink wasteful as there are lots of parts with unnessacery color that are either cut out or covered eg.turret opening,engine deck etc) anyway i got as far as the framework before i gave it up and i found that the best way to do it was to cut out the former lines on the sides and widen the parts for the rear and front it works very well..dont know if its any help
 

Attachments

  • DSC01251.JPG
    DSC01251.JPG
    156.6 KB · Views: 30
  • DSC01250.JPG
    DSC01250.JPG
    137.8 KB · Views: 18
  • DSC01249.JPG
    DSC01249.JPG
    138.5 KB · Views: 11
  • DSC01248.JPG
    DSC01248.JPG
    147.6 KB · Views: 16

charliec

Active Member
Jan 18, 2004
384
1
36
75
Brisbane, Australia
Thanks for that. I refill my inkjet cartridges so I'll make sure they are topped up before printing. The frame looks doable and reasonably strong.

I'm not sure that I like the keyway for the turret - might convert it to a cylinder. It might be nice to build both turrets with a single hull - 2 models for the cost of one and a bit.

Regards,

Charlie
 

charliec

Active Member
Jan 18, 2004
384
1
36
75
Brisbane, Australia
Ok - here goes....

I took a break from my other project (sick of trying to figure out Modelik's hieroglyphics (aka build diagrams)) and decided to make a start on the KV-2. Had what's known in Oz as a "rush of blood".

I used 2mm balsa rather than card for the basic frame - much easier to cut than thick card. The frame design is very simple - just a box without any bulkheads. I added some reinforcement to the joins to try get the hull frame square. The remaining frame parts are in 1mm card - including the curved parts on the rear of the hull.

The side plates of the frame have to go on the outside otherwise the skin doesn't fit so the other build start in this thread would have run into problems very quickly.

Regards,

Charlie
 

Attachments

  • frame_1.jpg
    frame_1.jpg
    66.6 KB · Views: 15
  • frame_2.jpg
    frame_2.jpg
    111.4 KB · Views: 13
S

Soaring

Mmm, Nice looking Forms you have built.Striaght, and evenly cut, you're doing a great job so far ^_^
 

KCStephens

Member
Sep 18, 2007
83
0
16
57
York, PA
Excellent Choice, Charlie! I'm glad to see you join in on all of the fun.
I especially enjoy following your armor builds, you are an inspiration. In addition to your excellent modeling skills, your technical know how and knowledge of historical data is truly amazing. I look forward to seeing this come together.
Good Luck

Kevin
 

charliec

Active Member
Jan 18, 2004
384
1
36
75
Brisbane, Australia
Kevin - Aw shucks....

The frame is pretty much finished. The turret frame certainly needs reinforcers to keep it square but it seemed quite accurate.

The turret rotation arrangement is quite clever although I'd recommend soaking the tabs in CA - I could just see it fraying in use.

Spray glue doesn't seem to work too well gluing paper to balsa - I should have used PVA.....

The frame is glued with Duco cement rather than PVA - the local Oz version of Duco is called Tarzan's Grip and doesn't seem to have the problems with stringing that the UHU brands have been reported as having. Because the frame isn't keyed together you need a glue which is strong and grabs quickly - I think this frame could be difficult to glue with PVA.

Regards,

Charlie
 

Attachments

  • frame_3.jpg
    frame_3.jpg
    92 KB · Views: 17
  • frame_4.jpg
    frame_4.jpg
    90.9 KB · Views: 12
  • frame_5.jpg
    frame_5.jpg
    38.3 KB · Views: 685

KCStephens

Member
Sep 18, 2007
83
0
16
57
York, PA
Holy cow! That's one big turret!

I can see where the Duco cement would be a better choice for gluing the balsa frame parts together. This reminds me of the stick-and-tissue airplanes that I built as a kid. Also, thanks for the heads-up on the paper-to-balsa glue issue. I wonder if sealing the surface of the balsa with few coats of a clear sealer prior to mounting the paper templates would help the paper stick any better? Either way, I'm sure you'll get it resolved before skinning this beast.

Thanks,
Kevin
 

Stev0

Active Member
Jan 30, 2006
626
1
36
Can you put a scale bar next to the shots please. This looks rather massive ... lol.
 

charliec

Active Member
Jan 18, 2004
384
1
36
75
Brisbane, Australia
Holy cow! That's one big turret!

I can see where the Duco cement would be a better choice for gluing the balsa frame parts together. This reminds me of the stick-and-tissue airplanes that I built as a kid. Also, thanks for the heads-up on the paper-to-balsa glue issue. I wonder if sealing the surface of the balsa with few coats of a clear sealer prior to mounting the paper templates would help the paper stick any better? Either way, I'm sure you'll get it resolved before skinning this beast.

Thanks,
Kevin

That's the MT-2 "lowered" turret version - the MT-1 turret was even higher - if I get enthusiastic I'll build the other turret as a comparison.

You're right - I should have sealed the balsa. I think I can retrieve the situation by sanding off the loose paper and glue the skin with diluted PVA.

Stev0 - mea culpa - scale cube will make an appearance from now on.

According to the instructions I shouldn't have glued the front of the turret on - the gun elevation stuff goes behind the front plate.

Regards,

Charlie
 

charliec

Active Member
Jan 18, 2004
384
1
36
75
Brisbane, Australia
The hull is skinned - the fit of skin was very good. I cut the sides off the bottom part of the hull - I'd rather have a join on the hull bottom edge than try to get a big piece in place in one go. The edge colouring where the skins join on the turret frame is an attempt to cover up any slight misfits.

After studying the model I figured I had to get the front off the turret to install the gun. The model has the gun barrel modeled as a double skinned tube with an elaborate collar on the muzzle end. The reference photo from www.jagdtiger.de shows a KV-2 in Moscow - the gun barrel is a simple tube with a thin band around the muzzle end - I think I'll forget the barrel as designed and scratchbuild one. I won't be able to skin the rest of the turret until the gun is done because to skins overlap the front part of the frame.

The turret rotation scheme works pretty well and seems to be smoother than the "cylinder in hole".

The green colour of the hull was derived from the Don color site (http://www.jpsmodell.de) - I took the mid point of his take on 4B0 (new and weathered) and lightened it by about 10%.

Regards,

Charlie
 

Attachments

  • hull_1.jpg
    hull_1.jpg
    84.7 KB · Views: 12
  • hull_2.jpg
    hull_2.jpg
    91 KB · Views: 10
  • ref_1.jpg
    ref_1.jpg
    93.5 KB · Views: 14

charliec

Active Member
Jan 18, 2004
384
1
36
75
Brisbane, Australia
The turret is skinned. I decided to go with the version with the slogan even if there's not a lot of evidence that KV-2s had slogans on the turret. The slogan is "Za Stalina" ( For Stalin ).

The rear door gave me a bit of grief - as designed it's supposed to have an angled strip around the edge to represent the camfer on the armoured door. After a failed attempt to get this looking reasonable I just made it up from oversize parts and cut the camfer. The hinges didn't seem to have any pins as designed so I added them.

The gun installation as designed has the side cheeks on the mantlet made from strips. The actual shape was a circular section so made my own from a stack of disks of matt board - sanded the stack to shape by spinning the stack in an electric drill. The shaped circle was then cut up into the segments representing the armour. Looks a lot better than the original design. The gun is rolled from 80gsm on a 6mm rod (scale 150mm - close enough to 152mm)

There's a bunch of stuff to go on the turret yet but these look like the hard bits.

Regards,

Charlie
 

Attachments

  • turret_1.jpg
    turret_1.jpg
    71.3 KB · Views: 7
  • turret_2.jpg
    turret_2.jpg
    104.2 KB · Views: 11

charliec

Active Member
Jan 18, 2004
384
1
36
75
Brisbane, Australia
Time for an update....

The turret is pretty much finished - no nasty surprises adding the detail to the turret roof.

The roadwheels were moderately painful to build - lots of work punching out the holes in the wheels. I think the design could have been better in locating the central web of each roadwheel in the center of the tire. The attachment of the roadwheel axle to the swing arms is pretty weak - replaced it with a bamboo skewer axle. The attachment of the swing arm to the hull is a simple card cylinder - replaced this with solid disks. Also drilled and pinned the swing arms with bamboo pins into the hull - the weight of the wheel plus swing arm was enough the delaminate the joint at the hull.

Regards,

Charlie
 

Attachments

  • susp_1.jpg
    susp_1.jpg
    99 KB · Views: 14
  • susp_2.jpg
    susp_2.jpg
    97.3 KB · Views: 11

charliec

Active Member
Jan 18, 2004
384
1
36
75
Brisbane, Australia
Got a bit bored with running gear.

The track model is supplied as individual elements and as a band track. The individual links looked a bit too daunting so I tried the band version.

The track section was printed on 200 gsm and built up like the Pz 1F tracks (other forum for details). However, rather than cut the detail into one side of the track section the detail part was cut out and glued onto the outside of the track. I did this because the KV tracks have an extension on the outside edges which is thinner than the rest of the link.

The painted section is just to give me some idea how the track will look.

Regards,

Charlie
 

Attachments

  • trk_0.jpg
    trk_0.jpg
    79 KB · Views: 10
  • trk_1.jpg
    trk_1.jpg
    136.2 KB · Views: 12
  • trk_2.jpg
    trk_2.jpg
    56.9 KB · Views: 11

charliec

Active Member
Jan 18, 2004
384
1
36
75
Brisbane, Australia
Tracks are finished.

The guide plates as modeled are too thin - added another layer of 200gsm and they seem much closer to the orginial thickness.

I haven't given any thought about the colour the tracks should be - probably will paint them a similar colour to the Pz 1F model.

Regards,

Charlie
 

Attachments

  • trk_3.jpg
    trk_3.jpg
    110.7 KB · Views: 13
Status
Not open for further replies.