New Desktop Layout

UP SD40-2

Senior Member
Apr 29, 2006
2,709
0
36
58
AWESOME progress so far Scott:bravo: .

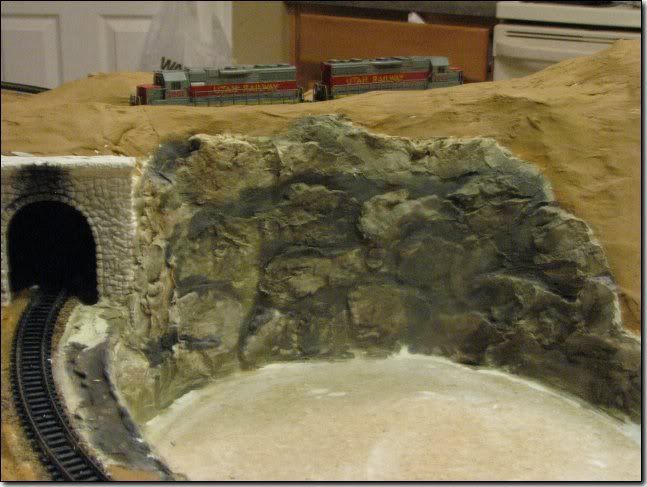
just thought i would throw this out there as far as "inside" tunnel walls go, i have taken tin foil and wrinkled it up, unwrinkle it, and paint it different tones of brown, this makes for a "decent" blasted rock look. just a thought:winki::smilie: .

Cant wait to see more progress!

deano1.gif
-Deano
 

woodone

Member
Feb 7, 2007
367
0
16
83
Phoenix, AZ.
Card board strips

That is one of the best ways to make hills,valleys and the likes. I use this type of construction now. I also use the plaster cloth. Goes fast and does not make a BIG mess. I have used plaster, diping small pieces of paper towels into the plaster, then to the layout. BIG mess, lots of clean up. The plaster cloth goes much faster and is much easer to keep the track and surounding area clean. Well worth the cost of the plaster cloth.
You might try a craft store for the plaster cloth. Like Michaels, or Hobby Lobby. It (plaster cloth) is some what cheaper to buy there.
Looking good:thumb: keep the photos coming.
 

steamhead

Active Member
Apr 16, 2005
2,360
0
36
75
Brownsville, TX
Hi...I used that method in the yard at Portales (see "The P in LC&P"). I added some bunched up newspaper to break the "flatness" of the cardboard frame, and covered it with plaster-soaked paper towels. As mentioned, it is messy....
 

jesso

Member
Jul 21, 2006
702
0
16
53
Washington, Utah
www.thetechfamily.com
Thanks for the suggestions guys. Deano, I tried to do the tin foil tunnels and at first it looked good, but then when I put it in the paint started flaking off. I went to fix it, but I was watching the NASCAR Race and Kevin Harvick wrecked my favorite driver Tony Stewart so I got all frustrated and trying to fix paint wasn't helping so I ripped it out and glued in the black construction paper. I really need to work on my sports temper. I may use plaster cloth, with see if the craft stores around here have any.

I put the tunnels together and caulked them and closed up the mountains around the portals. So far this is turning out much better than my first layout.

half.jpg


Here is a closeup of the Tunnels and the hill between them.

closeup.jpg
 

TrainNut

Ditat Deus
Sep 15, 2004
1,731
0
36
54
AZ
Lookin' good! What's your backup plan for retrieving that inevitable derailment from inside either tunnel?
 

Mountain Man

Active Member
Jan 19, 2007
1,607
0
36
80
A person in the train club made me a couple of tunnel cleaners (long sticks with track cleaners on the ends) that between the two of them, I am able to get everything out of the tunnels that so far I have put in.

Something to think about when building those tunnels! :cool:
 

jesso

Member
Jul 21, 2006
702
0
16
53
Washington, Utah
www.thetechfamily.com
Well, after everyone here suggesting plaster clothe and a guy in the train club teaching an easy way to use it, I was all excited to get some and use it. Unfortunately, our hobby shop didn't have any and none of the craft stores did either. They did have mold-a-scene plaster, which I have found is ABSOLUTELY WORTHLESS! Next time I want to build a sand castle, I'll use that stuff (most likely never). So back to plaster. I did find Scultamold, so hopefully will be able to make some rock looking walls with that. Here is the circle and tunnels that that I plastered:
tunnels.jpg

hills.jpg
 

jesso

Member
Jul 21, 2006
702
0
16
53
Washington, Utah
www.thetechfamily.com
I have started the substructure on the back of the hill. I think so far it is looking really good, which is kind of a shame since it will be back behind the monitors and not very visible, but hey it is good practice and hopefully each thing I do will help me get a little better.
backhill.jpg
 

jesso

Member
Jul 21, 2006
702
0
16
53
Washington, Utah
www.thetechfamily.com
I have built a some more of the hill, but I have ran out of caulk so I can close off the hill or glue any more retaining walls on, so I guess I am done for now. I got the tunnel caulked together underneath so that is in. Here is what I have so far:
moremountain.jpg

I wanted a flat area in the mountain because I am going to buy the Woodland Scenics Campers (probably online, since I am SURE that my hobby store doesn't have them) and I needed a camping area. Anybody know if anyone makes an N Scale Jeep Wranger cheap? Here is the flat area:
flat.jpg
 

steamhead

Active Member
Apr 16, 2005
2,360
0
36
75
Brownsville, TX
That's looking really good....!!! I wouldn't have thought so much "train" could be packed in so little space....Can't wait to see it finished...
 

jesso

Member
Jul 21, 2006
702
0
16
53
Washington, Utah
www.thetechfamily.com
Armed with more caulk, I went on a building spree tonight. I finished shaping my mountains in the back:
shapedback.jpg

Here is a side view:
shapedside.jpg

We went as a family to see the movie Wall-E while all the glue and caulk dried, when I got home I started in on the plastering. My wife thought my messy fingers were funny (and I had only put down three pieces at this point:
messy.jpg

8 small batches of plaster later (and very messy floor as my mixing bowl sprung a leak!) I got the rest of it covered up! Here it is from the back:
plasteredback.jpg

and the side:
plasteredside.jpg

Tomorrow night, will patch up any missed spots with drywall compound and use some sculptamold for some more rock faces. I am SO glad do be done with the plaster.
 

jesso

Member
Jul 21, 2006
702
0
16
53
Washington, Utah
www.thetechfamily.com
Finally Some Color!

Thanks Chessie6459!

Took a major step today! I pulled all the tape off protecting the track from the plaster. Last night we experimented with scupltamold and after using plaster, I love scupltamold, it is SO much EASIER to work with. I gave the layout a coating of honeycomb, my favorite ground color, thanks to whoever suggested the color a while back here on the forums. Here are the typical front and side views:
brownfront.jpg

brownside.jpg

Then I got brave and pulled out my brand new Woodland Scenics Earth Tone kit and didn't follow their instructions because I wanted darker rocks than they were suggesting. The tunnel portals I could have done a better job on (I may paint them white again and start over) but I am VERY happy with how the rocks turned out. I was a little scarey at first, but after getting all the colors on there and swishing them around, I think they turned out really well. Here is the front of the layout:
frontrock.jpg

Here is the right circle, the one that I will be able to see on my layout:
rightcircle.jpg

Here is the left circle, I think it turned out the best, which figures because it will face away from me and I won't ever see it:
leftcircle.jpg
 

woodone

Member
Feb 7, 2007
367
0
16
83
Phoenix, AZ.
Boy This Is Looking Good!

Scott,:wave:
Man this is very nice. You are really making some quick progress, and it looks GREAT!:thumb:
Keep the updates coming ( with photos of course).
Can't wait untill your next next photo upddate.