M4a3 Sherman - Gpm

Status
Not open for further replies.

charliec

Active Member
Jan 18, 2004
384
1
36
75
Brisbane, Australia
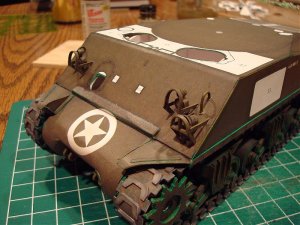
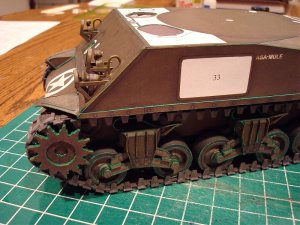
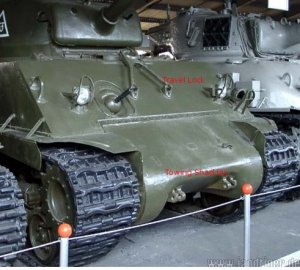
The GPM tracks aren't very realistic - but you've managed to do a great job with them. Most WW2 US tanks used a rubber block track (M4 Sherman Tank) which aren't easy to model in card. You might like to look at the Gremir M3 builds over at papermodelers.com for another take on US tank tracks.

Regards,

Charlie
 
M

Mark_1984

Great job - It's the tracks that put me off doing a tank. I just wouldn't have the patience to cut out so many identical parts. Yours look very realistic.
 
S

Soaring

Wow, that Sherman you have there looks excellent! The Tracks especially, I can't wait to see the rest of this Sherman :)
 

Patty

King of Swaziland
May 13, 2008
10
0
6
WOW!!! This is looking NICE. I hope the rest of build is as fast and easy as this part.
 

Stev0

Active Member
Jan 30, 2006
626
1
36
So far I have seen countless armor threads die at the track stage.

Good to see that you have pressed on.

As to the off color edging... You think 'brown' or 'tank' ink to those green areas would turn them down?
 

exzealot

Member
Jul 3, 2007
142
0
16
67
Lake Orion, MI
To all,

Thanks for the encouragement! I finished some of the front ornaments and their metal guards. These are the time-consuming details, but also the most fun.

Note that I tried to tone-down the edges a bit by using OD green paint. Still not exact, but a lot better. I have a plastic model of an American WWII tank, and the instructions call for Olive Drab. This model is something a little different - can't quite figure it out.

Ken
 

Attachments

  • Sherman 010.jpg
    Sherman 010.jpg
    225 KB · Views: 24
  • Sherman 011.jpg
    Sherman 011.jpg
    240.3 KB · Views: 25
  • Sherman 012.jpg
    Sherman 012.jpg
    227.3 KB · Views: 28
  • Sherman 015.jpg
    Sherman 015.jpg
    207.7 KB · Views: 32

logicman

Greybeard
Apr 30, 2008
275
0
16
Kent, UK.
Nice build.:thumb::thumb::thumb:

You have a lot of patience.

As for the colors, I like them. On my monitor this lot shows as brown with a green highlight to edges. That's the sort of thing a museum of engineering might do, to emphasise the working components. Red is more common, especially on cutaways, but for me, those colors suit the model.

:wave:
 

Stev0

Active Member
Jan 30, 2006
626
1
36
It's funny because I am building Nobi's Cromwell and it's roughly the same color base as your overall sherman and the edge coloring is the exact same.

The turret is going to be interesting. I want to get this kit.
 

exzealot

Member
Jul 3, 2007
142
0
16
67
Lake Orion, MI
This picture shows the installation of (what appears to be) a towbar on the front face of the tank. The model was designed for wire hinges on the bar, but I built mine the easy way out - I glued it permanently in place.

Also note the machine gun in the front. Again, the complexity and work required to make the gun moveable is not worth it to me, so I glued it stationary.

Please forgive me!

Ken
 

Attachments

  • Sherman 016.jpg
    Sherman 016.jpg
    202.8 KB · Views: 28

exzealot

Member
Jul 3, 2007
142
0
16
67
Lake Orion, MI
Small progress, but this picture shows the top covers for the front crew hatches. The model was designed so that the entire lid can lift up - many parts provided for this feature. However, the instructions were extremely vague in describing the build, so again, I glued everything down in a closed position. My plan is to have the two hatch doors open and close.

Ken
 

Attachments

  • Sherman 017.jpg
    Sherman 017.jpg
    221.7 KB · Views: 26

charliec

Active Member
Jan 18, 2004
384
1
36
75
Brisbane, Australia
I think you mean the travel lock for the gun. The idea is to support and lock the gun barrel so the breech mechanism won't move around when being transported.

The tow shackle points on the Sherman are low on the hull beside the brake housings (see image)

I should point out that the Sherman in the image is fitted with a 76mm gun rather than the 75mm of the GPM model. The 76mm gun barrel was longer so the travel lock clamps the barrel further out from the turret than the 75mm so the legs of the lock are a bit longer than the 75mm version.

Regards,

Charlie
 

Attachments

  • M4.jpg
    M4.jpg
    54.6 KB · Views: 355

Patty

King of Swaziland
May 13, 2008
10
0
6
About the tracks: "these are the times that try mens souls..."- need I qoute from where that came from? The tank is nice, but looks aren't everything...
 

exzealot

Member
Jul 3, 2007
142
0
16
67
Lake Orion, MI
Charlie,

Thanks for the explanation and the pictures. Makes sense! As you can see, I am not an expert in tanks; but thanks to some of you, I am learning as I build.

Thanks,

Ken
 
S

Soaring

Hey, Kenlwest, you did an exdcellent job with the hull of the tank. The little details looks so realistic!

On the note of creating the open features on the lids, I believe you use copperwire through some holes :/
To get a better look at it, I guess you could go onto Picasa web albums, type in M4A3 Sherman, and there should be some build pictures of the same Sherman you're building. In his album about the Sherman, there's one bit that shows the lids open and close feature up close, I guess it could be used as a reference.
 

cdavenport

Member
Sep 1, 2006
167
0
16
71
Athens,Georgia
Welds

Tanks are a subject where seams are good. Most of those seams are welds. Here's a tip for recreating welds. I suggest you try it on scrap first. You need some plastic sprue and a low temp soldering iron.

Yu will need to stretch the sprue to obtain a diameter that is consistent with the seam you wish to replicate.

Glue the sprue in place and trim to size. Use plastic tube glue for this. It will seep into the paper and bond plastic to paper.

Use the soldering iron to simulate weld beads by pressing the tip of the iron into the plastic and giving a gentle nudge. Repeating this with a measured sequence along the sprue makes it look amazingly like a weldment.

If you are unclear about any of this, let me know and I will shoot some photos or an mpeg so you can see the process.

It really is very simple and worth the effort....especially if you are going to show with the plastics guys. I know; I'm one of them. I am working on my card Hunley to compete against the plastic ships. It takes some effort.
 
Status
Not open for further replies.