Frog Points

Nomad

Active Member
Sep 26, 2006
1,570
0
36
72
Elks Plain, Washington
Anybody have a sure-fire method for building frog points? Without buying the jig.
I have tried the Steve hatch method, Tetters and Hminky's , and still can"t get them right. Help please!

Loren
 

ASH630

New Member
Jan 19, 2008
6
0
1
Fort Worth, TX
I haven't quite been able to get into building switches yet, but you could always take some existing rails and file them to where they fit together, then solder them or maby just lay them in place. You would have to experiment some with it though. My dad has some photo copies of certain turn outs that he would use to lay the track on top of (included tie spacing and length). The person who makes the switches for the club I go to just buys the frogs and points.

Also if you make your own switches you can isolate the frog and power it so absolutely no engines will stick. Depends on how you throw the switch Electric switch motor wire the frog into the electric, hand throw possibly use the points.

sorry I couldnt help more
 

pgandw

Active Member
Jul 9, 2005
1,002
0
36
Anybody have a sure-fire method for building frog points? Without buying the jig.
I have tried the Steve hatch method, Tetters and Hminky's , and still can"t get them right. Help please!

Loren

Not as pretty a result as the other methods, but it did work for me with my first layout with handlaid track. I used a method detailed by Jack Work in the April 1963 Model Railroader - note this works very well for NMRA HO standard flangeways. It might not work so well in other scales or flangeway sizes. For more detail, you might want to order a copy of the article from Kalmbach (publisher of Model Railroader).

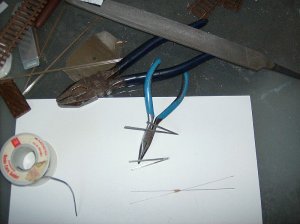
Basically you just file the frog point approximately in each rail and then spike the rails in place. Add the wing and closure rails (I used one piece to include the points with the wing and closure rails), and spike them in place. The bend in the wing rails does have to line up well with the frog rails. Now, fill the entire frog with solder up to the level of the rail heads.

Then, using a hacksaw blade, carefully saw out the flangeways. The flangeways will come almost perfect for HO. Use some files for final trimming.

This method does not require perfect filing of the frog point rails - the solder fills in any imperfections. Disadvantage is that deep, pizza cutter flanges will bump up on the solder filling unless you saw them nearly all the way down. And depending on much solder filling you use, the result may not look that prototypical.

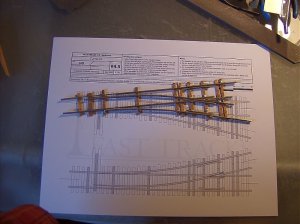
An obvious question is why did the other methods fail you? I'm guessing you are not using an accurate template of your proposed turnout as the basis for filing/folding the frog point. Steve Hatch suggests laying out flex track where you want one leg of the turnout to go and taping thin paper over top and shading to "trace" the rail heads' positions. Fold the paper back to the tape and realign the flex track for the other leg. Trace those rail heads, too. Now you have a paper template showing exactly where the frog and points should be, with the correct frog angle.

my thoughts, your choices
 

steamhead

Active Member
Apr 16, 2005
2,360
0
36
75
Brownsville, TX
My ol' man built several turnouts using the method described by Fred...Worked every time. I got to help by doing the "cleaning up" with the hacksaw blade....I still have a couple of them...Don't use them. Just kept them in his memory....
 

Nomad

Active Member
Sep 26, 2006
1,570
0
36
72
Elks Plain, Washington
Thanks everyone.
Fred, I use the templates from Fasttracks, and also use the angle template that Steve Hatch suggests. It seems like I can not get a sharp point, the tip is always pretty blunt. I am beginning to think I should get something more accurate than a hand file to make the angles.

Loren
 

60103

Pooh Bah
Mar 25, 2002
4,754
0
36
Brampton, Ontario, Canada
Visit site
Nomad: maybe you don't need that sharp a point. Rounded sometimes works better.
There are two schools on frog points. One likes to file half the angle on each rail and have both points even. The other puts the full angle on both rails and butts the less used rail against the side of the other.
And I remember another way I used for my first switches. Bend a rail to the opposite angle (the supplement, or 180 degrees minus the frog angle) and file through from the back, then bend into place.
 

Nomad

Active Member
Sep 26, 2006
1,570
0
36
72
Elks Plain, Washington
David, thank you. So maybe I am worrying to much about having a razor sharp point. Does the sharpness of the point really have that much to do with the reliable operation of the turnout?

Loren
 

TCH

New Member
Apr 30, 2007
97
0
6
rosebud,victoria,australia
it is easier if you have a disk sander or a bench grinder but even with these you still have to get the angles right.
however even using a file it should only take about 10 minutes to get the angles done.
it helps to clamp the rail in a vice but I have made frogs in the past by filing the rail just held on the edge of the bench.if you don`t have a good mill file [almost new] it will pay to buy one.
keep trying- patience is required.
 

tetters

Rail Spiking Fool!
Jan 21, 2005
879
0
16
50
Toronto, Ontario, Canada
I don't know what I can add to this. Especially if you tried the disc sander method I used to get my # 6 points. I'll have to disagree about blunt points though. I like my frogs to be near razor sharp. By getting a nice point you ensure a good transition from the wing rail to the frog rail by closing the gap between them as much as possible, but still maintaining the NMRA standard for the flangeway gap.

DSC01799.JPG


This is an example of the frog points I've built for a # 6 slip switch (freehand) and a # 5 t.o. built in the jig.


Another idea I haven't tried myself is to butt the rail bases together and then carefully (with file thin enough of course) file out the flangeways to get good alignment and a nice sharp point.

If you are getting really frustrated I've been thinking about picking up one of the frog point tools from Fast Tracks. Not to come across as incredibly bold, I am totally sold on the idea that I don't need to buy another jig from here on in. (My next project is a # 6 threeway which will replace a cluster of # 5 turnouts at the end of the east yard ladder) I don't mind the extra effort it takes to lay trackwork free hand either. The point form tool would just help to improve my accuracy. One tool would do it all. Unless I wanted a larger #'ed frog point. Just to illustrate a point the difference between secondary frog angles for a # 6 is only 3 degrees between a slipswitch/x-over and the 3 way. Something that can easily be corrected with a bit of filing.

Fast Tracks | #6 Crossover PointForm for Code 70, 83 & 100 Rail

Fast Tracks | #6 3-Way PointForm for Code 70, 83 & 100 Rail

Fast Tracks | #6 Slipswitch PointForm for Code 70, 83 & 100 Rail

Seriously. Watch some the videos by Tim on his website. They give a good understanding of t.o. construction for the newbie...which is what I am and already look at the results I've been able to get to in just over a years worth of track building. His advice and instructions are an incredible confidence builder.

Keep trying and be sure to post the results of your first sucessful prototype build! :thumb:
 

Nomad

Active Member
Sep 26, 2006
1,570
0
36
72
Elks Plain, Washington
Thanks TCH and Tetters. I tried making a frog point again, and took a close look at what I am doing. Filing seems to be the problem. I am rounding the angle instead of making it flat. I am going to get a bench grinder or belt sander today.

Loren
 

Nomad

Active Member
Sep 26, 2006
1,570
0
36
72
Elks Plain, Washington
Ok, got me a bench grinder. What a difference! Here is a picture of my first two frog points. This is a close as my el-cheapo camera will get.

Loren
 

Attachments

  • frog2.jpg
    frog2.jpg
    81.5 KB · Views: 13

Nomad

Active Member
Sep 26, 2006
1,570
0
36
72
Elks Plain, Washington
Ok, here is my forth try. This one is a keeper (the other three sure weren't )
I still have to gap the frog, but it is smooth as silk! Got rid of that horrid clunk at the frog that you get with the prefab t/o's. That's why I am doing this. The t/o's I have are so bad I don't run my steam loco.

Loren
 

Attachments

  • 001.jpg
    001.jpg
    165.5 KB · Views: 13