

This description will give you an idea to build your own truss rods or turnbuckles and it will give you a few hints for working with fine tubes and pieces of wire. Because the circumstance that turnbuckles in different sizes are not available and that in all cases the wire of truss rods is going through the turnbuckles in one piece without a splitting so I like to build my own truss rods.
First of all I should say that I built these parts for my modeling jobs in HO-scale. This means that I think it could be extreme more difficult to build these parts in N-scale – it is not impossible but it is a really challenge. There should be not any problems with modeling in greater scales than HO-scale so I think that this description can be helpful for better-detailed models too.

View of the tools I need to do this
- a small hammer,
- small screw drivers in different size,
- a fine triangular scraper,
- needle files with triangular, squarish and flat profile,
- fine and heavy side cutters,
- flat-nose and half-round pliers,
- caliper.

The simple material are
- fine tubes which will give the turnbuckles – here I use injection cannulae (I requested my doctor to give me these),
- a piece steel wire with same diameter like inner diameter of cannulae,
- nickel-silver wire or very hard brass wire for rods also with same diameter like steel wire and like inner diameter of cannulae.
I don’t know if wire and tubes (or cannulae) are available in U.S.A. with the need of identical diameter values but I hope you can use similarly materials. I use for my work wire and tubes with dimensions of
- 0.3 mm (in original very close to 1 inch) - for using as very fine truss rods
- 0.4 mm (in original close to 1 ¼ inch) - for using as regularly truss rods for freight or passenger cars
- 0.5 mm (in original very close to 1 ¾ inch) – for using only as very heavy truss rods like for special cars for transportation of extra ordinary heavy loads.
All these materials are available within Europe (excepting UK) and through the uniform metric system there are no problems. The nickel-silver wire has an exactly needed hardness. I did not work with hard brass wire but I think that it could be usable for this job. The steel wire is absolutely necessary – a more softly material does not work. If fine tubes made from brass or nickel-silver will be available than it will be very useful and you have to modify this technology. I have to work so as I have written because the cannulae are made from chrome-nickel steel and this well known not solderable.
Now the detailed description - step by step.

A very important hint!
Be careful - new cannulae are very sharp and they can cause to receive an injury.

In case new cannulae are used than you should begin with cutting off the tip using a heavy cutter!

At first the cannula or fine tube must get a flat surface using a flat file.

For removing the burr I use the fine triangular scrapper.

After inserting the steel wire into the cannula (or tube) you can start filing an eye with a small distance away from the end of tube. Here you should use a squarish file exactly with the dimension like you will get the length of the eye of future turnbuckle. Try to avoid each turn of tube and file down until the steel wire inside stops this process. File the opening flat and parallel to steel wire.

After pulling off the steel wire you should remove the inner burr of the eye by using the triangular scrapper again. Now you can see the result from filing and if it is necessary you can correct the length of eye yet.
Repeat these steps for making the second eye exactly on the opposite side. If you use injection cannulae so you can hold these at their small wings or parallel grip surfaces after an exactly turn for 180 degrees. You should check that the second eye has the same position to end of tube and that it get the same length like the opposite. At last you should see through the tube without seeing salient fringes.

For separating the future turnbuckle I insert the steel wire into tube again and I clamp the wire in my bench wise. I mark the position for cutting with a triangular file and I file a fine groove around the tube while a step-by-step turning of the cannulae (or tube). You should try to meet the start position after a full turn of the tube – but I try to avoid filing down until the ground of the tube. It is also not a problem when the cut is not exactly done then you have to file the ends of tube in all cases in one of the next steps.
When the groove is completed I use a flat-nose pliers and break of the small end from the tube – without to remove the steel wire. This prevents that the short piece of tube will jump off if you would work without inserted wire. The closed ends of future turnbuckles should not be not too shortly and than …

… the small separated piece should has this appearance, approximately.

Use the half-round pliers in order to hold the tube in a middle position at the eyes and now you can file both ends to final length of future turnbuckle. I use again the triangular scrapper for inner cleaning the ends from burr – a fine file is the best tool for outside deburring.
At this point I use every time a caliper for controlling the length of each tube because one turnbuckle alone is used seldom. In most cases four turnbuckles are positioned next together at a model car and differences in size would give a very bad impression for the model that you will like to build.

The eyes of the prepared turnbuckle have to be widened now. In detail I use for this different screwdrivers starting with a smaller one. To do this you have to use a small hammer and you have to work directly on your worktable or lay a piece of harder wood underneath. Give a few punches with the hammer on the head of the screwdriver until the eye is widened a small part. In all cases you must drive in the screwdrivers into the wood underlayment in order to get the widening of the eye.
Reply it again after the turnbuckle is turned to the opposite. Reply this again step-by-step using a grater and greater screwdriver until the whole length of the eye is widened for wished result.

As a result you will get such a wry turnbuckle …

… this must be adjusted only – and the turnbuckle is completed.

As a last step drive the steel wire again for clearing a smooth channel through the turnbuckle. Use your half-round pliers again for fixing the turnbuckle in the center at the eyes.

At this point a hint yet. It is recommended to use a small piece of thin and smooth wire for storing the completed turnbuckles. These small parts will be jumped off with easiness and through this “store solution” you can this prevent on a simple way. I’m sure, lost turnbuckles are bad to retrieve parts and in most cases I must made a lost turnbuckle a second time.

Next step is providing pull rods for making truss rods.
I have written already before that the chrome-nickel turnbuckles are not solderable and so I have to make a mechanical connection of the parts. So I “forge” a small head on one of the nickel-silver rods that I use for making truss rods. After this I reduce this head using a fine side cutter to a shortened end which has around 50% more wide than the diameter of the wire. Thus it is ensured that these widened ends cannot slide through the tubes form inner side.

One end of turnbuckle must be bent sideward again ...

… so that the row end of the prepared wire can be inserted in the bent end of turnbuckle from the inner side.

After straightening of the bent end of turnbuckle I have to repeat these steps with a second wire at the other end of turnbuckle.

After straightening the turnbuckle again the truss rod is completed now.
Working with these widened heads at wire ends inside the turnbuckle I have got a multiple faster truss rod than I would use a brass tube for making turnbuckles and solder all the parts together. After installing such truss rods to a model car I add two fine drops of ACC glue at the connection points of turnbuckle. This is a small addition that gives my multiple part truss rods a bit more stiffness and not one of my truss rods has disconnected since I work with this method for own truss rods.
Here you see one of my models after replacing all under body parts where I used also truss rods which are built after the written way.

At this point I will write also about differences to truss rods modeled by soldering the rods inside to turnbuckles. The rod ends are visible inside of turnbuckle exactly modeled after reality and I know that my truss rods vary in this detail. I have written about the reason of this difference but I think that I have built fine truss rods with great eyes and that I can see through these turnbuckles. Secondly I can build truss rods in different sizes with easiness – all these things I cannot achieve by using lost wax brass parts.

After making truss rods – here I remodeled a set to turnbuckles with eyes on the rod ends so that they can be used for all types of fixing of parts or machinery.

In a next step I added two shackles to the ends …

... in order to fasten a heavy load on a flat car.

I have to say this was a difficult job because the small chains did rend again and again – and this was not a model that I modified for my own collection. But I think that the result will give a nice looking impression.
Bernhard
First of all I should say that I built these parts for my modeling jobs in HO-scale. This means that I think it could be extreme more difficult to build these parts in N-scale – it is not impossible but it is a really challenge. There should be not any problems with modeling in greater scales than HO-scale so I think that this description can be helpful for better-detailed models too.
View of the tools I need to do this
- a small hammer,
- small screw drivers in different size,
- a fine triangular scraper,
- needle files with triangular, squarish and flat profile,
- fine and heavy side cutters,
- flat-nose and half-round pliers,
- caliper.
The simple material are
- fine tubes which will give the turnbuckles – here I use injection cannulae (I requested my doctor to give me these),
- a piece steel wire with same diameter like inner diameter of cannulae,
- nickel-silver wire or very hard brass wire for rods also with same diameter like steel wire and like inner diameter of cannulae.
I don’t know if wire and tubes (or cannulae) are available in U.S.A. with the need of identical diameter values but I hope you can use similarly materials. I use for my work wire and tubes with dimensions of
- 0.3 mm (in original very close to 1 inch) - for using as very fine truss rods
- 0.4 mm (in original close to 1 ¼ inch) - for using as regularly truss rods for freight or passenger cars
- 0.5 mm (in original very close to 1 ¾ inch) – for using only as very heavy truss rods like for special cars for transportation of extra ordinary heavy loads.
All these materials are available within Europe (excepting UK) and through the uniform metric system there are no problems. The nickel-silver wire has an exactly needed hardness. I did not work with hard brass wire but I think that it could be usable for this job. The steel wire is absolutely necessary – a more softly material does not work. If fine tubes made from brass or nickel-silver will be available than it will be very useful and you have to modify this technology. I have to work so as I have written because the cannulae are made from chrome-nickel steel and this well known not solderable.
Now the detailed description - step by step.
A very important hint!
Be careful - new cannulae are very sharp and they can cause to receive an injury.
In case new cannulae are used than you should begin with cutting off the tip using a heavy cutter!
At first the cannula or fine tube must get a flat surface using a flat file.
For removing the burr I use the fine triangular scrapper.
After inserting the steel wire into the cannula (or tube) you can start filing an eye with a small distance away from the end of tube. Here you should use a squarish file exactly with the dimension like you will get the length of the eye of future turnbuckle. Try to avoid each turn of tube and file down until the steel wire inside stops this process. File the opening flat and parallel to steel wire.
After pulling off the steel wire you should remove the inner burr of the eye by using the triangular scrapper again. Now you can see the result from filing and if it is necessary you can correct the length of eye yet.
Repeat these steps for making the second eye exactly on the opposite side. If you use injection cannulae so you can hold these at their small wings or parallel grip surfaces after an exactly turn for 180 degrees. You should check that the second eye has the same position to end of tube and that it get the same length like the opposite. At last you should see through the tube without seeing salient fringes.
For separating the future turnbuckle I insert the steel wire into tube again and I clamp the wire in my bench wise. I mark the position for cutting with a triangular file and I file a fine groove around the tube while a step-by-step turning of the cannulae (or tube). You should try to meet the start position after a full turn of the tube – but I try to avoid filing down until the ground of the tube. It is also not a problem when the cut is not exactly done then you have to file the ends of tube in all cases in one of the next steps.
When the groove is completed I use a flat-nose pliers and break of the small end from the tube – without to remove the steel wire. This prevents that the short piece of tube will jump off if you would work without inserted wire. The closed ends of future turnbuckles should not be not too shortly and than …
… the small separated piece should has this appearance, approximately.
Use the half-round pliers in order to hold the tube in a middle position at the eyes and now you can file both ends to final length of future turnbuckle. I use again the triangular scrapper for inner cleaning the ends from burr – a fine file is the best tool for outside deburring.
At this point I use every time a caliper for controlling the length of each tube because one turnbuckle alone is used seldom. In most cases four turnbuckles are positioned next together at a model car and differences in size would give a very bad impression for the model that you will like to build.
The eyes of the prepared turnbuckle have to be widened now. In detail I use for this different screwdrivers starting with a smaller one. To do this you have to use a small hammer and you have to work directly on your worktable or lay a piece of harder wood underneath. Give a few punches with the hammer on the head of the screwdriver until the eye is widened a small part. In all cases you must drive in the screwdrivers into the wood underlayment in order to get the widening of the eye.
Reply it again after the turnbuckle is turned to the opposite. Reply this again step-by-step using a grater and greater screwdriver until the whole length of the eye is widened for wished result.
As a result you will get such a wry turnbuckle …
… this must be adjusted only – and the turnbuckle is completed.
As a last step drive the steel wire again for clearing a smooth channel through the turnbuckle. Use your half-round pliers again for fixing the turnbuckle in the center at the eyes.
At this point a hint yet. It is recommended to use a small piece of thin and smooth wire for storing the completed turnbuckles. These small parts will be jumped off with easiness and through this “store solution” you can this prevent on a simple way. I’m sure, lost turnbuckles are bad to retrieve parts and in most cases I must made a lost turnbuckle a second time.
Next step is providing pull rods for making truss rods.
I have written already before that the chrome-nickel turnbuckles are not solderable and so I have to make a mechanical connection of the parts. So I “forge” a small head on one of the nickel-silver rods that I use for making truss rods. After this I reduce this head using a fine side cutter to a shortened end which has around 50% more wide than the diameter of the wire. Thus it is ensured that these widened ends cannot slide through the tubes form inner side.
One end of turnbuckle must be bent sideward again ...
… so that the row end of the prepared wire can be inserted in the bent end of turnbuckle from the inner side.
After straightening of the bent end of turnbuckle I have to repeat these steps with a second wire at the other end of turnbuckle.
After straightening the turnbuckle again the truss rod is completed now.
Working with these widened heads at wire ends inside the turnbuckle I have got a multiple faster truss rod than I would use a brass tube for making turnbuckles and solder all the parts together. After installing such truss rods to a model car I add two fine drops of ACC glue at the connection points of turnbuckle. This is a small addition that gives my multiple part truss rods a bit more stiffness and not one of my truss rods has disconnected since I work with this method for own truss rods.
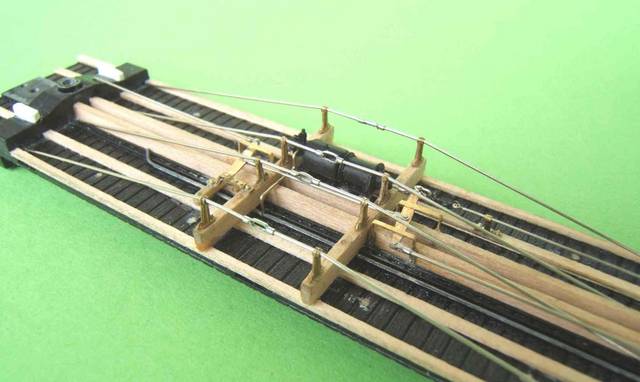
Here you see one of my models after replacing all under body parts where I used also truss rods which are built after the written way.
At this point I will write also about differences to truss rods modeled by soldering the rods inside to turnbuckles. The rod ends are visible inside of turnbuckle exactly modeled after reality and I know that my truss rods vary in this detail. I have written about the reason of this difference but I think that I have built fine truss rods with great eyes and that I can see through these turnbuckles. Secondly I can build truss rods in different sizes with easiness – all these things I cannot achieve by using lost wax brass parts.
After making truss rods – here I remodeled a set to turnbuckles with eyes on the rod ends so that they can be used for all types of fixing of parts or machinery.
In a next step I added two shackles to the ends …
... in order to fasten a heavy load on a flat car.
I have to say this was a difficult job because the small chains did rend again and again – and this was not a model that I modified for my own collection. But I think that the result will give a nice looking impression.
Bernhard
") :thumb::thumb: It would surprise me not at all to see you use the appropriate taps and dies to make these into working turnbuckles. Beautiful work.
:thumb::thumb: It would surprise me not at all to see you use the appropriate taps and dies to make these into working turnbuckles. Beautiful work.