Answering more requests

N

nachoman

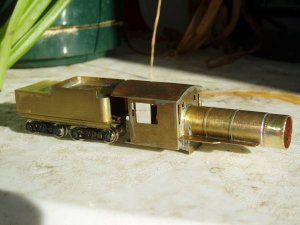
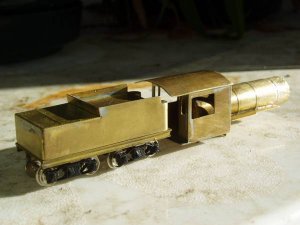
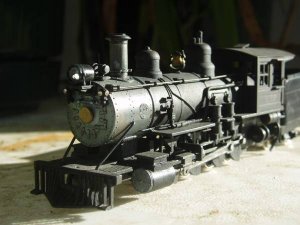
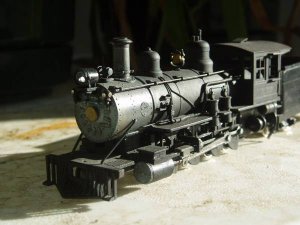
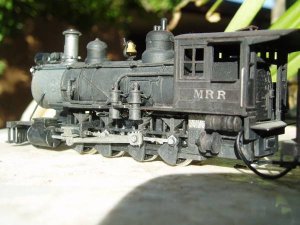
A few mentioned that they would like to see more photos of my projects and rolling stock. Here is one of the oldest projects on my workbench, a model of Magma Arizona #4 that I started long before I joined the gauge. I hadn't worked on it in years, but recently have been working on it again. Plans were published in Gordon Chappel's book "rails to carry copper" and in the Narrow Gauge Shortline gazette back in the early 80s. Unfortunately, I lost my photocopy of the plans, and need to make it to the library and re-copy before I can resume work!

I've been making it out of brass mainly using files, a rotary tool, and an 80w pencil soldering iron.

Kevin
 

Attachments

  • marr4.jpg
    marr4.jpg
    34.2 KB · Views: 5
  • marr4-2.jpg
    marr4-2.jpg
    32 KB · Views: 5
N

nachoman

And here is my only operating steamer (the shay is out of service for reworking, and the other 2-8-0 needs new drivers). This is a roundhouse 2-8-0 kit. The engine has been detailed, but havent gotten around to detailing the tender yet. I still need an engine crew (currently unpainted on my workbench) and need to figure out how to install a headlight.

Kevin
 

Attachments

  • mrr4.jpg
    mrr4.jpg
    40 KB · Views: 9
  • mrr4-2.jpg
    mrr4-2.jpg
    39.2 KB · Views: 7
  • mrr4-3.jpg
    mrr4-3.jpg
    46 KB · Views: 8

Russ Bellinis

Active Member
Feb 13, 2003
4,501
0
36
78
Lakewood, Ca.
Visit site
For installing a headlight, how much room is there in the smoke box, and how easy would it be to disassemble the headlight? You could take the headlight off and take it apart. Install a grain of wheat or grain of rice bulb in it. Run the wires down between the headlight and the mounting bracket, and then through the front of the smoke box at the very top just above the bracket or even tightly against the bottom of the bracket between the 2 braces.
 
N

nachoman

the smoke box is a solid chunk of pewter. I'd have to drill all the way through.

Kevin
 

nkp174

Active Member
Oct 10, 2006
1,455
0
36
41
Cincinnati, O.
That's cool. Your 2-8-0 looks nicer than my 2-8-0...I learned after the fact that their outside frame version looks 10x better than their inside frame version.

Do you (or did you) have a plan for getting the running gear for #4? It seems that finding the right drivers is by far the most difficult task in scratch building steam locomotives. Are you using 0.005" thick brass as an overlay with the rivet details...or have you had access to a riveting tool? It is good to see people scratch building steam. I have a few such projects on the horizon...probably a DSP&P Baldwin 2-8-0 which was a sister to the D&RG Class 56 engines.
 
N

nachoman

yeah, I am using thin brass with embossed rivets as an overlay. I am using a turned nail in a pin vice to hand-emboss the rivets one at a time.

For the running gear, I havent decided yet. You can get c-16 driers from precision scale. They are costly and two inches oversize. You can also still get drivers from athearn (the old MDC drivers). They are 4 inches oversize. Or, I could try and find n-scale ones and widen the gauge. Sometimes, there are hon3 drivers on ebay, but they usually go for $$$. I am willing to live with oversize. I also have considered making my own drivers and using NWSL tires. I would probably make one driver center and then make a mold of it and cast it with pewter. Then I would press the tire on the center.

Kevin
 

ed acosta

Member
Aug 4, 2005
198
1
16
81
Washington-British Columbia
What a beauty!

It takes only seconds to pull a ready-to-run loco out of a box, but it takes weeks to build a jewel such as your Roundhouse 2-8-0. The pride and attachment that you have over something that you created is well worth the extra time spent. Congratulations on this fine model.

-Ed
 
N

nachoman

By the way, I think the inside frame version needs to be lowered to look better, and all the "firebox" detail needs to be cut off. I have an inside frame version that either needs new drivers or the drivers re-quartered (they wobble and spin on their axles). maybe that is a task for tomorrow.

Kevin
 

bigsteel

Call me Mr.Tinkertrain
Dec 12, 2006
1,319
0
36
60
Cincinnati,Ohio
great lookin locos kevin :thumb:,cant wait to see the scratchbuilt loco finished,i find the handbuilt locos to have so much more character over the R-T-R models.keep up the good work.--josh
 

Ray Marinaccio

Active Member
Aug 4, 2003
1,940
0
36
66
Dewey Az.
Visit site
Hi Kevin,
Nice job on old #4.:thumb:
For the headlight on the MDC loco, check out how I did the headlight on the MDC shay in the academy.
What diameter are the drivers that you need?
 
N

nachoman

I'll go see if that shay page still pulls up.

The loco should have 34" drivers, but I doubt anyone would notice if I used 36" or 38".

Kevin
 

pgandw

Active Member
Jul 9, 2005
1,002
0
36
Outside frame narrow gauge steam always looks better than inside frame. :D

Depends on whether you want to model the run-down, falling apart 20th Century, or you want to model the golden years of narrow gauge - when dreams were huge, and locomotives tiny. :mrgreen:

It's great to see the fine modeling going on here. On my HOn3 locomotive project list:
- Keystone Shay
- Ken Kidder 0-4-0T to be converted to an 0-4-2T, detailed, remotored, and regeared.
- assuming the 1st Keystone Shay turns out well, building a second one (or an early Climax)
- MDC inside frame - needs boiler lowered and backdating to approximate a C-20
 

Glen Haasdyk

Active Member
Feb 2, 2004
1,283
0
36
53
Kelowna, BC
Visit site
Great locos. I have both the Inside and outside frame roundhouse engines and alot of parts (probably enough to build another one of each) But I only had one motor so I powered the outside frame. Your's looks alot better than mine, probably because you added a few more details than I did and your weathering is really good.