

Lightjet - with cockpit
- Thread starter Sky Seeker
- Start date
You are using an out of date browser. It may not display this or other websites correctly.
You should upgrade or use an alternative browser.
You should upgrade or use an alternative browser.


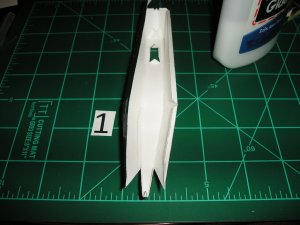
Lightjet Assembly
Note the internal reinforcement for the fuselage.

Forward nose section assembled prior to final closing or "buttoning up".

Bottom view fuselage

Side view fuselage.

Top & side view

All pieces ready for joining with fuselage.

Part #3 joined with fuselage

Part #5 joined to fuselage - top view.

Part #4 joined to fuselage - bottom view.

Part #7 - lower wing - joined to fuselage & side pod.

Sky Seeker
:tank:
Note the internal reinforcement for the fuselage.
Forward nose section assembled prior to final closing or "buttoning up".
Bottom view fuselage
Side view fuselage.
Top & side view
All pieces ready for joining with fuselage.
Part #3 joined with fuselage
Part #5 joined to fuselage - top view.
Part #4 joined to fuselage - bottom view.
Part #7 - lower wing - joined to fuselage & side pod.
Sky Seeker
:tank:
Light jet - More pics
Part #8 lower wing joined to other side.

Bottom view

Part #6 side pod joined to wings and fuselage.


Top view

Bottom view landing gear joined to fuselage and pods.


Cockpit assembly. Canopy positioned on top clear plastic piece and traced.

That's it for now.
Sky Seeker
:tank:
Part #8 lower wing joined to other side.
Bottom view
Part #6 side pod joined to wings and fuselage.
Top view
Bottom view landing gear joined to fuselage and pods.
Cockpit assembly. Canopy positioned on top clear plastic piece and traced.
That's it for now.
Sky Seeker
:tank:
Last edited:
LightJet - More pics
Traced clear piece cut.

Canopy windows cut.

Canopy glued together.

Cockpit - initial conceptual internal design

Marking the edges with a marker to remove the white on the edges will be done at a later date.
Have to make sure to get the scale right before building. Also, getting the right sized pilot is a challenge. Although I do have ideas. One of those mental "humps" to get over.
This is it for now.
Sky Seeker
:tank:
Traced clear piece cut.
Canopy windows cut.
Canopy glued together.
Cockpit - initial conceptual internal design
Marking the edges with a marker to remove the white on the edges will be done at a later date.
Have to make sure to get the scale right before building. Also, getting the right sized pilot is a challenge. Although I do have ideas. One of those mental "humps" to get over.
This is it for now.
Sky Seeker
:tank:
Last edited:
- Apr 5, 2013
- 13,498
- 9,549
- 228
I agree...Great job in taking on a challenge of your own cockpit design and GREAT job on your canopy!
I have to ask...are you using ... Matt Finish Photo Paper? it looks like it in the texture in a couple of your pix... will wait for reply to finish response...
I have to ask...are you using ... Matt Finish Photo Paper? it looks like it in the texture in a couple of your pix... will wait for reply to finish response...
I agree...Great job in taking on a challenge of your own cockpit design and GREAT job on your canopy!
I have to ask...are you using ... Matt Finish Photo Paper? it looks like it in the texture in a couple of your pix... will wait for reply to finish response...
NO. Actually, it's just 200 g card stock printed by a laserjet printer. I think that it's just the way the flash on the camera reflects on the paper that might give that impression.
BTW I have to thank you for the print out on the Vorchan wing. I still have to compare the scale with Jaybat's design of the Omega destroyer. Everything on the Vorchan model depends off the wing. More work to do. Fun stuff.
Sky Seeker
:tank:
Nice canopy glass!!")
Thanks Z. My inspiration was from a video from Fiddler's Green. See here:
More work to do.
Sky Seeker
:tank:
NO. Actually, it's just 200 g card stock printed by a laserjet printer. I think that it's just the way the flash on the camera reflects on the paper that might give that impression.
BTW I have to thank you for the print out on the Vorchan wing. I still have to compare the scale with Jaybat's design of the Omega destroyer. Everything on the Vorchan model depends off the wing. More work to do. Fun stuff.
Sky Seeker
:tank:
Ok
...That makes sense!and you are welcome...the Vorchan wing is was just a test..so will / might not ever be used... but the .svg file can be re-scaled to what ever scale desired so... I have NO IDEA what scale it is in..but to get it on a page from Blender I had to plug in some-where around 1:800 from the original mesh file...
- Apr 5, 2013
- 13,498
- 9,549
- 228
I think an Anime series based on this would "take off"!! Great job!!
I'm just a builder, Jan Rukr is a true visionary!
Sky Seeker
:tank:
- Apr 5, 2013
- 13,498
- 9,549
- 228
Next time you make a cockpit using one piece of plastic, cut like that, use very thin paper. You will see how much better it will look. I only use thicker paper if they are actually acting as the framework of the cockpit. You then glue the backside of the cockpit with paper (appropriately), and it gives the cockpit a very realistic look.
nice job....
Wow!! I feel quite honored & speechless!

 However, I'm not done yet! More to do. Will share more pictures soon.
Thanks again for your kind complement!
Sky Seeker
:tank:
Next time you make a cockpit using one piece of plastic, cut like that, use very thin paper. You will see how much better it will look. I only use thicker paper if they are actually acting as the framework of the cockpit. You then glue the backside of the cockpit with paper (appropriately), and it gives the cockpit a very realistic look.
Z-
OK. So if I understand you right you glue the canopy to the underside of thinner cardstock. Could you show me a pic of what you're talking about?
Thanks!
BTW thanks for getting the website up and running again.
Sky Seeker
:tank:
You are doing a GREAT JOB!
Here is a tutorial on functioning cockpit canopies that I did back in March 2012 that you might find both interesting and helpful.
Here is a tutorial on functioning cockpit canopies that I did back in March 2012 that you might find both interesting and helpful.
You are doing a GREAT JOB!
Here is a tutorial on functioning cockpit canopies that I did back in March 2012 that you might find both interesting and helpful.
Rhaven,
It's no surprise to me that you know a thing or two about canopies ... especially with your previous work on the Thunderfighter! Thanks for sharing your link on this.
Sky Seeker
:tank:
Thank you for the complement. Although, there is still more that I need to learn. I am wanting to attempt to make form canopies (like the ones used on the Viper MK-VII or F-16).Rhaven,
It's no surprise to me that you know a thing or two about canopies ... especially with your previous work on the Thunderfighter! Thanks for sharing your link on this.
Sky Seeker
:tank:
Thank you for the complement. Although, there is still more that I need to learn. I am wanting to attempt to make form canopies (like the ones used on the Viper MK-VII or F-16).
Vacuum plastic forming is the ticket laddie! Zathros knows how.
Sky Seeker
:tank: